
Una LCD screen can be a solution for those projects in which you need to display information without having to depend on a constantly connected computer. That is, in an Arduino / Raspberry Pi project, you can use the serial port to transmit information that is displayed on the screen to get sensor readings, show a graph, accounts, etc. But if your project is constantly running or far from where you can have a computer, the LCD screen is your salvation.
For example, imagine that you install an automated irrigation system and you would like to check the humidity and temperature readings when you go to your vegetable garden or garden. Having to take the computer there to connect the Arduino board to the PC is not a practical solution. In this case, you can modify your code so that said information is displayed on the LCD screen and even add some keys or buttons to be able to show different information.
What is an LCD panel?
A liquid crystal display or LCD (Liquid Crystal Display) It is a kind of thin, flat panel that can display images. Each panel is made up of a certain number of color or monochrome pixels that are placed in front of a light source. Their consumption is low, which is why they are ideal for this type of DIY low-power electronics projects.
Each pixel on the LCD screen is made up of a layer of molecules aligned between two transparent electrodes, and two polarization filters. Between polarizing filters there is a liquid crystal display, hence its name, and prevents the light that passes through the first filter from being blocked by the second.
Also, if you have noticed, when you touch one of these screens the image is deformed and a kind of black stain appears when pressing, that is because you are exerting pressure on the liquid crystal and it is not advisable to do so ... You may end up with lower quality screen colors, uneven distribution of lighting or even dead pixels (black spots or areas on the screen that do not go away).
LCD screens for Arduino and Raspberry Pi
An LCD screen, such as the modules that exist for electronics or for Arduino, typically has multiple columns to display alphanumeric characters or symbols and one or two rows to display information. That makes them much more interesting than a seven-segment display, which would have to connect several pins to only be able to display a single number, symbol or letter. If you want to show more you should place several displays.
Instead, with a single LCD screen you can display much more information. But you must know the pinout of this type of modules well to connect them properly. I recommend you always see the datasheet of the manufacturer and specific model that you have as they may vary.
For example, You can buy this one from Adafruit on Amazon, which is one of the most popular with a keyboard and contains the possibility of displaying up to 16 characters in each of its two lines. And there are even 20 × 4, or something more advanced andMulti-inch color to display more complex images.
For LCD screen of Adafruit 16 × 2 you can see this datasheet...
For arduino maybe a simpler one like the one is better 16x2 LCD screen without keyboard. If you look at this board, it has 16 pins on the back. If you take the board and turn it upside down and look at its pins from left to right, you have a pinout:
- Pin 16: GND for backlight
- Pin 15: Vcc for backlight
- Pin 7-14: 8-bit (next 8 pins) to transmit the information to be displayed on the screen
- Pin 6: read and write sync
- Pin 5. R / W (write and read for data and commands)
- Pin 4: RS (selector between commands and data)
- Pin 3: contrast control
- Pin 2: Vcc of 5v for power
- Pin 1: GND (0v) for power
Remember that when you place it in its correct position the pins are reversed ...
Integration with Arduino
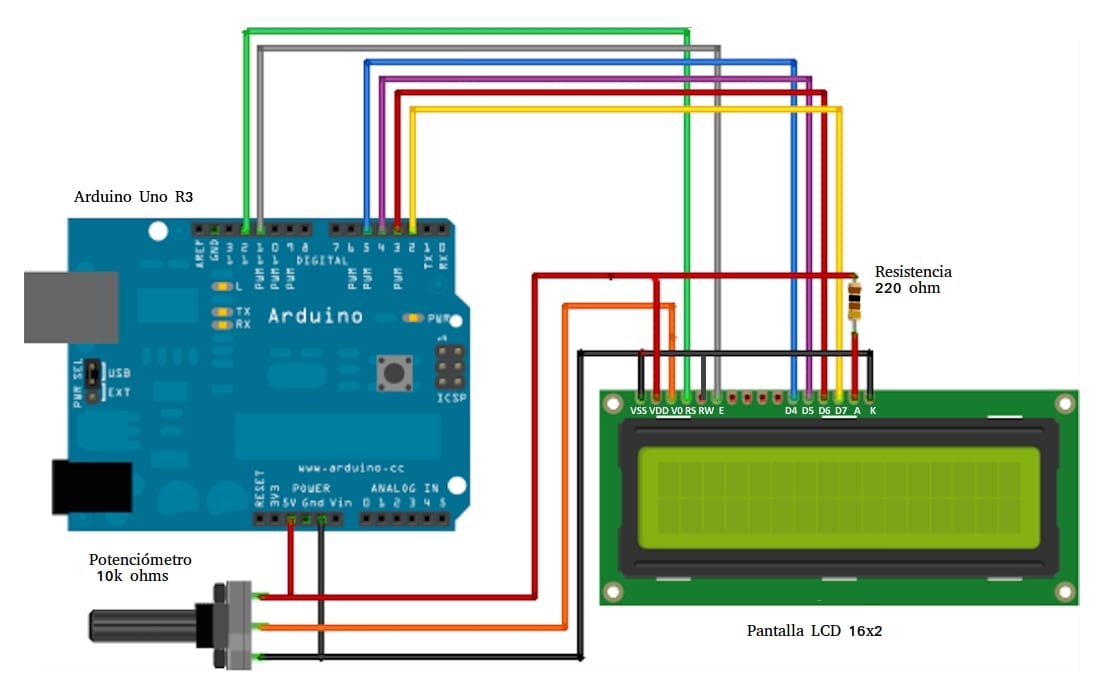
For connect it to arduino It is not too complicated, you just have to consider including a 220 ohm resistor to regulate the input voltage for the screen power, and a potentiometer to modulate the screen contrast. Then connect each of the pins to the Arduino board appropriately and you're done. You can look at the image of Fritzing ...
As you can see, the potentiometer will be through which it will be fed the LCD screen and the contrast will also be adjusted. Therefore, it will be connected to both GND and Vcc of the display, as well as to the backlight control line and contrast control. Perhaps that is the most complicated, then it is a matter of connecting the remaining pins to the inputs / outputs that you are going to use in your project.
Programming with Arduino IDE
For programming you must take into account some peculiarities, Keep in mind that you must not only know how to send data, but also move it, place it well on the screen, etc. And you should also use a library called LiquidCrystal.h, as long as your LCD screen has a compatible Hitachi HD44780 chipset. You have a code example here:
#include <LiquidCrystal.h>

// Definimos las constantes
#define COLS 16 // Aqui va el num de columnas del LCD, 16 en nuestro caso
#define ROWS 2 // Aqui las filas x2
#define VELOCIDAD 200 // Velocidad a la que se movera el texto

// Indicamos los pines de la interfaz donde hayas conectado el LCD
LiquidCrystal lcd(12, 11, 5, 4, 3, 2);

// Para el texto que se muestra
String texto_fila = "Ejemplo LCD";

void setup() {
  // Configura el monitor serie
  Serial.begin(9600);

  // Configurde filas y columnas
  lcd.begin(COLS, ROWS);
}

void loop() {

  // Tamaño del texto a mostrar
  int tam_texto=texto_fila.length();

  // Indicamos que la entrada de texto se hace por la izquierda
  for(int i=tam_texto; i>0 ; i--)
  {
    String texto = texto_fila.substring(i-1);

    // Limpia la pantalla para poder mostrar informacion diferente
    lcd.clear();

    //Situar el cursor en el lugar adecuado, en este caso al inicio
    lcd.setCursor(0, 0);

    // Escribimos el texto "Ejemplo LCD"
    lcd.print(texto);

    // Esperara la cantidad de milisegundos especificada, en este caso 200
    delay(VELOCIDAD);
  }

  // Desplazar el texto a la izquierda en primera fila
  for(int i=1; i<=16;i++) {
    lcd.clear();
    lcd.setCursor(i, 0);
    lcd.print(texto_fila);
    delay(VELOCIDAD); }
  // Desplazar el texto a izquierda en la segunda fila
    for(int i=16;i>=1;i--)
  {
    lcd.clear();
    lcd.setCursor(i, 1);
    lcd.print(texto_fila);
    delay(VELOCIDAD);
  }
  for(int i=1; i<=tam_texto ; i++)
  {
    String texto = texto_fila.substring(i-1);
    lcd.clear();
    lcd.setCursor(0, 1);
    lcd.print(texto);
    delay(VELOCIDAD);
  }
}
More information - Arduino Programming Manual (Free PDF)