
After our programming tutorial and first steps in Arduino, this time we bring you a practical guide to work with Arduino or with a relay module, that is, to be able to control, by means of the Arduino low voltage direct current circuitry, a higher voltage alternating current system. That is, what seemed impossible with a simple Arduino board, such as controlling 220v loads, is now possible with the relay module.
In this way, it will allow you control appliances connected to the mains. And in order not to be too restrictive in terms of practices, I will try to explain it in a way that can be applied to any type of project that you can think of or modified in an easy way to do what you really want, since there are many projects on the Internet very specific that use an Arduino board and a relay module ...
The relay:
Let's explain everything you need to know about relays.
What is a relay?
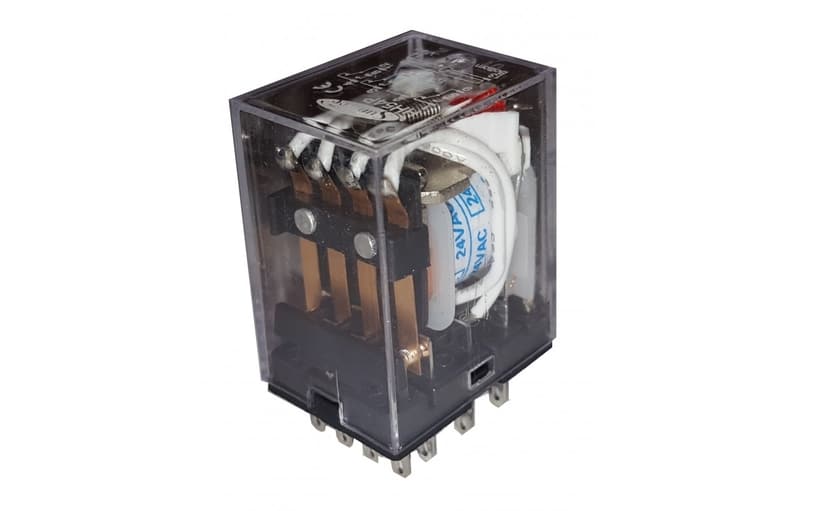
In French relais means relay, and that gives an indication of what a relay actually does. It is basically an electromagnetic device that works as a controlled switch by a stream. By means of a mechanism with a coil and an electromagnet, one or more contacts can be activated to open or close an independent electrical circuit, since this circuit works with a voltage and a type of current different from the one that controls it (at its output it handles a circuit higher power than the input).
It was invented by Joseph Henry in 1835 (although it is also attributed to Edward Davy in that same year) and since then it has evolved and changed in size to the modern relays that we have now. Initially it was used for telegraphy machines, thus controlling a higher current signal from a weaker signal received at the input. Little by little the applications were increasing and are currently used for a multitude of cases.
What types are there?
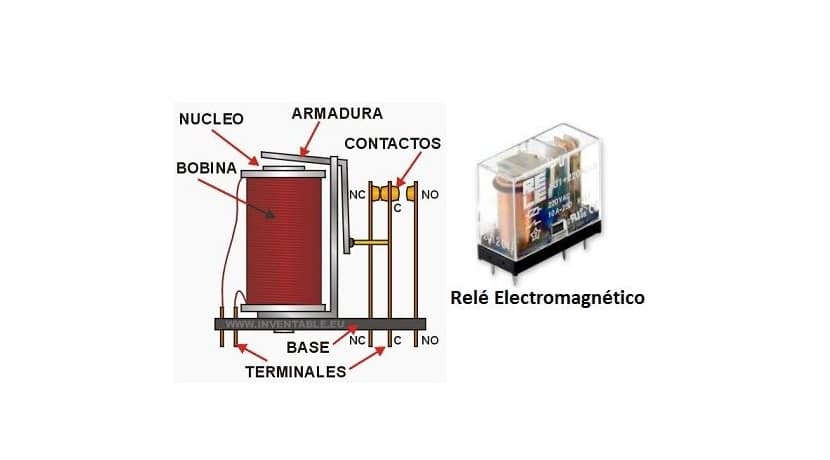
If we look inside a relay, and analyze its operation, we see that the small input control current is the one that operates the electromagnet with that copper winding and moves the switch or switch that opens or closes the higher power circuit that will control its output. All this is isolated by means of an insulating protector to avoid accidents, but regardless of this, I am interested in something else and it is the types that exist depending on their operation.
The types of relays that we have can be seen from different points. On the one hand, we must focus on its mechanism for opening or closing the switch and depending on that we have:
- NO or normally open: as its name suggests, they are those that without activating the electromagnet, the contacts of the switch or output switch are open, there is no electrical connection between them and therefore the circuit will be deactivated or open in its normal state. When the input is actuated so that this changes, at that moment the switch terminals will be touched and the circuit will close, that is, it will allow current to pass.
- NC or normally closed: it is the opposite of the previous one, the output circuit in its normal or resting state will let the current flow. On the other hand, as soon as the input is acted upon, the circuit opens and the current is interrupted.
This is very important to know when buying a relay depending on the project we want to create. You must think about what is the most normal thing for your project, that the device or devices connected to the relay are always active or that you only want to activate them at specific times. Depending on that, it would be better to choose one or the other.
By example, an irrigation system in which you connect a water pump to the relay so that it activates when you want it will be better to choose a NA, since only when you order from the Arduino platform should the pump be connected. On the other hand, in a security system where it is necessary to be permanently connected and only disconnect it at specific times, an NC will be more appropriate. That way you will avoid having to constantly power the relay from the Arduino board to force a state that is not normal ...
But regardless of that, there is other types of relays according to other points of view, such as the mechanisms that actuate them. The classics are the electromagnetic ones that we have described, and they are the most popular. But there are also others that can be driven by optocoupled devices, that is, based on solid state. Another interesting type are those with delayed output, that is, relays that have an additional circuit so that the effect on their output to open or close the circuit is after a certain time and not immediate.
Single relays and modules:
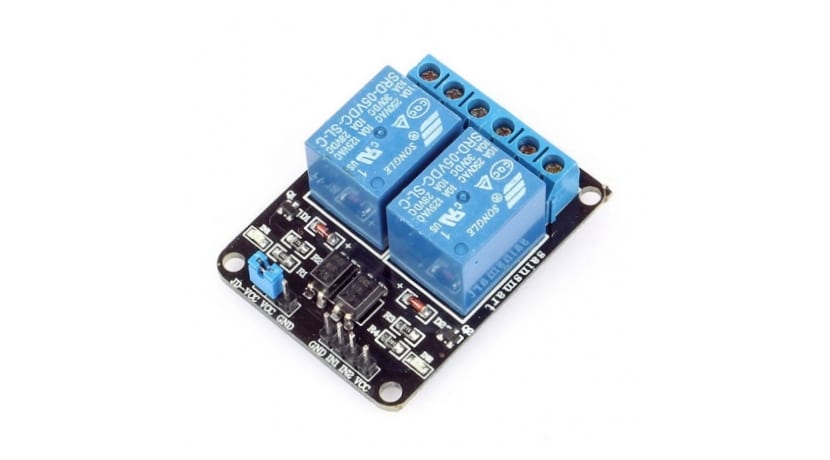
You can use a multitude of types of relays for your projects, such as those sold loose if they adapt to the electrical capacities of the Arduino board at its input. However, the simplest way to avoid incompatibility surprises if you are not sure what you are buying is to use modules specifically designed for Arduino. There are modules with a single relay whose connection to our Arduino board is very simple, but there are also double ones like the one you can see in the image above.
This type of double module usually includes an NO relay and an NC relay so that you have everything you need for your project and can test both options with a single module mounted on a mount like the ones Keyes plates that you will find in the market.
How do you connect and program with Arduino?
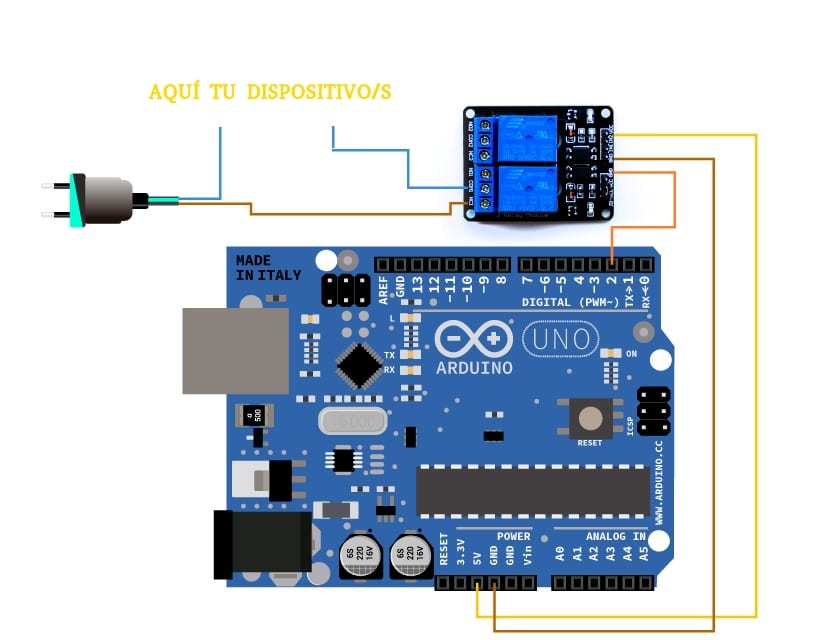
Here is a simple diagram of Arduino connection with relay module. The connection is very simple, as you can see. Obviously, if you have chosen a module with a single relay or a single relay that you have bought, you will have to modify it slightly to connect it properly. By the way, if you have chosen a double relay module, you can use one or the other depending on what suits you best for your project, as I have already mentioned.
As you can see, it would simply be to put a cable from GND or ground that you must connect to the GND pins of your relay or module. Then the Vcc line should go to one of the Arduino's 5v pins. That will be all that is needed to power the relay, but a third is required. control line to "tell" the relay to activate when we want or when we have programmed in the code of our sketch.
Respect the safety margins of the relay, for example, do not exceed those 250VAC and 10A maximums specified by some relays. And be careful when handling this circuit, since you are not only "playing" with low voltages of direct current that do not affect you, but you can suffer damage if you are not careful when handling those 220v ...
You can put that control or signal line in any of the programmable digital output pins from your Arduino and from there to the input marked IN on the relay module. Although in our scheme 2 has been used, you can use whatever you want, but remember which one you have used to modify the code properly or it will not work if you specify a different one (very common error).
I need to comment on two other details of the scheme, one would be that where I have put «here your device / s» you could connect a light bulb, a fan, an alternating current motor or any device that works with a 220v line. Of course, you will have to give it power by plugging said device or devices to an electrical network. To do this, you can modify the device's power cable by interrupting one of its two power cables (not the ground cable, if it has one), interposing the relay that opens or closes the circuit.
Program Arduino:
You can do it with Arduino IDE, with Ardublock or Bitbloq, that is, whichever is more suitable for you. The simple code for programming would be the following, although you can modify the code or extend it according to the needs of your project:
const int rele = 2;
/***Setup***/
void setup() {
pinMode(rele,OUTPUT);}
/***Loop***/
void loop() {
digitalWrite(rele, XXX);
}
You can change XXX for HIGH or LOW depending on what you want to do, that is, turn it on or off respectively. But remember that you have to keep in mind if it is an NC or a NO ... Of course, you can add more code to program a timing, or to activate or deactivate it depending on an event, perhaps the input or the status another Arduino input, such as adding a sensor and depending on whether it is activated or not make the relay change, etc.
You already know that the possibilities are many and the limit is your imagination. You can see more possibilities and code examples in our tutorial. For example, to add times to activate and deactivate in 1 minute intervals we could use:
const int pin = 2;

void setup() {

Serial.begin(9600); //iniciar puerto serie  pin

Mode(pin, OUTPUT); //definir pin como salida

}

void loop(){

digitalWrite(pin, HIGH); // poner el Pin en HIGH (activar relé)

delay(60000); // esperar un min  digital

Write(pin, LOW); // poner el Pin en LOW (desactivar relé)

delay(60000); // esperar un min

}
I hope this tutorial has served you and you get kick start your high voltage projects...
I have found the information received extraordinary.
If it is not too much to ask, I wanted to ask a question, could I connect several 220V devices to the same relay or should I put each device in a relay.
Thank you very much for everything.
Hello,
Yes, you can connect multiple devices to a relay as long as they do not exceed the maximum capacities of the relay model you have. For example, you can connect a light bulb and a fan so that they both connect in unison, etc. Check your datasheet.
A greeting!