Surely on many occasions you have needed handle liquids in your DIY projects with Arduino. To make this possible, makers have a large number of products and tools to work with. Already in the past we show the famous flowmeters, with which you could control the flow of a liquid that passed through them in a simple way. Now it is the turn of the water pump ...
Using those flowmeters The amount of fluid flowing through a pipe could be measured to control it. All thanks to a simple circuit with these elements and others compatible electronic devices with Arduino. Now it's time to go a little further to give you the possibility of moving liquids, filling / emptying tanks, creating irrigation systems, etc.
What is a water pump?
Really the name Water Pump it is not suitable as it could also work with liquids other than water. Either way, a water pump is a device capable of generating a flow of liquid using kinetic energy. Therefore, it has some basic elements:
- Home: where the liquid is absorbed.
- Motor + Propeller: the one in charge of generating the kinetic energy that extracts the water from the inlet and sends it through the outlet.
- Departure from: it is the inlet where the liquid propelled by the power of the water pump will come out.
These hydraulic pumps they are quite used in a multitude of projects and devices. From industry, to water dispensing machines, automatic irrigation systems, sprinkler irrigation, supply systems, treatment plants, etc. For this reason, there are a large number of models on the market, with different powers and capacities (measured in liters per hour or similar). From the smallest, to the largest, for dirty waters or for clean waters, deep or surface, etc.
As for the the characteristics The ones you should look at are:
- Capacity: measured in liters per hour (l / h), liters per minute (l / min), etc. It is the amount of water it can extract per unit of time.
- Hours of useful life- Measures the amount of time it can be running continuously without problems. The older it is, the better. They are usually 500 hours, 3000 hours, 30.000 hours, etc.
- Noise: Measured in dB, it is the amount of noise it makes in operation. This is not too important, unless you want it to be very quiet. In such a case, look for one with <30dB.
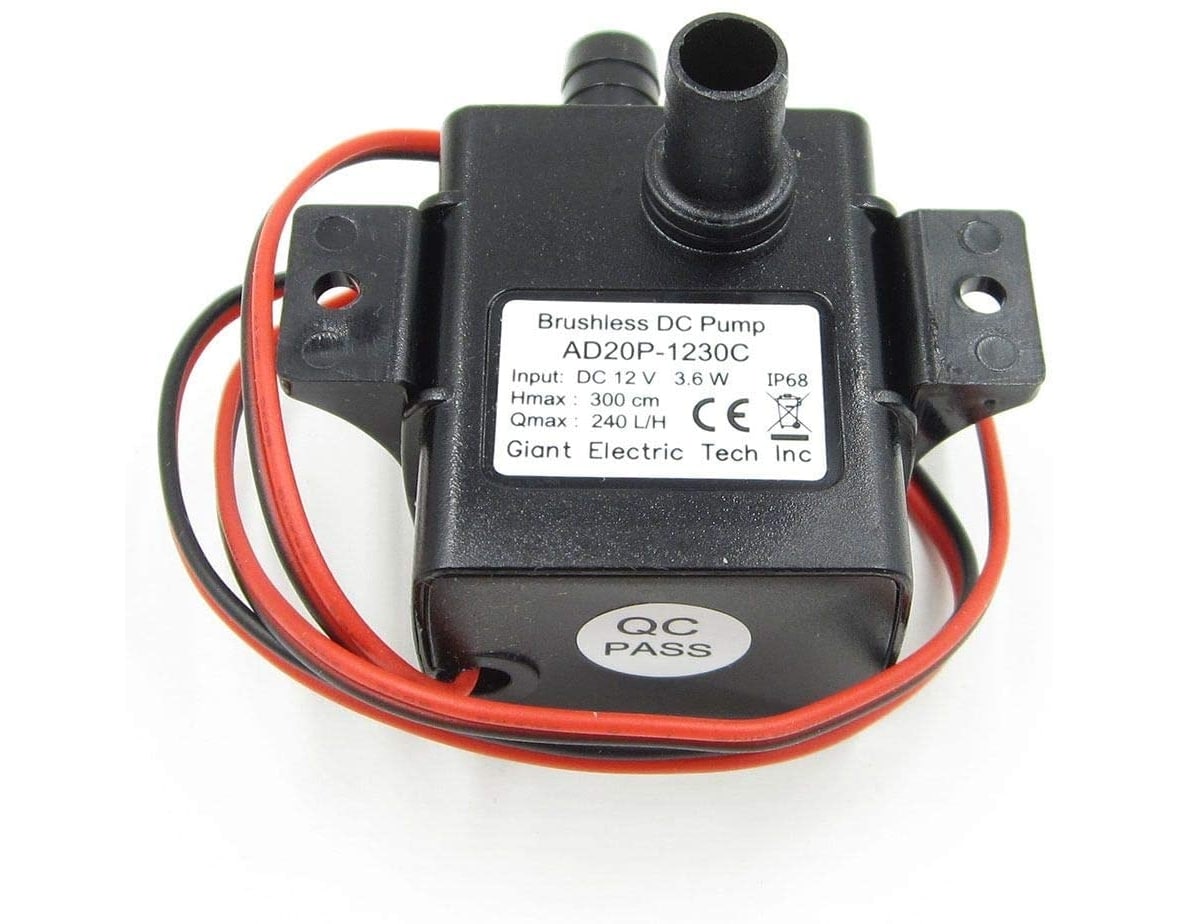
- Protection: many have IP68 protection (the electronics are waterproofed), which means that they can be submerged (amphibious type), so they can be under the liquid without problem. Others, on the other hand, are surface and only the inlet tube can be submerged through which it absorbs the water. If they are not submersible and you put it under the liquid it will be damaged or short circuit, so pay attention to this.
- Static lift: it is usually measured in meters, it is the height to which the liquid could propel. This is especially important if you are going to use it to raise liquids to a greater height or extract water from wells, etc. It can be 2 meters, 3m, 5m, etc.
- Consumer goods- It is measured in watts (w) and will indicate the amount of power they need to function. In many cases they are quite efficient, they could have consumptions of 3.8W more or less (for the small ones).
- Accepted liquids: Like I said, they accept several types of liquids, although not all. If you want to be sure that the pump you buy can work with the liquid you are going to handle, check this manufacturer's specification. They can generally work well with water, oil, acids, alkaline solutions, fuels, etc.
- Type of motor: These are usually DC electric motors. The brushless type (without brushes) are especially good and durable. Depending on the engine power you will have a pump with more or less capacity and static elevation.
- Propeller type: the motor has a propeller connected to its shaft, which is what generates the centrifugal energy to extract the liquid. These can be of different types, and the speed and flow with which the pump works will depend on it. They can even be printed using 3D printing with different results depending on their shape. I leave you the following interesting video about it:
- Caliber: the inlet and outlet socket have a specific gauge. This is important when it comes to being compatible with the pipes you are going to use. However, you can find adapters for different fitting gauges.
- Peripheral vs centrifugal (radial vs axial): Although there are other types, these two are generally used for these domestic applications. They vary depending on how the propeller is positioned with the blades, pushing the fluid centrifugally or peripherally. (for more information see the section on "How a water pump works")
But regardless of the type and performance, always are electrically controlled. By feeding the motor that drives the propellers to generate the kinetic force, their use can be controlled. Therefore, small pumps (or large ones with relays or MOSFETs) can be used to automate hydraulic systems with Arduino.
As for its applications, I have already mentioned a few. But think that you could create your own simple project with Arduino. For example, here I leave you any ideas:
- A homemade mini-scrubber to learn how real treatment plants work.
- A bilge system that detects water through a sensor and activates a water pump to drain.
- An automatic plant watering system with a timer.
- Transfer of liquids from one place to another. Fluid mixing systems, etc.
Prices and where to buy

The water pump is a simple device, it does not have too much mystery. Also, for € 3-10 you can buy some of the simplest electronic pumps that exist for Arduino, although there are more expensive ones if you want higher powers. For example, you can have these:
- 12v submersible pump with 240 l / h capacity and 3m static lift
- 12v UEETEK submersible pump with 10 l / min capacity and 5m static lift
- 240l / h submersible oil and water mini-pump, with 3m static lift.
- 12V submersible water pump with 5m static elevation and 600 l / h.
- 24V submersible pump with static elevation of 5m and 1300 l / h.
- Submersible pump with 220 / 240v plug with a capacity of 1500l / h and 2m of static lift.
- Mini submersible pump 2.5-6v 80-120 l / h
- Ultra-quiet mini pump with up to 3.5m lift and 7.5 l / min capacity
- JOYKK micro water pump 2.5-6V with capacity of 80-120 l / h
How a water pump works
A water pump it works in a very simple way. It has a propeller attached to the motor, thus transferring the energy to the fluid that passes through its blades, thus propelling it from the inlet to the outlet.
In those of axial type, the water enters the pump chamber where the propeller is located through the center, increasing its kinetic energy as it passes through that element that is rotating at high speed. It will then exit the chamber tangentially through the exit.
En the radial, the blades rotate in front of the inlet opening and will propel the water to the outlet as if it were a water wheel. This is how they will move the water in this other case.
Integrate the water pump with Arduino
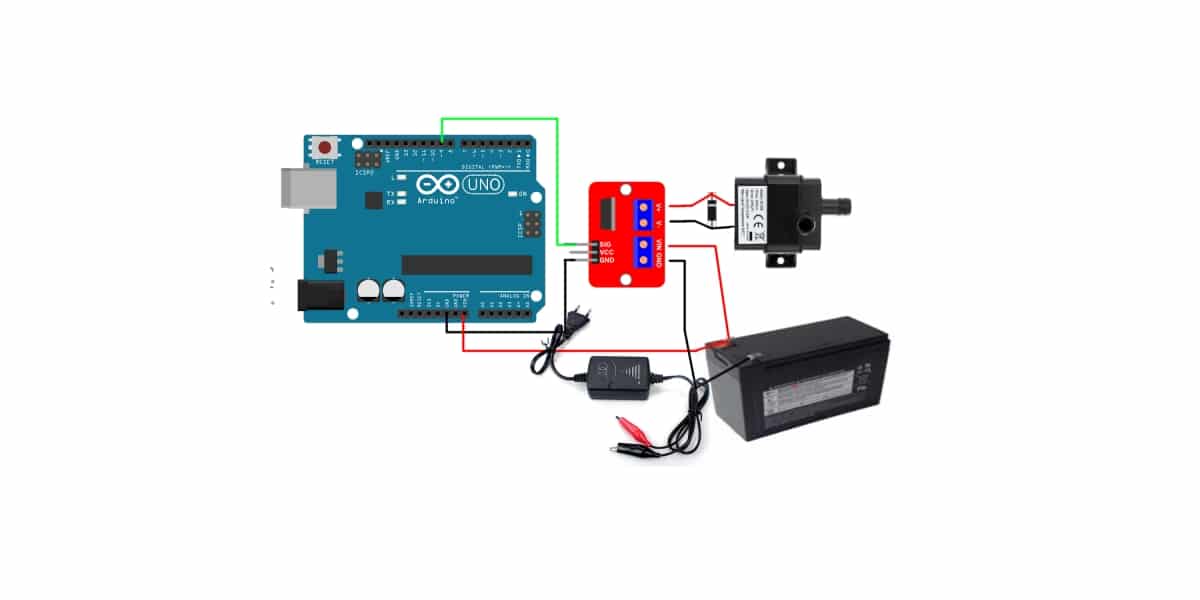
As you know, you could also use a relay if you need it. But here, to integrate the water pump with Arduino I have chosen a MOSFET. Specifically a module IRF520N. And for the connection, the truth is that it is quite simple, just follow these recommendations:
- SIG of the IRF520N module will be connected to an Arduino pin, for example D9. You already know that if you change it, you must also alter the sketch code to make it work.
- Vcc and GND of the IRF520N module you can connect them to 5v and GND of your Arduino board.
- U + and U- This is where you will connect the two wires from the water pump. If it is not internally compensated, it is an inductive load, so it would be advisable to use a flyback diode between both cables.
- Vin and GND It is where you will connect the rack with the batteries that you are going to use to power the water pump externally, or the battery, power supply or whatever you are going to use to power it ...
After that everything would be assembled and ready to start with the sketch source code. To do this, in Arduino IDE you will have to create a program similar to the following:
const int pin = 9;  //Declarar pin D9

void setup()
{
  pinMode(pin, OUTPUT);  //Define pin 9 como salida
}

void loop()
{
  digitalWrite(pin, HIGH);   // Poner el pin en HIGH (activar)
  delay(600000);               //Espera 10 min
  digitalWrite(pin, LOW);    //Apaga la bomba
  delay(2000);               // Esperará 2 segundos y comenzará ciclo
}
In this case simply turn on the pump and makes her work for 10 min. But you can add more code, sensors, etc., and control it based on the output of a humidity sensor, using timers, etc.