Summer is a time when many tend to go on vacation outside and plants are a problem, since they cannot be water those days when you are not at home. In addition, garden stores usually sell a kind of gel that allows the plant to be hydrated and nourished for about a month. But with the heat that it is or if you leave for more than a month, then you will need a somewhat better system so that when you return they are still alive and vigorous.
For that to be possible, the solution that exists is to buy a automatic irrigation system that you can program or if you are a maker and you like DIY, you can do it yourself with Arduino. The materials you need, apart from the Arduino board, are easy to find and quite cheap, so they do not involve too great an expense. Also, for some elements like the water tank, etc., you could use recycled materials ...
If you browse the web a bit you will find various projects of this type, but perhaps the most interesting is garden. In that I will be inspired for this project, since I consider that other irrigation systems that only use humidity sensors and nothing else are not so complete.
What do you need?
The materials needed for your automatic irrigation system are:
- No products found., although others would be worth.
- Protoboard or PCB if you want to solder it and make it permanent.
- Temperature and humidity sensor No products found.
- Cables
- Sensor YL-69 moisture on the ground with a hygrometer to stick in your pot / s or soil.
- Minipump 3V submersible water and approximate flow of 120 l / h.
- Diode 1N4007
- Bipolar transistor PN2222
- 3 Resistors: 1x 220 ohms, 1x 1k, 1x photoresist LDR
- Water tank, which can be a drum or a bottle of 5 or more liters, etc.
- Tubo to connect to the minipump and take to the plant / s
How to Live Aligned with alternative ideas, I would tell you that you could also use a sonoff or a WiFi module to activate it over the Internet from wherever you are, or improve it by also adding an automatic valve to the tap to program the filling of the water tank when it empties, etc.
How to set up the automatic irrigation system
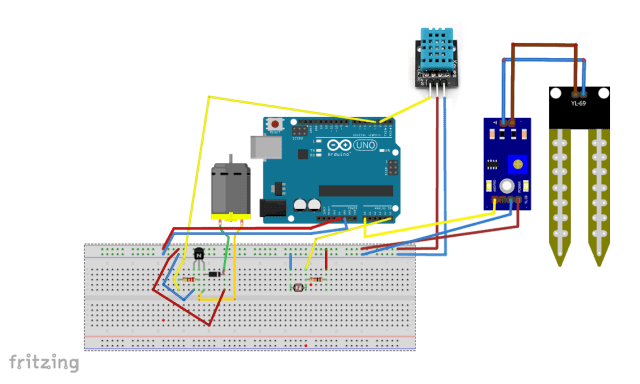
The assembly is quite simple. You may use the above schematic to make all the connections. You should position your system in a place near the window or where the plant you want to water is located and stick the two tips of the humidity sensor in the soil of the plant, near the stem.
The automatic watering system with Arduino will water whenever it detects a series of environmental conditions. For example, when it detects low light or darkness, the air temperature is a concrete one that we will configure in the Arduino IDE sketch, and the humidity on the ground is low. At that moment he would activate the motor to water the plant.
It is advisable to water the plants at night, when it is less hot, since doing so during intense hot days could harm more than benefit ...
Remember that you should introduce the mini pump under water in the tank that you have destined for irrigation, and that should have a sufficient capacity to hold the days that you are not there. You can do previous tests to know how long it lasts and you should leave a little more water in case it evaporates with the intense heat ...
It goes without saying that the tube must be fixed to the plant so that it does not move with the wind or the water can fall out and be wasted. And I think it would not be necessary to remember that you have to maintain a current supply to the Arduino board for it to work ...
Programming Languages
Now is when you should write the code needed in Arduino IDE to be able to program the microcontroller that manages the hardware you have used. This is the time to adapt the appropriate temperature, humidity and light values to water in your area, as it can vary depending on where you are. But the example you can use as a base is (I have left comments where you could modify the values, the rest you can leave it like this):
Download the code from code-irrigation-autowatering-auto for your garden
#include <SimpleDHT.h>
#include <SPI.h>
#define humidity_sensor_pin A0
#define ldr_pin A5
//Bibliotecas para los módulos sensores usados necesarias
//Y definición de variables para los sensores de humedad y LDR en los pines A0 y A5

int pinDHT11 = 2;
SimpleDHT11 dht11;
int ldr_value = 0;
int water_pump_pin = 3;
int water_pump_speed = 255;
//Aquí puedes dar valores desde 0 a 255 para la velocidad a la que trabajará la minibomba
//Haz pruebas previas del caudal y configura la. Yo he //elegido 255 pero ustedes pueden elegir la que estimen conveniente. A más velocidad, mayor //bombeo de agua
void setup() {
  Serial.begin(9600);
}
void loop() {
// Mide la temperatura y humedad relativa y muestra resultado
  Serial.println(“*******************************”);
  Serial.println(“Muestra DHT11…”);

  byte temperature = 0;
  byte humidity_in_air = 0;
  byte data[40] = {0};
  if (dht11.read(pinDHT11, &temperature, &humidity_in_air, data)) {
    Serial.print(“Lectura del sensor DHT11 fallida”);
    return;
  }

  Serial.print(“Muestra RAW Bits: “);
  for (int i = 0; i < 40; i++) { Serial.print((int)data[i]); if (i > 0 && ((i + 1) % 4) == 0) {
      Serial.print(‘ ‘);
    }
  }
  Serial.println(“”);

  Serial.print(“Muestra OK: “);
  Serial.print(“Temperatura: “);Serial.print((int)temperature); Serial.print(” *C, “);
  Serial.print(“Humedad relativa en aire: “);Serial.print((int)humidity_in_air); Serial.println(” %”);

  int ground_humidity_value = map(analogRead(humidity_sensor_pin), 0, 1023, 100, 0);
  Serial.print(“Humedad en suelo: “);
  Serial.print(ground_humidity_value);
  Serial.println(“%”);

  int ldr_value = map(analogRead(ldr_pin), 1023, 0, 100, 0);
  Serial.print(“Luz: “);
  Serial.print(ldr_value);
  Serial.println(“%”);
   Serial.println(“*******************************”);

//**************************************************************
// Condiciones de riego
// Si la humedad en el suelo es igual o inferior al 60%, si la luminosidad es inferior al 30%,
// Si la temperatura es inferior al 35%, entonces el sistema de riego riega.
// En caso de que no se  cumpla alguno o ninguno de los 3 requisitos anteriores,
// el sistema de riego no riega
//**************************************************************
//Aquí puedes variar los parámetros que necesites de 60, 35 y 30, e incluso usar otros operandos <>=...
 if( ground_humidity_value <= 60 && ldr_value<30 && temperature<35) {
 digitalWrite(water_pump_pin, HIGH);
 Serial.println(“Irrigación”);
 analogWrite(water_pump_pin, water_pump_speed);

 }
 else{
 digitalWrite(water_pump_pin, LOW);
 Serial.println(“Riego detenido”);

 }
 delay (2000);
// Ejecuta el código cada 2000 milisegundos, es decir, 2 segundos. Puedes variar la frecuencia de muestreo
}
More information - Arduino Programming Course (Free PDF)
Fonts
More information - garden
WHY DOES I EXIT exit status 1
#include expects "FILENAME" or ESO ON LOAD
Hello,
This error is due to some syntax problem in the code. I have gone through it and had an error. Now it should be fine.
A greeting!
Hello, good afternoon, I also have the same problem:
project: 3:10: error: #include expects "FILENAME" or
#include <SimpleDHT.h>
^
project: 4:10: error: #include expects "FILENAME" or
#include <SPI.h>
^
exit state 1
#include expects "FILENAME" or
Hello, excuse me, can you help me with an error that occurs in the code
In the same way, I have an error in the code, could you help me with that problem please
Hello,
Please leave information about the error you have so that I can help. If I don't know the content of the error, it is difficult for me to help you or locate where the problem is ...
All the best
Hello, this error appears, how can I solve it?
error: SimpleDHT.h: No such file or directory
#include
^ ~~~~~~~~~~~~
compilation terminated.
exit state 1
SimpleDHT.h: No such file or directory
Hello Samantha,
That error is because the Arduino IDE doesn't seem to detect the SimpleDHT.h library. Do you have it installed correctly? In case you have it, try using a more current version of Arduino IDE if it is older ...
You can view more information here:
https://www.arduino.cc/en/Guide/Libraries
And get the library from here:
https://github.com/adafruit/DHT-sensor-library
A greeting!
First thanks for the post that is very interesting and very valid, but I have read this:
"It is advisable to water the plants at night, when it is less hot, since doing so during intense hot days could harm more than benefit ..."
I have heard this many times, but I would like someone to explain to me clearly how it hurts them…. I have been raising plants for more than 20 years and when it is very hot there is nothing that they appreciate more than a good watering and to be able to be with a sprinkler wetting the leaves.
This is a myth that all it does is make the plants suffer ... When you are hot and thirsty, do you wait until night to drink? ... think about it
thanks for the post !!!
Hello Pepe,
Thanks for your input. I live in the countryside and sometimes, when the heat is very intense, watering the plants in hot hours can kill them. I have checked it myself (in addition, it is not the same depending on the geographical area where you are, in my land it is very hot). It can be for several reasons:
1-Because the drops of water on the leaves act like glass, burning them with sunlight like a magnifying glass would.
2-The plants have stomata that close so as not to dehydrate when it is sunny. If you water them they open up and can cause them to become dehydrated.
3-If they are in a plastic pot, the effect could be even worse.
A greeting!
HELLO!
I really liked the elaborated project, I have my own garden and I am testing this project as a personal experience, without obtaining a lucrative benefit, I just wanted to ask you if you would help me with the code, since it gives me an error, I have the DHT library but when verifying it I it throws an error at the end of the code: {Serial.println ("Watering stopped");} and tells me it is: stray '\ 342' in program.
I have very little knowledge of the matter and I have investigated and I have not been able to solve it.
I would appreciate if you help me. Thanks 😀
Hello,
Is the code correct? That is, it has no typos?
On the other hand, you can check more about that error here:
https://forum.arduino.cc/index.php?topic=386225.0
All the best
Hello Good afternoon, sorry, I don't know if there is a way to contact you, it is that it is giving me many errors with this code in the arduino
Hello everyone,
I have cleaned up the code and have written it again, to see if there was an error for any reason in the code displayed on the web. So that it can be downloaded, I have left the new code in a download link just before the code that appears on the web. If you click there you can download it in text format. I hope there are no more problems.
A greeting!
How can I add the wifi module? and would it be possible to control it by making an application?
How is the food also: c?
Hi Chaqui! I'm trying to do the same as you, could you help me if you finished your code ????
A question which component would be the one between the Arduino board and the DHT11 sensor?
Thank you!
Hi, Nerea,
You mean the diode and resistor? Notice that in the section before the diagram there is a list of all the components ...
A greeting!
Hello, you have a video of how your irrigation system was.?
excuse me only works for arduino uno or also for arduino mega
Hello good morning, sorry I wanted to ask a question why when I open the Arduino ide monitor, I get a failed dht11 sensor reading?
The whole program compiled well and loaded well, the detail is when I open the monitor and that legend appears.
What can it be?
HELLO FRIEND GREAT JOB BUT ME GETS ERROR IN THIS PART No such file or directory
#include
WHAT WILL IT BE? I would appreciate your help
HELLO, THIS IS PUBLIC, BUT DOESN'T MATTER, I REALLY WANT TO THANK THE PERSON OR PEOPLE WHO PARTICIPATED IN THE DEVELOPMENT OF THIS PROJECT, MAYBE FOR MANY IT IS FOOL, BUT YOU HAVE SAVED MY LIFE, SO I THANK YOU VERY MUCH SCHOOL TO WHICH I DO NOT WANT TO BELONG AND THE TRUTH I DO NOT SORRY I HAVE LEARNED, THANK YOU FOR YOUR PAGE, I WISH YOU THE BEST.
How can I add the wifi module? and would it be possible to control it by making an application?
#include "DHT.h"
DHT dht (2, DHT11);
int valueLDR;
int pinLDR = A5;
int ENGINE = 8;
// ——————————————————————————————————————————————-
void setup ()
{
Serial.begin (9600);
valueLDR = 0;
Serial.begin (9600);
Serial.println ("IRRIGATION SYSTEM TEST");
dht.begin ();
pinMode (MOTOR, OUTPUT);
Serial.println ("Humidity sensor value");
}
// ——————————————————————————————————————————————-
void loop ()
{
Serial.println («============================================ =========================== »);
int humidity = analogRead (A0);
Serial.print ("Read:");
Serial.println (humidity);
if (humidity> = 0 & humidity> = 1000) {
Serial.println ("Sensor in dry soil");
} else if (humidity> 500 & humidity <= 1000) {
Serial.println ("Sensor in wet soil");
} else if (humidity <= 500) {
Serial.println ("Sensor in water");
}
valueLDR = analogRead (pinLDR);
Serial.print ("LIGHT (");
Serial.print (valueLDR);
Serial.println (")");
delay (2000);
float h = dht.readHumidity ();
float t = dht.readTemperature ();
if (isnan (h) || isnan (t)) {
Serial.println ("Failed to read DHT11 sensor!");
return;
}
Serial.print ("Humidity:");
Serial.print (h);
Serial.print ("%");
Serial.print ("Temperature:");
Serial.print (t);
Serial.println ("* C");
if (h <= 50 && LDRvalue <70 && t = 1000) {
digitalWrite (MOTOR, HIGH);
Serial.println ("Must water");
}
else {
digitalWrite (MOTOR, LOW);
Serial.println ("should NOT water");
}
delay (1000);
}
I only used the
-DTH of temperature and humidity on pin 2
-the LDR photoresist on pin A5
-motor on pin 8
-sensor for soil moisture on pin A0
this is my code I hope and it works for you
-moisture sensor for soil
Good morning, I am having problems with the code I get this and I am using the newest software:
sketch_nov12c: 1: 10: fatal error: SimpleDHT.h: No such file or directory
#include
^ ~~~~~~~~~~~~
compilation terminated.
exit state 1
SimpleDHT.h: No such file or directory
I would like you to help me how to solve this please, as I am new to this I do not know how it works very well. Thank you.
Hello, could you leave a better image of how the circuit is connected? It is not appreciated well, with what power voltage is it fed? Thanks
#include "DHT.h"
DHT dht (2, DHT11);
int valueLDR;
int pinLDR = A5;
int ENGINE = 8;
// ——————————————————————————————————————————————-
void setup ()
{
Serial.begin (9600);
valueLDR = 0;
Serial.begin (9600);
Serial.println ("IRRIGATION SYSTEM TEST");
dht.begin ();
pinMode (MOTOR, OUTPUT);
Serial.println ("Humidity sensor value");
}
// ——————————————————————————————————————————————-
void loop ()
{
Serial.println («============================================ =========================== »);
// —————————————————————————————–
// ———– Moisture, Soil Sensor —————————————————–
int humidity = analogRead (A0);
Serial.print ("Read:");
Serial.println (humidity);
if (humidity> = 0 & humidity> = 1000) {
Serial.println ("Sensor in dry soil");
} else if (humidity> 500 & humidity <= 1000) {
Serial.println ("Sensor in wet soil");
} else if (humidity <= 500) {
Serial.println ("Sensor in water");
}
// —————————————————————————————–
// ————— Photo resistance ———————————————————-
valueLDR = analogRead (pinLDR);
Serial.print ("LIGHT (");
Serial.print (valueLDR);
Serial.println (")");
delay (2000);
// —————————————————————————————–
// ————— Sensor DTH11 temperature and humidity in the air —————————–
float h = dht.readHumidity ();
float t = dht.readTemperature ();
if (isnan (h) || isnan (t)) {
Serial.println ("Failed to read DHT11 sensor!");
return;
}
Serial.print ("Humidity:");
Serial.print (h);
Serial.print ("%");
Serial.print ("Temperature:");
Serial.print (t);
Serial.println ("* C");
// —————————————————————————————–
// ———— Condition to water or not water ———————————————-
// (AirHumidity) (Photoresist) (Temperature) (EarthHumidity)
if (h <= 50 && LDRvalue <70 && t = 1000) {
digitalWrite (MOTOR, HIGH);
Serial.println ("Must water");
}
else {
digitalWrite (MOTOR, LOW);
Serial.println ("should NOT water");
}
delay (1000);
}
// as soon as the pins only check that the pump is a pwm pin and
// that of the LDR photoresist is analog and also that of soil moisture equal a pin
// analog and those of the dth11 of the air temperature and humidity sensor whatever
// digital pins can still be based on the original code of this page
// to connect the pins
// works with 5v
I get an error in this part of the code »empty loop () {» could help me
Hello, could you tell me what libraries or what is their name to install them since when I paste the code it tells me that I need the DTH library
Hello, the system seems very good. I tried to recreate it but at the time of including the code and the corresponding library the following appears.
In file included from C: \ Users \ User \ Documents \ Arduino \ TEST_1 \ TEST_1.ino: 5: 0:
C: \ Program Files (x86) \ Arduino \ libraries \ DHT-sensor-library-master / DHT_U.h: 36:10: fatal error: Adafruit_Sensor.h: No such file or directory
#include
^ ~~~~~~~~~~~~~~~~~~
compilation terminated.
exit state 1
Compiling error for card Arduino Uno.
I'm not sure if I need any other bookstore if someone can help me please.
Very good project, however after verifying the code, compiling it and uploading it, the only thing that appears on the serial monitor is "DHT11 reading failed" it does not go beyond that point
Hello, I have several problems, could you please help me and if someone has a video or I found a detailed video that I can see
I have a question, where to put the current and what type of current can be used.
Can you add a higher resolution outline? some connections are not clearly visible