Surely many of you have seen in science fiction movies how the scientist or geek has a robotic arm that controls everything and can pick up objects or perform functions as if it were a human person. Something that is increasingly possible thanks to Hardware Libre and the Arduino Project. But what is a robotic arm? What functions does this gadget have? How is a robotic arm built? Below we are going to answer all these questions.
What is a robotic arm
A robotic arm is a mechanical arm with an electronic base that allows it to be fully programmable. In addition, this type of arm can be a single element but it can also be part of a robot or other robotic system. The quality of a robotic arm compared to other types of mechanical elements is that a robotic arm is fully programmable while the rest of the device is not. This function allows us to have a single robotic arm for various operations and to perform various different and different activities, activities that can be carried out thanks to electronic boards such as Arduino boards.
Functions of a robotic arm
Possibly the most basic function of a robotic arm is the auxiliary arm function. In some operations we will need a third arm that supports some element so that a person can build or create something. For this function no special programming is needed and we will only need to turn off the device itself.
Robotic arms can be built with various materials which makes it possible to use them as a substitute for dangerous operations. like the manipulation of polluting chemical elements. A robotic arm can also help us to perform heavy tasks or those that require adequate pressure, as long as it is constructed of a strong and resistant material.
Materials needed for its construction
Next we are going to teach you how to build a robotic arm in a fast, simple and economical way for everyone. However, this robotic arm will not be as powerful or useful as the arms we see in the movies but will serve to learn about its operation and construction. So that, the materials we will need to build this device are:
- A plate Arduino UNO REV3 or higher.
- Two development boards.
- Two axis servos in parallel
- Two micro servos
- Two analog controls in parallel
- Jumper cables for development boards.
- Tape
- Cardboard or foam board for the stand.
- A cutter and scissors.
- Much patience.
Assembly
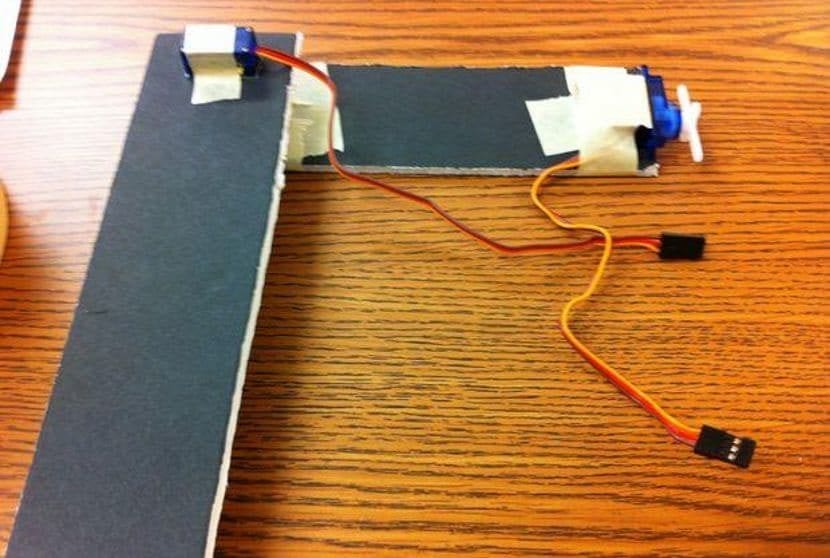
The assembly of this robotic arm is quite simple. First we have to cut out two rectangles with the foam; each of these rectangles will be parts of the robotic arm. As you can see in the images, these rectangles will have to be the size we want, although it is recommended that the size of one of them is 16,50 x 3,80 cm. and the second rectangle has the following size 11,40 x 3,80 cm.
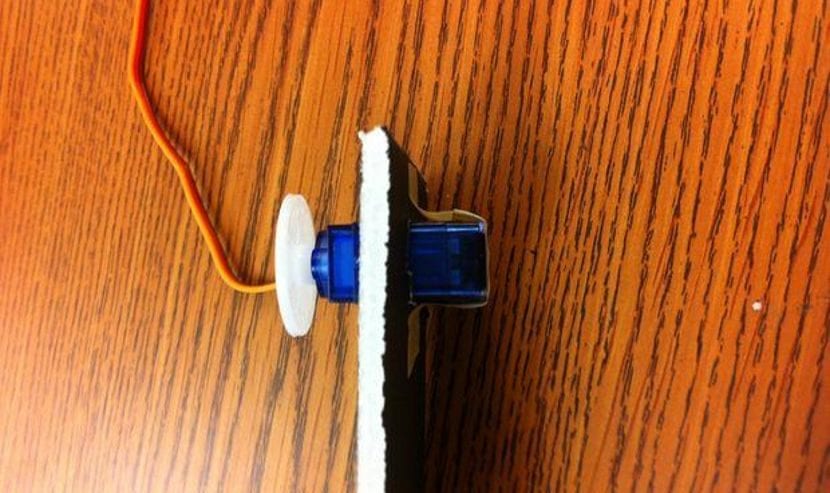
Once we have the rectangles, at one end of each rectangle or strip we will tape each servomotor. After doing this, we will cut a "U" of foam. This will serve as a holding part or end part of the arm, which for a human would be the hand. We will join this piece to the servomotor that is in the smallest rectangle.
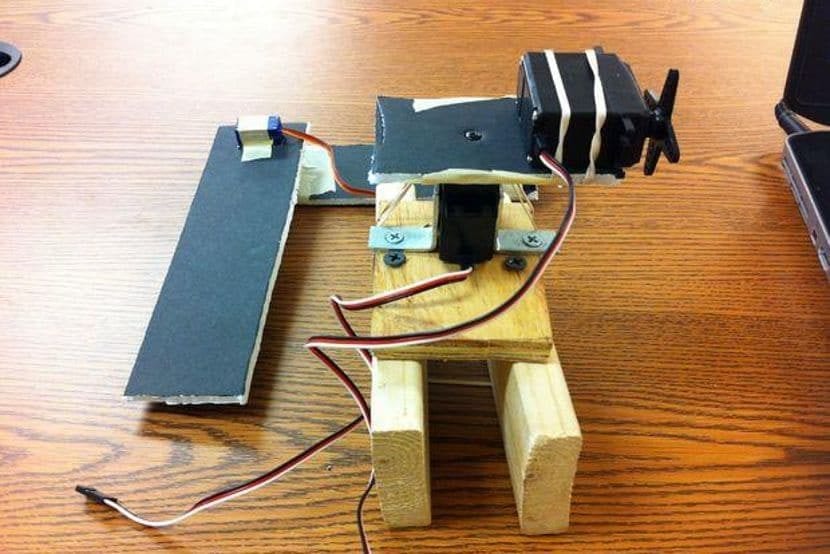
Now we have to make the lower part or base. For this we will carry out the same procedure: we will cut out a square of foam and place the two axis servo motors in parallel as in the following image:
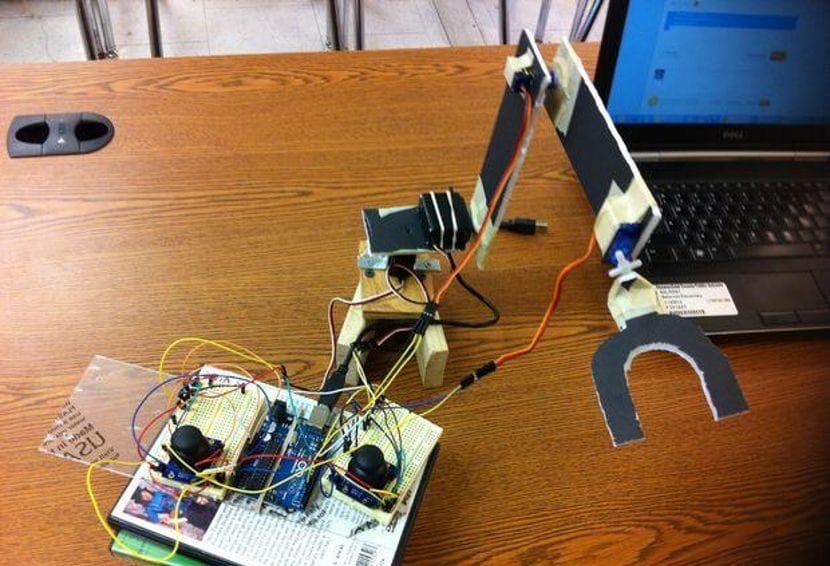
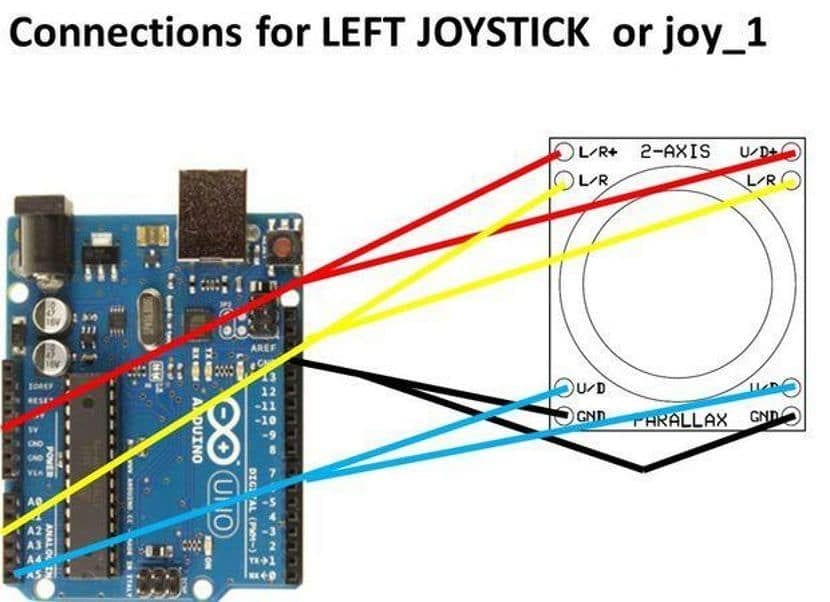
Now we have to connect all the motors to the Arduino board. But first, we have to connect the connections to the development board and this to the Arduino board. We will connect the black wire to the GND pin, the red wire we will connect to the 5V pin and the yellow wires to -11, -10, 4 and -3. We will also connect the joysticks or controls of the robotic arm to the Arduino board, in this case as the image indicates:
Once we have everything connected and assembled we have to pass the program to the Arduino board, for which we will need to connect the Arduino board to the computer or laptop. Once we have passed the program to the Arduino board, we have to make sure that connect the cables to the Arduino board although we can always continue with the development board and disassemble everything, the latter if we only want it to learn.
Software required for operation
Although it seems that we have finished building a robotic arm, the truth is that there is still a lot ahead and the most important thing. Creating or developing a program that gives life to our robotic arm since without it, the servomotors would not stop being simple clock mechanisms that spin without meaning.
This is solved by connecting the Arduino board to our computer and we open the program Arduino IDE, we connect the computer to the board and write the following code in a blank file:
#include <Servo.h>

const int servo1 = 3;       // first servo

const int servo2 = 10;      // second servo

const int servo3 = 5;       // third servo

const int servo4 = 11;      // fourth servo

const int servo5 = 9;       // fifth servo

const int joyH = 2;        // L/R Parallax Thumbstick

const int joyV = 3;        // U/D Parallax Thumbstick

const int joyX = 4;        // L/R Parallax Thumbstick

const int joyP = 5;        // U/D Parallax Thumbstick

const int potpin = 0;      // O/C potentiometer

int servoVal;           // variable to read the value from the analog pin

Servo myservo1;  // create servo object to control a servo

Servo myservo2;  // create servo object to control a servo

Servo myservo3;  // create servo object to control a servo

Servo myservo4;  // create servo object to control a servo

Servo myservo5;  // create servo object to control a servo

void setup() {

// Servo

myservo1.attach(servo1);  // attaches the servo

myservo2.attach(servo2);  // attaches the servo

myservo3.attach(servo3);  // attaches the servo

myservo4.attach(servo4);  // attaches the servo

myservo5.attach(servo5);  // attaches the servo

// Inizialize Serial

Serial.begin(9600);

}

void loop(){

servoVal = analogRead(potpin);

servoVal = map(servoVal, 0, 1023, 0, 179);

myservo5.write(servoVal);

delay(15);

// Display Joystick values using the serial monitor

outputJoystick();

// Read the horizontal joystick value  (value between 0 and 1023)

servoVal = analogRead(joyH);

servoVal = map(servoVal, 0, 1023, 0, 180);     // scale it to use it with the servo (result  between 0 and 180)

myservo2.write(servoVal);                         // sets the servo position according to the scaled value

// Read the horizontal joystick value  (value between 0 and 1023)

servoVal = analogRead(joyV);

servoVal = map(servoVal, 0, 1023, 70, 180);     // scale it to use it with the servo (result between 70 and 180)

myservo1.write(servoVal);                           // sets the servo position according to the scaled value

delay(15);                                       // waits for the servo to get there

// Read the horizontal joystick value  (value between 0 and 1023)

servoVal = analogRead(joyP);

servoVal = map(servoVal, 0, 1023, 70, 180);     // scale it to use it with the servo (result between 70 and 180)

myservo4.write(servoVal);                           // sets the servo position according to the scaled value

delay(15);                                       // waits for the servo to get there

// Read the horizontal joystick value  (value between 0 and 1023)

servoVal = analogRead(joyX);

servoVal = map(servoVal, 0, 1023, 70, 180);     // scale it to use it with the servo (result between 70 and 180)

myservo3.write(servoVal);                           // sets the servo position according to the scaled value

delay(15);                                       // waits for the servo to get there

/**

* Display joystick values

*/

void outputJoystick(){

Serial.print(analogRead(joyH));

Serial.print ("---");

Serial.print(analogRead(joyV));

Serial.println ("----------------");

Serial.print(analogRead(joyP));

Serial.println ("----------------");

Serial.print(analogRead(joyX));

Serial.println ("----------------");

}
We save it and after that we send it to the plate Arduino UNO. Before finishing with the code we will carry out the pertinent tests to verify that the joysticks work and that the code does not present any errors.
I already have it mounted, now what?
Surely many of you did not expect this type of robotic arm, however it is ideal because of the basics of what it is, the cost it has and the way to teach how to build a robot. From here everything belongs to our imagination. That is, we can change the materials, the servo motors and even complete the programming code. It goes without saying that too We can change the Arduino board model for a more powerful and complete one that allows us to connect a remote control or work with the smartphone. In short, a wide range of possibilities that the Hardware Libre and robotic arms.
More information - Instructables
Definitely 3D printing is the door to great things. I have worked with a Lion 2 on my own designs and the results have fascinated me. Since I was recommended to read about it in http://www.leon-3d.es It already caught my attention and when I tried it and witnessed the self-leveling and the details in the final result, I knew what a good investment I made.