
Currently there are a multitude of smart bulbs that can be controlled from a mobile app or through certain virtual assistants through voice commands. The Smart Home, or smart home, is in fashion, and if you want to start learning how these systems work, you can make your own light regulator at home.
With it you can control intensity of a lamp or bulb to create the atmosphere you prefer. More intensity for when you read, study, etc., and less to generate a more welcoming atmosphere when you want to relax ...
What is a dimmer or dimmer?
Un light regulator, or luminous intensity, is a device that can control voltage based on voltage regulators or triacs. This modifies the voltage that reaches the bulb and its intensity will fluctuate depending on the supply voltage. For example, in this case I will show a regulator that I had to assemble a long time ago for a project in the electronics course.
It's simple, cheap, and can be used with any conventional light bulb. In order to create it, here are the instructions ...
Materials
What you will need for this DIY project is to have the skills of a maker and materials easy to find like:
- Bifilar copper cable for electrical supply.
- Plug to connect to any outlet to supply power.
- Glass fuse of 5A, represented by F in the scheme. Optionally, you can use a fuse holder, to make it easier to change the fuse, although it can be soldered directly.
- Insulating box o to embed. You can also 3D print it if you have a printer, or make it out of wood, etc. It will serve as a support and insulation for the circuit.
- Printed circuit board to record it with the proper circuit or a breadboard.
- No products found. y heat sink for triac.
- Diac BR100 or equivalents.
- 2x 39nF / 250v polyester capacitors (C1 and C4). And another 2x 22nF / 250v polyester capacitors (C2 and C3).
- Linear potentiometer No products found. (P1), will serve as an actuator to be able to regulate the intensity manually.
- Resistance of 12KΩ 0,5w (R1) and another resistance of 100Ω 0,5w (R2).
- Choke coil with ferrite (L).
- Splice tab to connect the output (S) and input (E).
- Tin soldering iron (if you are not going to use breadboard).
- Wire strippers.
Construction
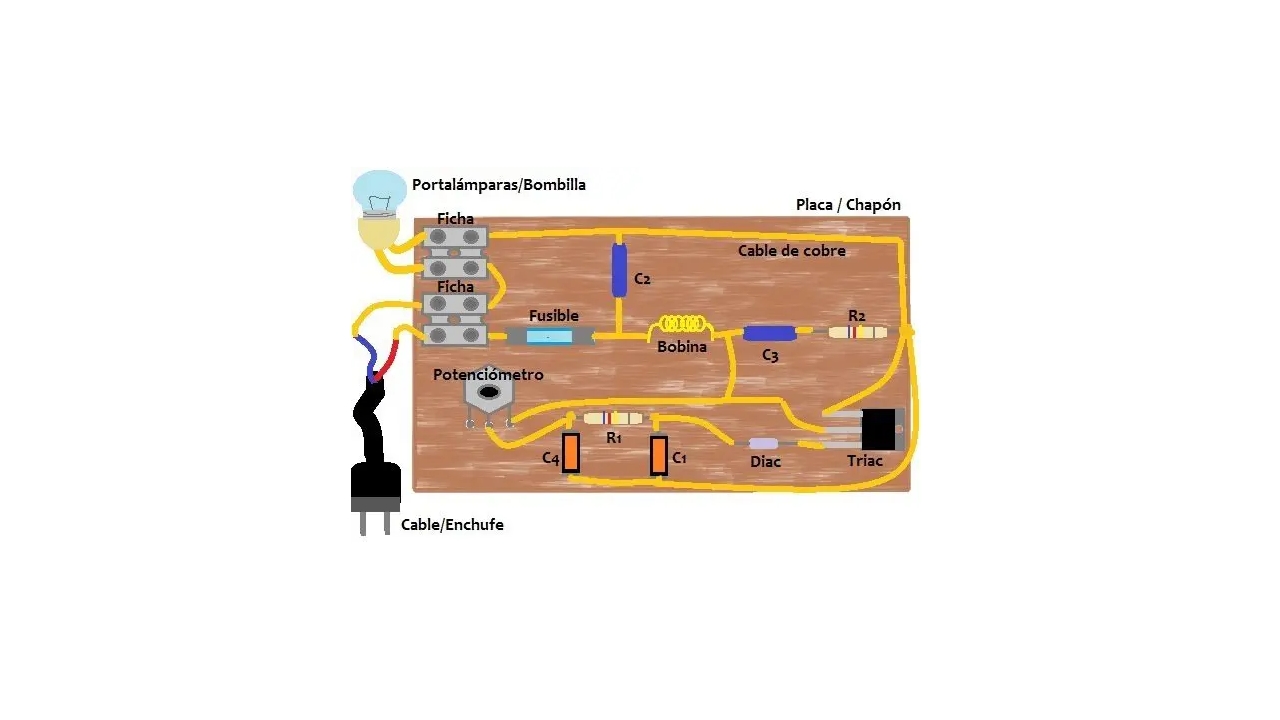
With all this, you must generate the following electrical circuit:

Once everything is connected, the result it should be something like this:
And the operation you should get the following result:
Implementation with Arduino

Now if you want save components y use arduino to perform the dimmer, then you can also do it simply. In fact, they sell No products found. like this, to make things easier for you. Its configuration is simple ...
For make our dimmer, or dimmer, with Arduino, you can do it in a multitude of ways. You can even use many of the elements from the previous schematic to create this project:
You can use a module:
You can even use the WiFi module to create a smart light ...
As you can see, the Possibilities they are quite a lot ...
More information - Free Arduino course