
In some projects it is necessary to have proof of the time, the hour, or the date. Either due to the need to perform certain functions based on time, to maintain a calendar of events or registration, to keep the time in a system, or simply to create a digital clock with Arduino. With the DS3231 you can get it, another of the components that we add to the list.
The DS3231 is the module you were looking for, and here you will find everything you need for its control and I will also show you an example of how integrate it with Arduino with a practical example ...
What is the DS3231?
First of all, you should know what a RTC (Real Time Clock), or real time clock. These chips are very frequent in a multitude of applications, in fact, your PC has one of them on your motherboard, and it is also powered by a CR2032 battery also. It is the one that maintains the time and the configuration in the BIOS / UEFI and from which the operating system takes it when booting to be on time (although now, with the Internet, synchronization with servers can be used for greater precision, but this is another story…).
What the RTC does is obtain time measurements, that simple. The difference from other types of electronic watches is that they simply measure the time, and it does so by counting clock signal pulses, knowing the frequency and periods of it. In addition to the time, an RTC also allows you to keep an account of the days, weeks, months and years. That is, the full date ...
For this to be possible, the RTC must be accompanied by a Xtal or quartz crystal which will act as a resonator, the one that provides the frequency. Additionally, you need electronic circuitry capable of counting and storing the date in a memory. The circuitry must be capable of counting seconds, minutes, hours, days, weeks, months and years.
That memory is volatileThat is why it needs the battery, to have constant power. If you don't have a battery or it runs out, it will be erased ... That's what happens to PCs when the battery runs out, they give an incorrect time. If you configure it while the PC is on, the time will be kept, since the RTC is being powered, but it is during the processes during which it is off when that battery is needed ...
For DIY projects, makers usually use two common RTC chips, which are the DS1307 and DS3231. Both are manufactured by Maxim (formerly Dallas Semiconductor), and the DS3231 is the more accurate of the two, as it is not as affected by temperature variations as the former does. Therefore, it does not fluctuate so much depending on the temperature, and it keeps the time more precisely.
The DS3231 is not that it is unaffected by variations, but that it has built-in temperature measurement and compensation systems to ensure an accuracy of 2ppm, which would be equivalent to a time lag of about 172ms a day, that is, a little more than 1 second a week at most. And in practice, they usually vary only 1 or 2 seconds a month.
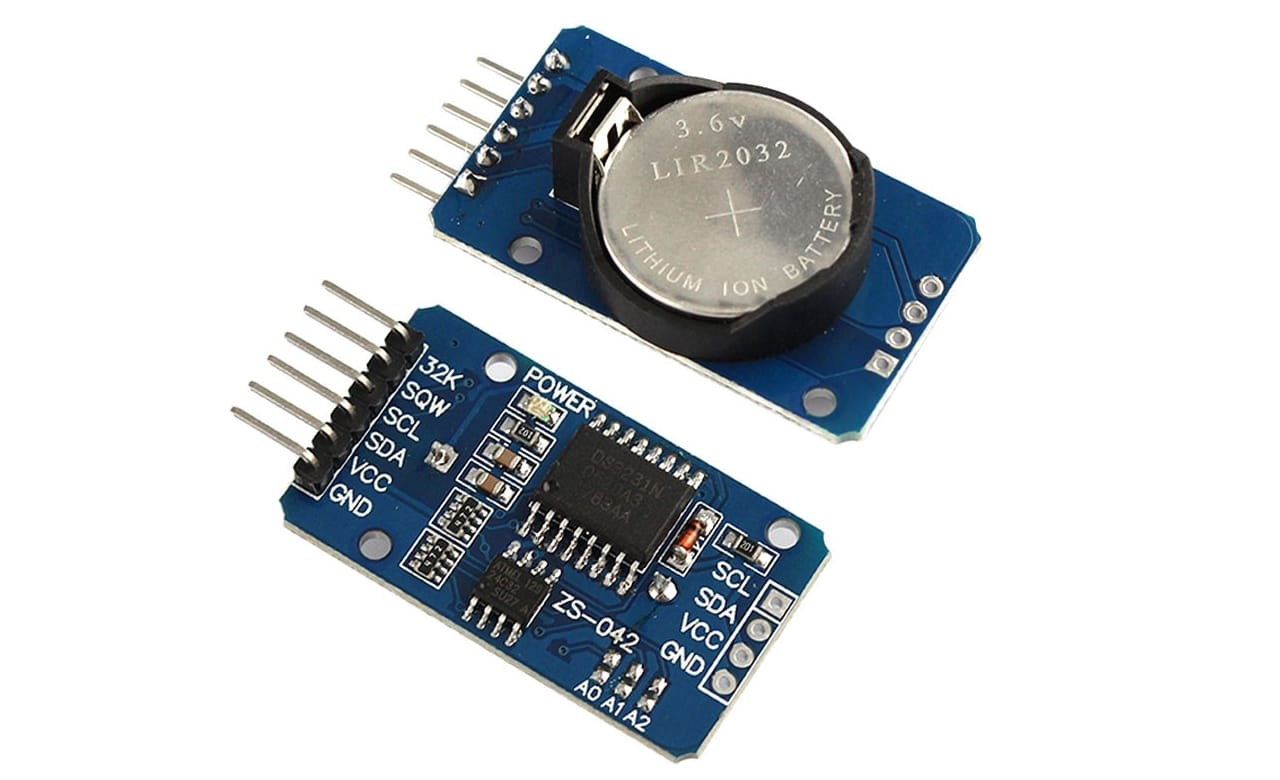
As for the way communicate with the RTC DS3131 to obtain the date values it gets, it is done by I2C bus. And for power, you can use 2.3 to 5.5v for the DS3231, which is somewhat lower than the 4.5 to 5.5v for the DS1307, so it can be more energy efficient and make the battery last longer.
Also, you should know that these modules usually have a EEPROM additional AT24C32 to store some records and previous measurements, which is quite practical.
Applications
As for the applications, I have already mentioned some, such as to implement a clock with Arduino, to create a system that acts based on The time Whatever, to keep the time on equipment such as PCs and many other electronic devices and appliances that have time, etc.
Can also be used in projects to create timers for lighting, irrigation systems, datalogger, etc. The applications can be the most numerous ...
Buy an RTC DS3231
The DS3131 is cheap, and you can find it in some specialized electronics stores or in large stores such as eBay, AliExpress, Amazon, etc. If you are interested in having one, here are some recommendations:
- Buy DS3231
- No products found.
DS3231 Arduino Integration
If you would like to integrate your DS3231 with your Arduino board and start creating "timed" projects, you must first make the appropriate connections. To be able to connect it, it is as simple as:
- The SLC pin of the DS3231 board must be connected to the A5 of your Arduino UNO.
- SDA of the DS3231 is connected to A4 of Arduino.
- Vcc from the module will go to 5V from Arduino.
- GND to GND.
Now you have the system connected, the next thing is to write the sketch source code to schedule it. You can modify the codes and adapt them to your needs, but you could start by simply getting the date from an RTC DS3231 connected to Arduino:
#include <Wire.h>
#include "RTClib.h"

// RTC_DS1307 rtc;
RTC_DS3231 rtc;

String daysOfTheWeek[7] = { "Domingo", "Lunes", "Martes", "Miércoles", "Jueves", "Viernes", "Sábado" };
String monthsNames[12] = { "Enero", "Febrero", "Marzo", "Abril", "Mayo",  "Junio", "Julio","Agosto","Septiembre","Octubre","Noviembre","Diciembre" };

void setup() {
   Serial.begin(9600);
   delay(1000);

   if (!rtc.begin()) {
      Serial.println(F("No se encuentra el RTC"));
      while (1);
   }

   // Si se ha perdido el suministro eléctrico, fijar fecha y hora
   if (rtc.lostPower()) {
      // Fijar a fecha y hora (poner la de compilación del sketch)
      rtc.adjust(DateTime(F(__DATE__), F(__TIME__)));

      // Fijar a fecha y hora específica. En este ejemplo el 2021-01-01 a las 00:00:00
      // rtc.adjust(DateTime(2020, 1, 1, 0, 0, 0));
   }
}
//Imprimir completa obtenida la fecha en decimal
void printDate(DateTime date)
{
   Serial.print(date.year(), DEC);
   Serial.print('/');
   Serial.print(date.month(), DEC);
   Serial.print('/');
   Serial.print(date.day(), DEC);
   Serial.print(" (");
   Serial.print(daysOfTheWeek[date.dayOfTheWeek()]);
   Serial.print(") ");
   Serial.print(date.hour(), DEC);
   Serial.print(':');
   Serial.print(date.minute(), DEC);
   Serial.print(':');
   Serial.print(date.second(), DEC);
   Serial.println();
}

void loop() {
   // Obtener fecha actual y mostrar por Serial
   DateTime now = rtc.now();
   printDate(now);

   delay(3000);    //Espera 3 segundos
}
And in order to use the RTC date to schedule some task, such as for turning lights on or off, for automatic watering, or for an alarm to sound, etc. Remember that to handle higher voltage devices you can use transistors or relay:
#include <Wire.h>
#include "RTClib.h"

const int outputPin = LED_BUILTIN;
bool state = false;

// RTC_DS1307 rtc;
RTC_DS3231 rtc;

void setup() {
   Serial.begin(9600);
   delay(1000);

   if (!rtc.begin()) {
      Serial.println(F("Couldn't find RTC"));
      while (1);
   }

   if (rtc.lostPower()) {
      rtc.adjust(DateTime(F(__DATE__), F(__TIME__)));
   }
}

// Se comprueba si está programado el encendido
bool isScheduledON(DateTime date)
{
   int weekDay = date.dayOfTheWeek();
   float hours = date.hour() + date.minute() / 60.0;

   // Configuración de horas de 08:30 a 9:30 y de 22:00 a 23:00 (usando decimal)
   bool hourCondition = (hours > 8.50 && hours < 9.50) || (hours > 22.00 && hours < 23.00);

   // Configuración del día Lunes, Sábado y Domingo con números (recuerda que en inglés comienza la semana en Domingo=0, Lunes=1,...
   bool dayCondition = (weekDay == 1 || weekDay == 6 || weekDay == 0);
   if (hourCondition && dayCondition)
   {
      return true;
   }
   return false;
}

void loop() {
   DateTime now = rtc.now();

   if (state == false && isScheduledON(now))      // Apagado
   {
      digitalWrite(outputPin, HIGH);
      state = true;
      Serial.print("Activado");
   }
   else if (state == true && !isScheduledON(now))  // Encendido
   {
      digitalWrite(outputPin, LOW);
      state = false;
      Serial.print("Desactivado");
   }

   delay(3000);
}