
Guitarist playing with amplifier
It seems like yesterday when I started playing the guitar: my mother bought me an acoustic for about 15.000pts (about € 90 today) and at that time I didn't know a single chord. I started to learn classical guitar, but what I liked were groups like Nirvana or MetallicA. It wasn't until about 4 years later that I had (and still have) my first amp. It was a Fender that was priced at my salary for a month then, about 80.000pts (about € 500 now). In those four years I missed having an amplifier to be able to play with "electricity".
Today there are many more options. In fact, I no longer use my amp. Instead, I connect my instruments to multi-effects stompboxes that go straight to the computer, where I can record and edit whatever I want. But how much are those pedalboards worth? There are many prices, but I have two that once cost me between € 300 and € 500. I explain this because it is clear that one of the problems with wanting to play with an amp is the price of it or the devices that replace it. In this article we will show you how to create the cheapest mini amp you can imagine.
The cheapest amp you can imagine
All we will need to create this mini amp will be:
- One LM386 chip (buy).
- A 9V battery. The "flask" of a lifetime.
- Something from Perfboard. You have something in THIS LINK, but that one in particular already exceeds the promised price. If you have something from an old device you can use it perfectly.
- A 10 ohm resistor.
- A 10k potentiometer (buy).
- Some old headphones.
Circuitry
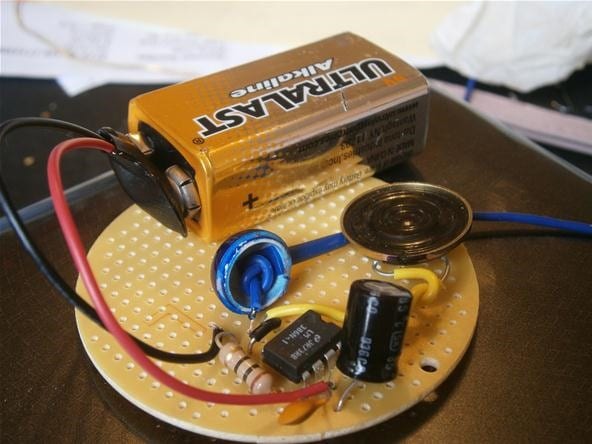
Lo first we will have to do is make the circuitry or circuit board. We will do it without welding anything and, if it works, we will weld everything. The intention is to first check if it works and then to give the finishing touches to the plate. If we rush when welding and something goes wrong there will be no going back. In addition, when welding we can get out of hand, break something and not know what has caused the failure, if a bad assembly or when welding it.
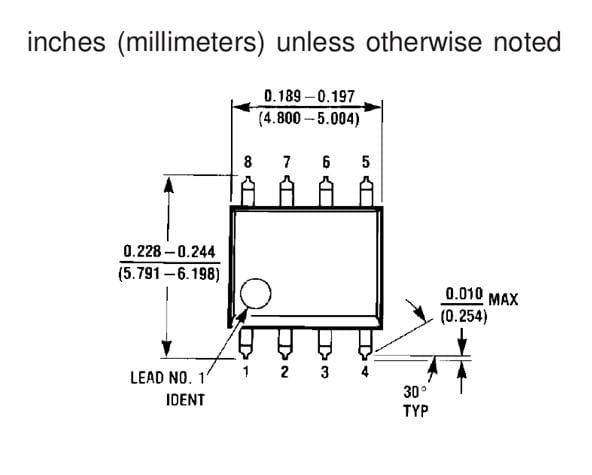
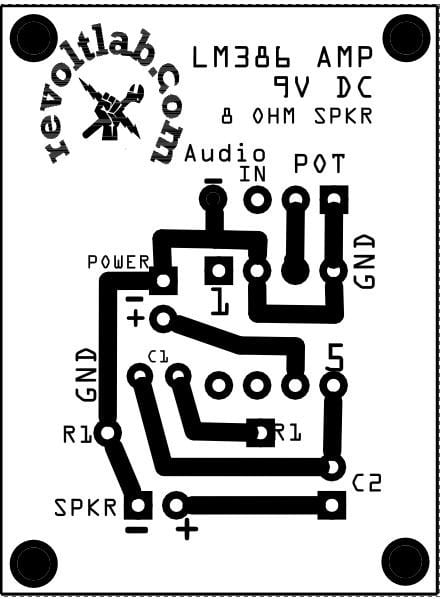
Blade Chip LM386 instructions already brings some examples to create amps, so we won't have to overheat our heads. We will have to take the first example, that of the 20-gain amplifier. Chip diagrams can be a bit confusing: the triangle represents the 386-pin LM8 chip in the center of the circuit, and the chip's layout is anything but triangular. The pins are numbered around the chip from 1 to 8 as we see in the following image. IMPORTANT: unless we see otherwise in our instructions, measurements are in inches.

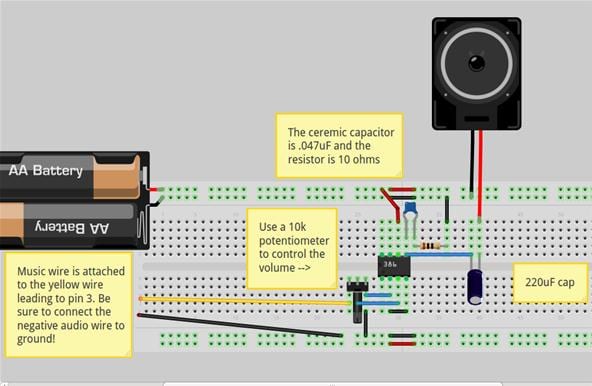
We will have to alter capacitor values to get as close as we can to standard values. We will use a .047μF ceramic capacitor and a 220μf electrolytic capacitor instead of the values we see above. In the following image, we would replace the two batteries on the left with the 9V battery.
Representation of amplifier circuits
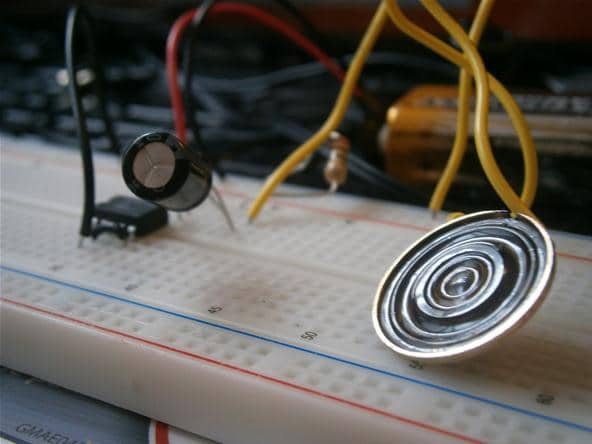
In the following image we see a small speaker of a compact plate. We can use any 8 ohm speaker.
Amplifier motherboard
Welding
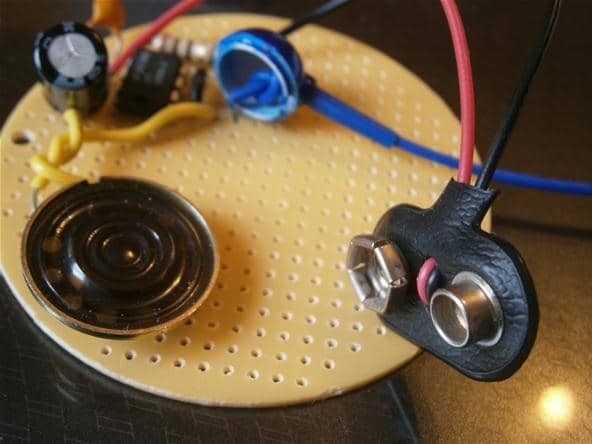
Next we will have to put the components in the perforated material and bend the wires to form the circuit. Here we have to bear in mind that we have to leave enough space to fit the 9V battery, the largest component of all the necessary by far. If we use a larger speaker, we can simply put the mini-circuitry on the back or opposite to the one that is the speaker.

Where to use this amp
We can use it in any project where we need to amplify the sound, such as a headphone preamplifier, a portable guitar amplifier, a portable speaker for an MP3 player or even to make robotic voices. Mind you, sound delivery It can never be compared to a quality speaker worth hundreds of euros, of course.
In this article we are talking about using it as a guitar amp. If we are going to put it in a metal box, we will have to cover the walls with some kind of insulation. It is clear that 9V is not going to kill us, but it is likely that we will get a shock in the form of a cramp with which we will feel like a small puncture. In addition, isolating it will also come in handy so that dirt does not deteriorate our new creation.
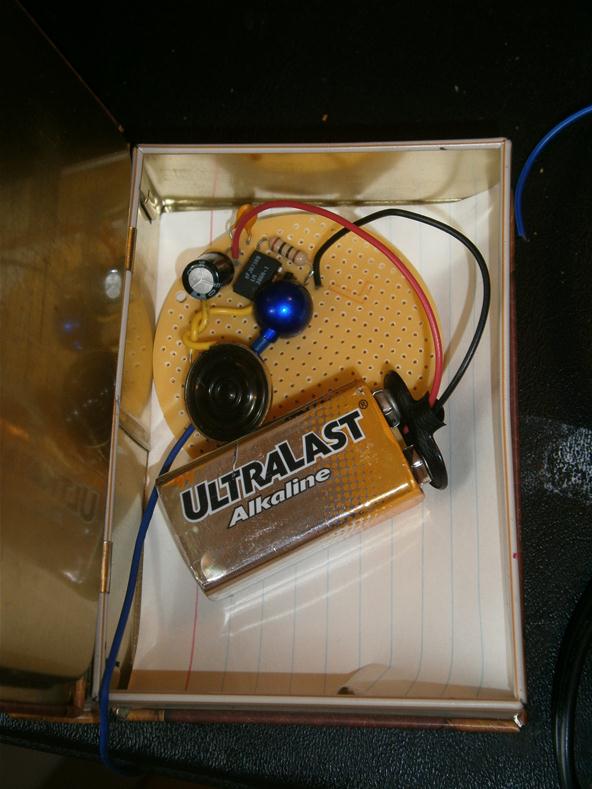
Amplifier in its box
Printed circuit
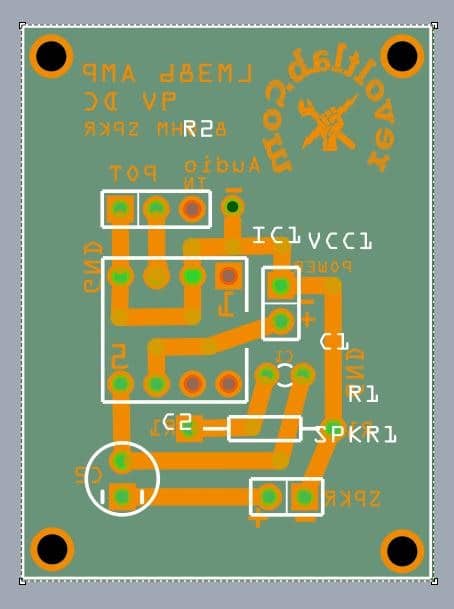
Here are several printed circuit images. Labels and strokes have been added to aid assembly. Keep in mind that the audio input cable of our headphones will be soldered directly in the hole of the potentiometer.
-

- Circuits
To use it as a guitar amplifier, what we would be missing is connect the 1/4-inch jack port to the audio input. The moment we solder it, any standard electric guitar cable will work. The result you would have in the following image. A box of Altoids pills has been used, which are like the famous Juanola that we have in Spain but with a mint flavor. It seems important to mention that you have to be careful with the 1/4 jack port because if we bend the part inside we can cause it to sound bad, that it does not usually or that we hear very annoying interferences.

Mini-amplifier mounted
You also have to take into account the decoration. Because of its size, we can fit this mini-amp practically anywhere. If we are going to use it as a loudspeaker, I have seen this amplifier put inside a hollow book where an MP3 can also fit. Moreover, it is also possible make him a box with LEGO pieces, which would give it a more "geek" image while avoiding the problem of small cramps, which are not dangerous but can be annoying.
How about this cheapest mini-amp in the world?