There are a lot of basic kits for e-learning, from some generic ones to learn electronics in general, others focused on robotics or Arduino, to practice with renewable energies with photovoltaic technology, etc. But one of the most sought after is the famous LittleBits. The New York startup is one of the best known that offers this type of kits for education and makers.
It was created by Ayah Bdeir in 2008, and since then it has grown to significant numbers, present in more than 200 schools around the world and in many homes. They have certainly known how to return something that was common in the 80s and 90s, where you found famous educational kits of all kinds, including electronic ones. Also, littleBits has lots of open-source software products and libraries. With these open source pieces you can create codes to be able to manage the hardware they sell.
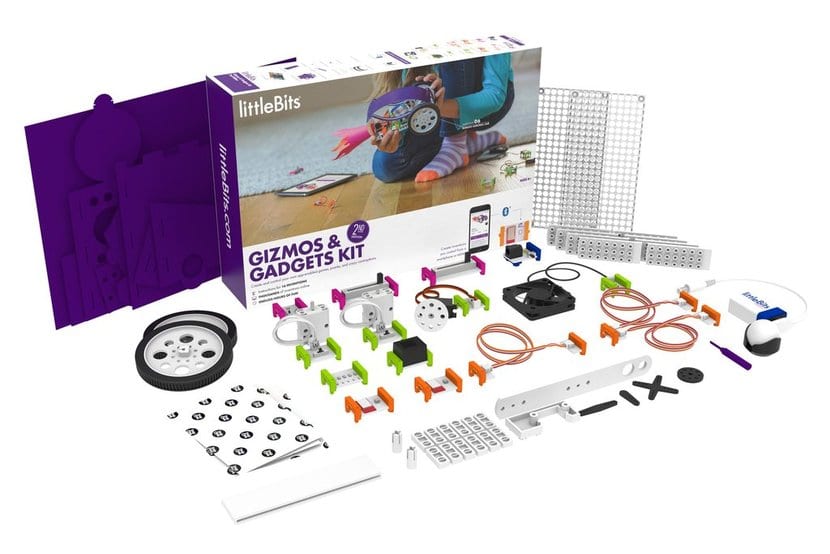
In some stores, like Amazon, you can find different types of littleBits kits. With prices ranging from € 80 to € 600 of other more advanced. The great thing about these kits is that with just a few modules you can create a lot of things. For example, one of the basic kits e littleBits includes about 10 modules that allow thousands of possible combinations to create almost anything you want.
Why is littleBits so interesting?
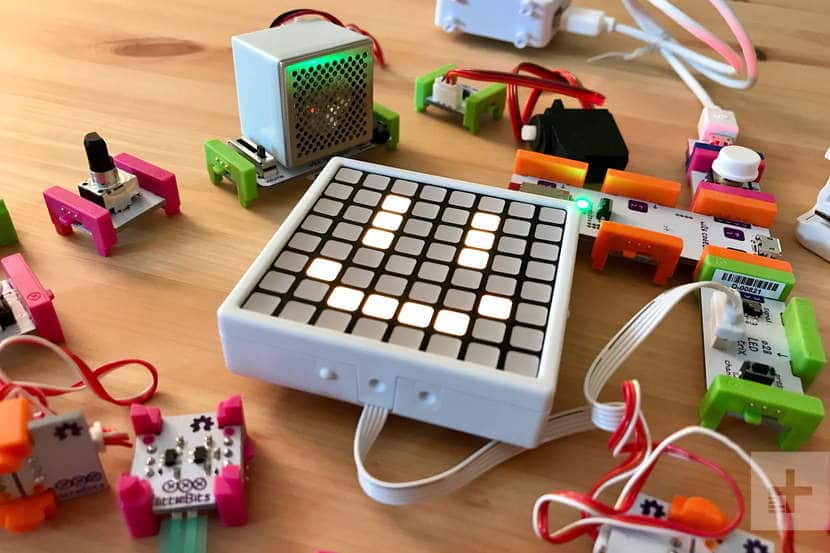
The modules are can be easily docked and undocked with small magnets for prototyping. They are suitable for children, since if they make a mistake in the design it is possible to start over easily, without having to weld or remove the solder, or work with dangerous elements. That is why they like them so much, the ease and the multiple combinations make it a lot of fun for the little ones (and not so little ones) to learn by playing.
They also usually include color coding on modules, that allows not to confuse how they should be connected, for polarity, etc. In this way, you can start working with the kits without any prior knowledge of electronics or circuits. The pink colors are those of the entrances and the green ones for the exits. As if that's not enough, it includes an instruction book that will help you with 8 example projects.
With that you can get used to the way it works, and then move on to realize the more than 150.000 possibilities of which you have. However, on the networks you can also find more ideas. LittleBits even has an official website where you will also find a database with another 100 projects in addition to those in the manual. So you will not be able to limit your creativity.
Between the basic modules Commonly found in kits are Light Sensor Module, DC Motor Module, Power Supply Module, Switch Module, etc. But remember that depending on the kit the composition and orientation may vary.
How to have a littleBits?
To have a littleBits in your hands, you have several possibilities. One of them is to directly buy these kits. But if you find them expensive and you want to save a few euros, you could create the kit yourself. So you can give your child a cheaper learning kit that you have made yourself, or perhaps give it to yourself. This will also help you learn during the construction process.
Buy kits
You can buy some kits on amazon with different objectives and prices:
- littleBits Star Wars Droid Inventor Kit + Code: Is a kit that you can buy for about € 99 With which you can create a nice R2D2 from the Star Wars saga and that you can program and control from a mobile device. It does not need the intervention of adults, it can be handled safely by children. With the Droid Inventor app for iOS and Android, you can teach the droid new skills.
- littleBits Space Rover Inventor Kit: It is similar to the previous one, but instead of having the character from Star Wars, this one has the space rover from Mars. A small robot that you can assemble, customize, and program from a mobile device. The price is about € 139, somewhat more expensive than the previous one.
- littleBits Smart Home Kit: is a kit for home automation enthusiasts, as can be deduced from the name. The price is about € 680 and includes a large number of modules and components. You can build Internet-connected devices thanks to the open source littleBits library. The devices that you create will be able to be controlled by Internet to automate it. You do not need wiring, no welding, or programming knowledge. Mobile devices can be used to manage its 14 bits or modules, from temperature sensors to MP3 players ...
- littleBits Electrical Installation Kit: there are several versions, some for € 88 and others more completes and expensive about € 682. It allows you to build circuits of light, sound, with motors, etc., easily connected and controlled. In addition, you can buy several kits and they are compatible with each other, to combine them if you already have one.
- littleBits Synth Electrical Installation Kit: for about € 137 you have 12 bits or modules to compose. Both this and the previous ones include manuals with instructions and step-by-step examples. In this case, focused on sound synthesization.
Create your kit


Another option, if you like DIY or are an inveterate maker, it would be create it yourself, being able to customize the modules you need or want for your kit. There is a very good JackANDJude project that allows you to see the step-by-step process of creating a kit with various modules or bits.
The kit you have created consists of 10 modules:
Power module:
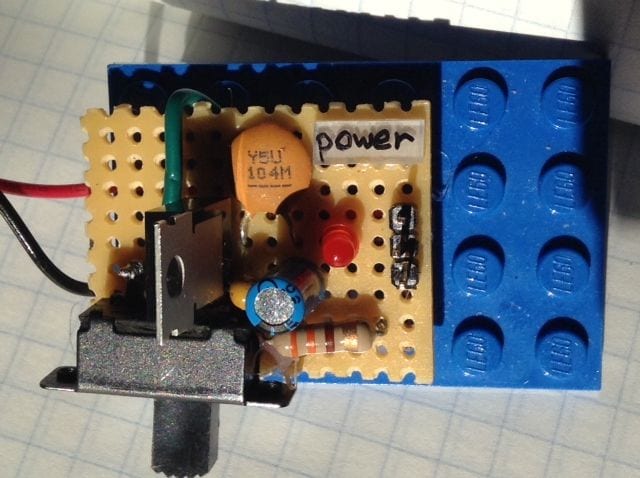
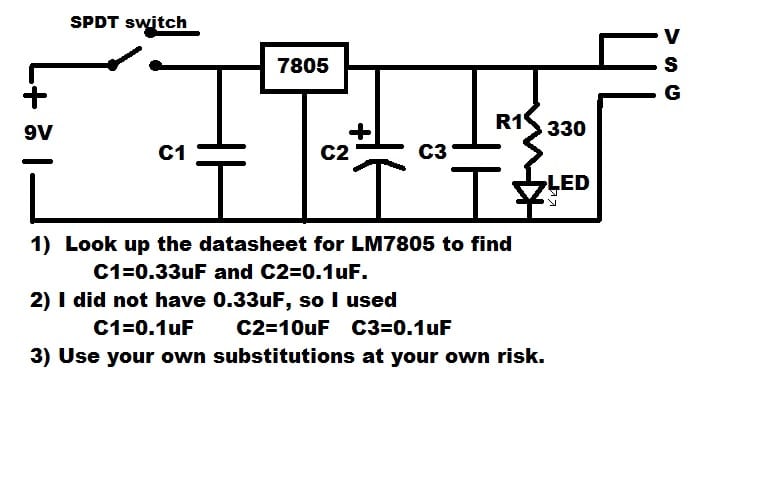
Is power module or power supply that will feed the rest. It can be easily assembled with these components and joining them as shown in the circuit image:
- 9V battery
- Battery box or holder with red and black wires for polarity.
- 9 × 12 perforated printed circuit board.
- LM7805
- 0.1uF Ceramic Disc Capacitor (Code 104), 1.0uF, 10uF
- 330 ohm resistor
- Red led
- SPDT switch
- 3-pin jumper
- Header for 3 pins, for the jumper
Light sensor module

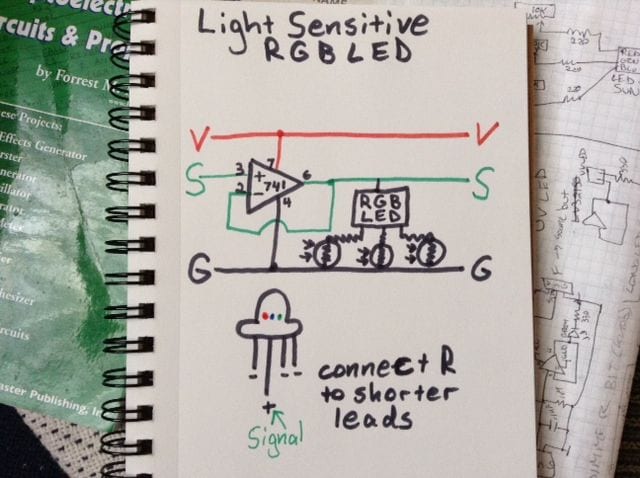
El RGB led module with light sensor, it should have the following parts, connected as shown in the picture:
- 9 × 12 Perforated Printed Circuit Board
- RGB tricolor LED
- 3 330 ohm resistors, and 3 photoresistors
- LM741 operational amplifier
- 3-pin jumper and header for it
LED module
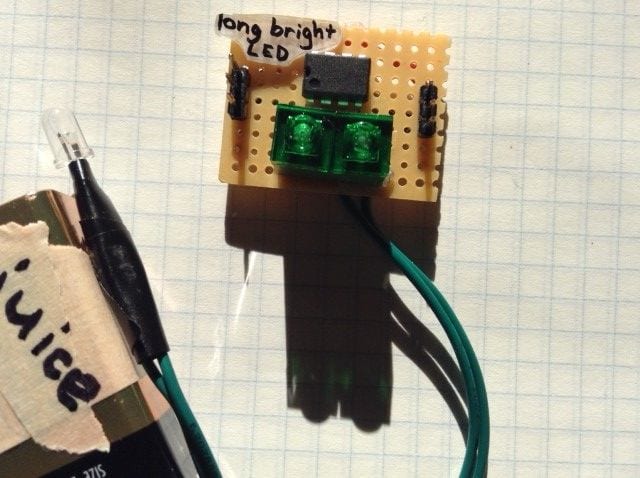

This module is very simple, and can be assembled with:
- 9 × 12 Perforated Printed Circuit Board
- Bright white LED
- 220 ohm resistor
- LM741 operational amplifier
- 3-pin jumper and header for it
Button module
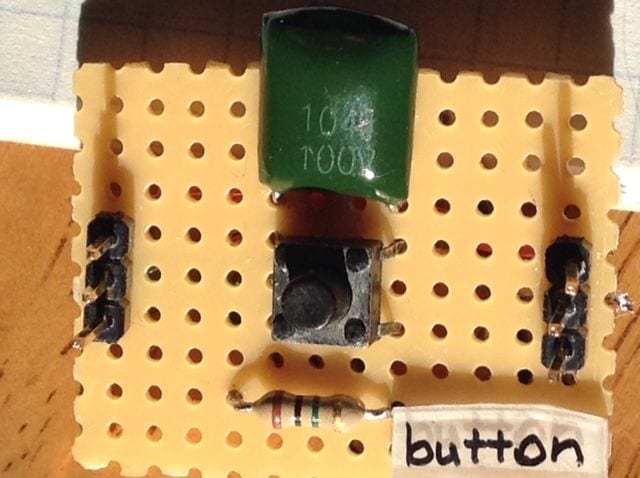
Another of the easiest modules to create with:
- 9 × 12 Perforated Printed Circuit Board
- SPST button or switch
- 0.1uF capacitor
- Resistance 1M Ohm
- 3-pin jumper and 3-pin connector
Inverter module
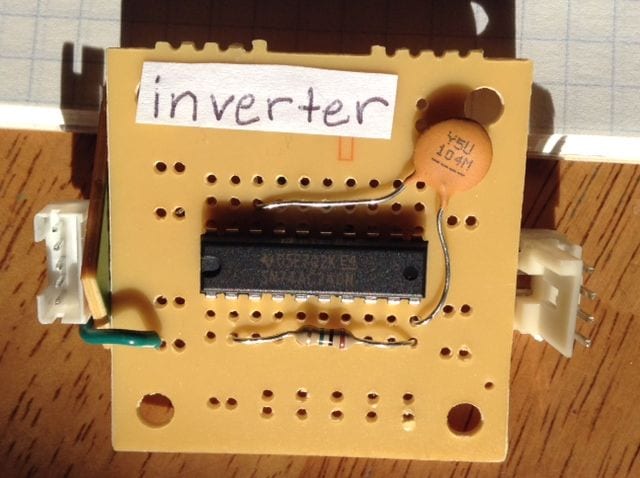
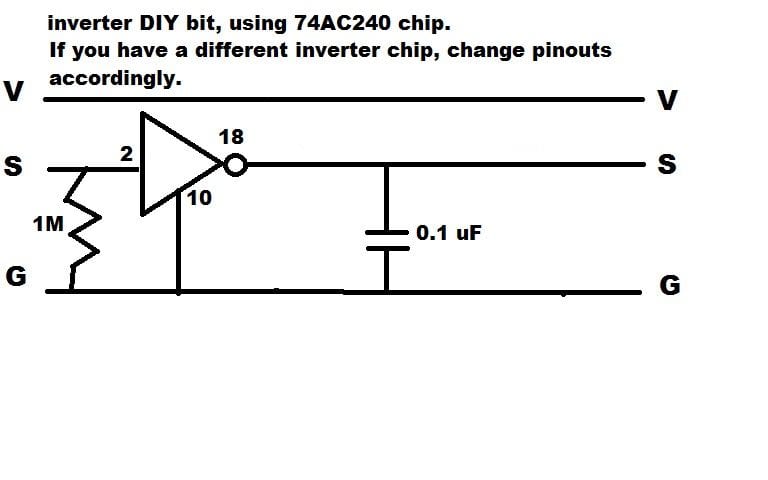
El inverter module it is also very important to vary voltages. It is made up of:
- Perforated circuit board
- 0.1uF capacitor
- Resistance 1M ohms
- 74AHC1G04DCK inverter chip
- 3-pin connector and jumper.
Pulse module
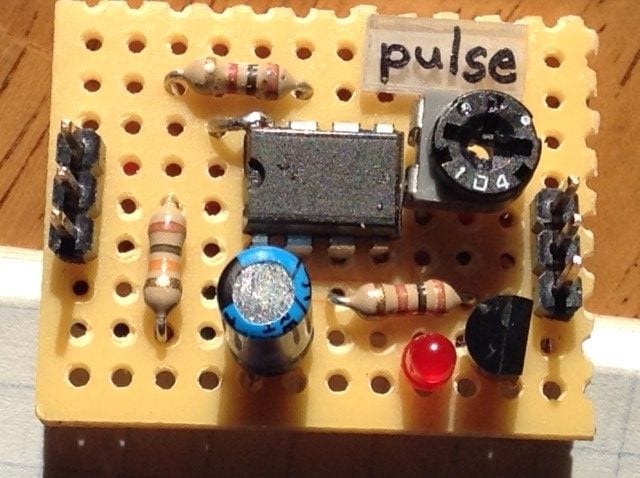
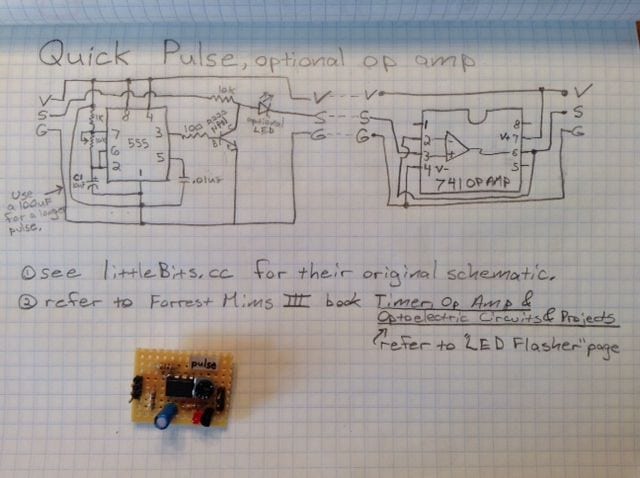
It is one of the more interesting modules to generate pulses or clock signals. It is made up of:
- 9 × 12 Perforated Printed Circuit Board
- 555 timer chip
- LM741 operational amplifier (optional)
- Capacitor 10uF, 0.01uF
- 100 ohm, 1K, 10K and 10K micro potentiometer resistors
- NPN bipolar transistor 2n2222
- LED
- 3-pin jumper and header
Switch module
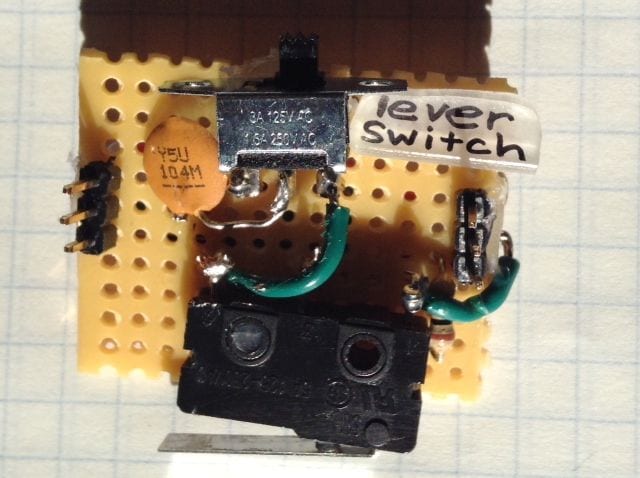
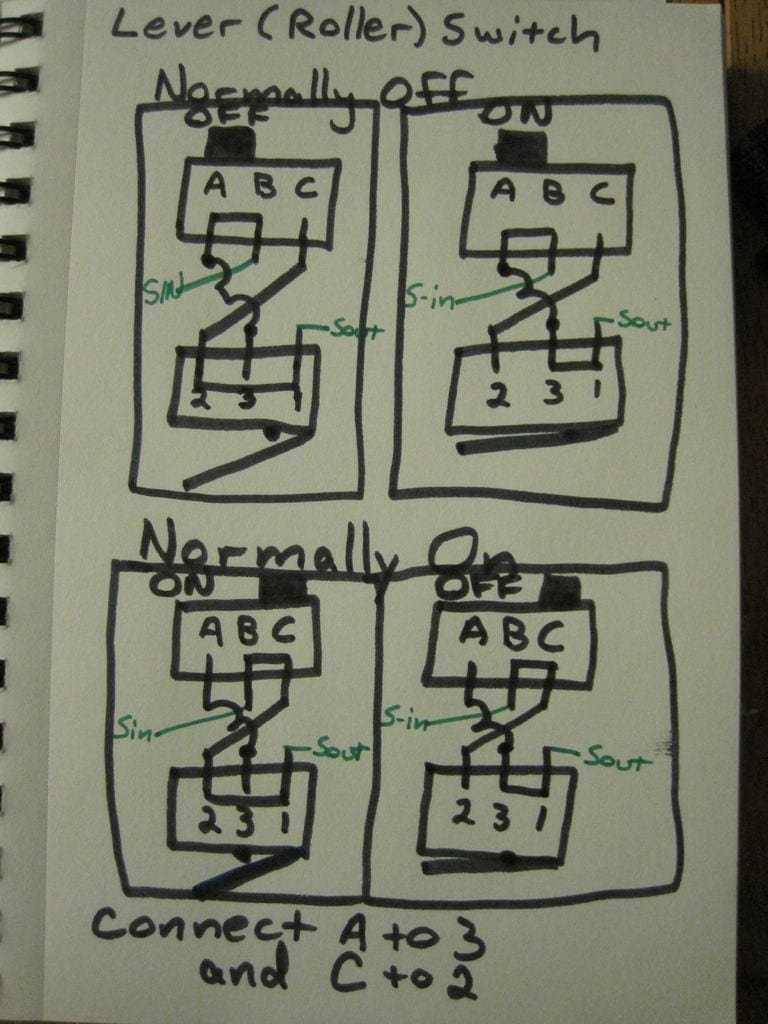
In this module you will need the following materials:
- 9 × 12 Perforated Circuit Board
- SPDT switch with 3/4 ″ lever
- 0.1uF ceramic or polyester capacitor
- Resistance 1M ohm
- 3-pin connection and jumper
Light activator module
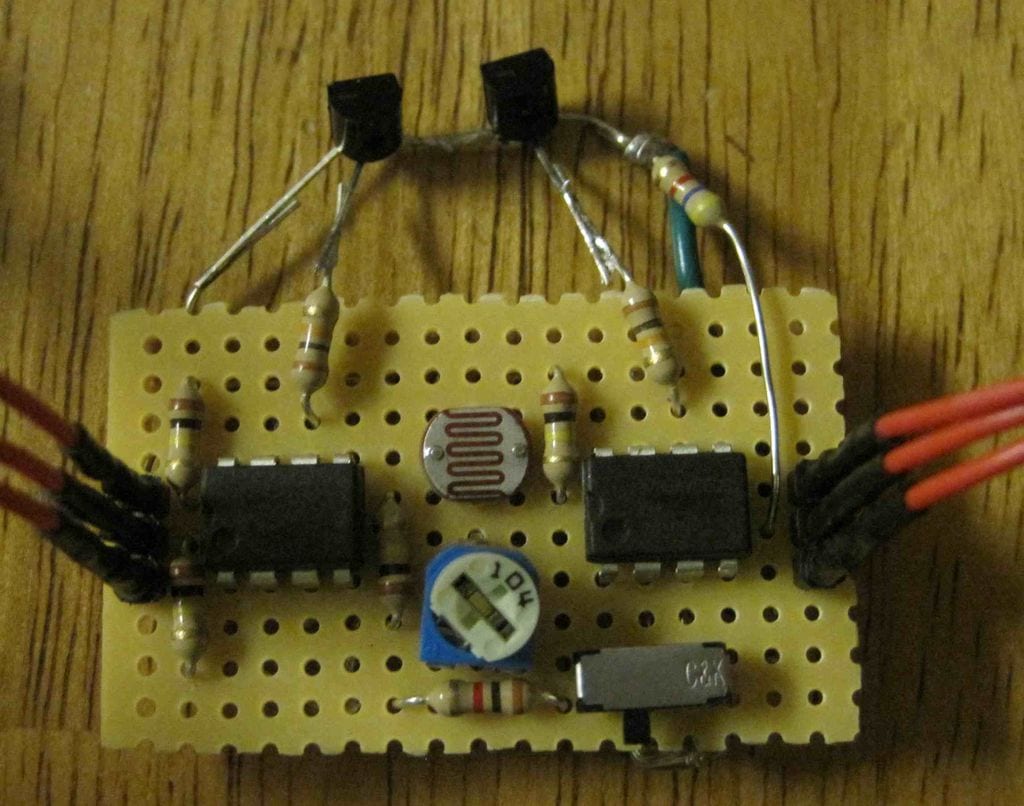
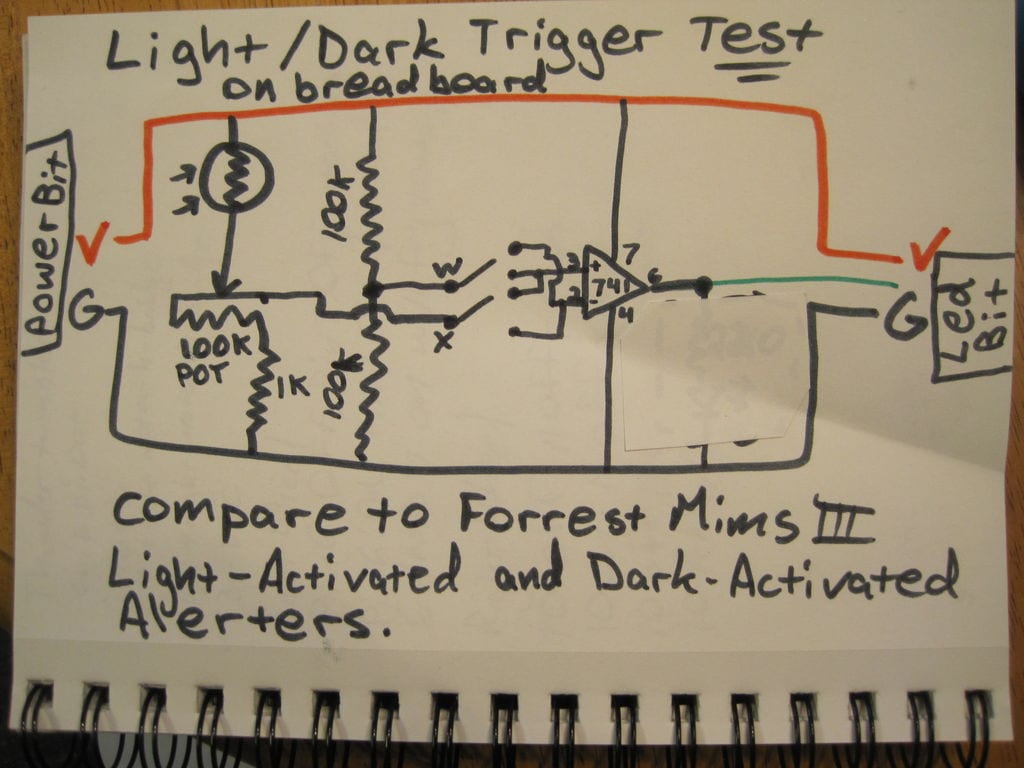
El last module it would be this one here (although you can add DC motors, ...), composed of:
- 9 × 17 Perforated Printed Circuit Board
- 2 LM741 operational amplifiers
- 0.01uF capacitor
- Resistors: 4x 100K, micro potentiometer 100K, and photoresistor
- AND gate, like the ones included in the 74LS08 chip, although you can use something different.
- DPDT switch or switch
- 3-pin jumper and header for it
By the way, a very good recommendation they give is to label the modules with a permanent marker or identification stickers so you know which one is. From there, you can use the jumpers and connectors to make your compositions ...
Source:
Instructables - DIY Little Bits