
For all those who like comics of this type of superheroes, or you are simply lovers of Norse mythology, in this tutorial we bring you the steps to build your own Thor's hammer. Although you may know him from Mjolnir. If you have free time and want to do DIY, you can create your own hammer with some "magical" characteristics that the use of hardware libre to be able to implement, for example, magnetic attraction.
The truth is that there are several ways to do it, also various materials to work with, and even various diagrams of the circuitry or hardware that we will implement to have different functions for our homemade hammer. You already know that DIY is free, that you can introduce your own modifications compared to what we show you here, and that the limit is your imagination ...
Ideas:
As I mentioned in the previous paragraph, there are many ways to do it, since you can customize your hammer of Thor to your liking. Here I will give you some ideas to modify it And then I'll show the steps to create a base prototype that you can build on:
Makings:
You can use various materials to create the hammer, depending on what you like to work with more or according to the tools and resources you have. The material is not a limitation, since you can do it with almost anything. Here are some proposals:
- Recycled materials: You can use wooden or plastic boxes with a suitable size for what the hammer head is going to be. It should be something hollow so that the circuitry can then be housed inside and camouflaged so that it cannot be seen. As for the handle, you can use a trimmed mop or broom stick, and even the mast of old tools (better something hollow or that you can easily hollow out to carry wiring inside). Also keep in mind that if the surface can be worked easily, much better. I am not only referring to painting, since there are materials to which paint does not adhere well, but also to whether they accept being carved, cut, etc.
- Wood: Wood is a cheap material and it can be worked very well, for example to create the angular profiles of the faces of the hammer head and even make the carvings that the original Thor's hammer has. It can be glued with glue or another type of glue that we can easily find in hardware stores. As for the handle, perhaps the wood is not the best, since a hollow wooden tube of these dimensions could be not very solid ...
- PolymersPlastic is also a cheap material and easy to work with. We can use a multitude of glues to join all the parts. Some even admit heat treatments to mold the parts. You can also use PVC tubes of the appropriate thickness to make the handle. Obviously, both wood, plastic and other materials, would need extra treatments such as paint, leather coatings, etc.
- 3D printing- If you have a 3D printer, it would be a very good idea to use the gray base plastic color for the hammer head and generate a faithful computer generated replica of the hammer and let the 3D printer do all the work. Keep in mind that the head should be removable to fit the electronics inside, so don't make it in one piece.
- Metal: If you have the opportunity to work with metal, although it is not the safest material, you could also do it. For example, with welded sheets to make the head, and devise a mechanism to leave a door to be able to enter and access the electronics in case of needing any adjustment or repair. The handle can be any metal tube ...
- Paper mache: It is not the most solid option of all, but it is one of the cheapest. You can use a box or brick as a mold and cover it with layers of layers of paper (eg: newspapers) and glue diluted in water. Layer by layer it will take on consistency until leaving a more or less hard structure. Remember that what you use as a mold then you will have to remove it from the inside, do not close it completely ... Also, one of the faces would have to be temporarily uncovered to insert the circuitry.
- mix: you can also use different types of material for each of the parts of the hammer ...
Circuitry:
As with the materials, we are also going to give you some ideas to create your electronic mechanism to customize the hammer:
- Magnetism: Creating magnetism can be very simple, you can build an electromagnet and insert it inside the hollow head of the hammer. Another idea is to insert neodymium magnets inside to generate this attraction in an even easier way, and let the circuit do other things explicitly.
- Make it only work for you: If you want, you can add a module for Arduino like a fingerprint reader so that it only works with your fingerprint, and thus make it only "obey" you as it happens with Thor's hammer in fiction.
- Sound: Maybe you think that you could use some sound as a sound effect when you move the hammer or when it hits a surface. Maybe record or extract certain sounds from the Thor movies and leave them recorded in a memory and reproduce them through a small speaker that we have inside the hammer. You can use sensors that detect when you move the hammer so that, through an Arduino sketch, they begin to emit.
- All combined ...
As base to create your prototype, you can continue reading in the following sections ...
and also quite a few versions of the hardware that we can implement so that it has different functions. You can go programming the Arduino board to add some more if you feel like it, such as sound for the effects using a motion sensor, adding a fingerprint sensor on the handle so that only we can "handle" it, and so on.
Build the structure of the Mjolnir or Thor's hammer:
Now let's the step-by-step guide to building what will be the casing and structure, that is, the exterior of our hammer. You can take it strictly step by step or use it simply as a guide to make your modification based on the ideas that we have proposed or your own:
Step 1 (research and materials):
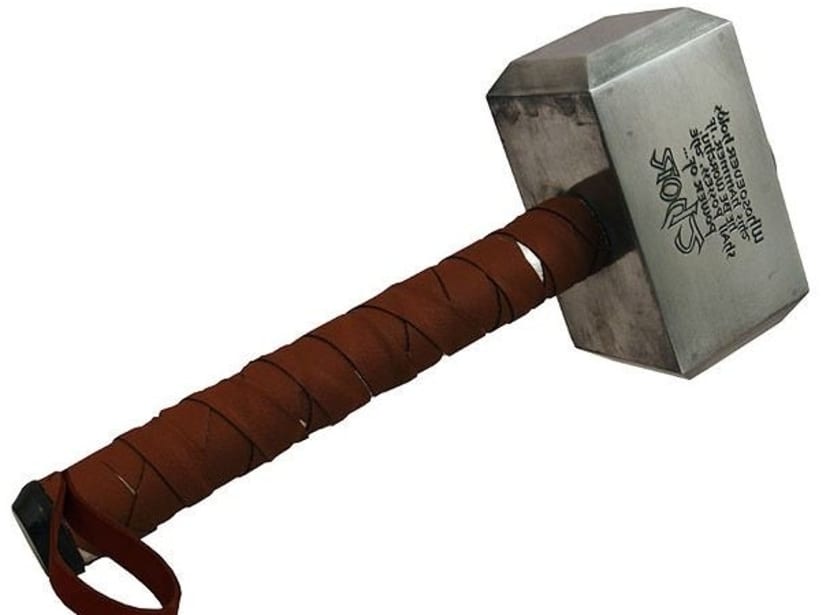
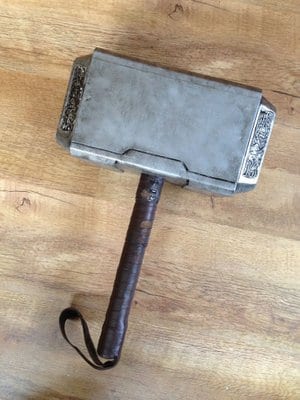
Search Google or other sources how is thor's hammer to have a reference of what you should build. Even if it is more comfortable for you, you can use this same image that we show you here. This gives you an idea of the materials and finishes you need to use.
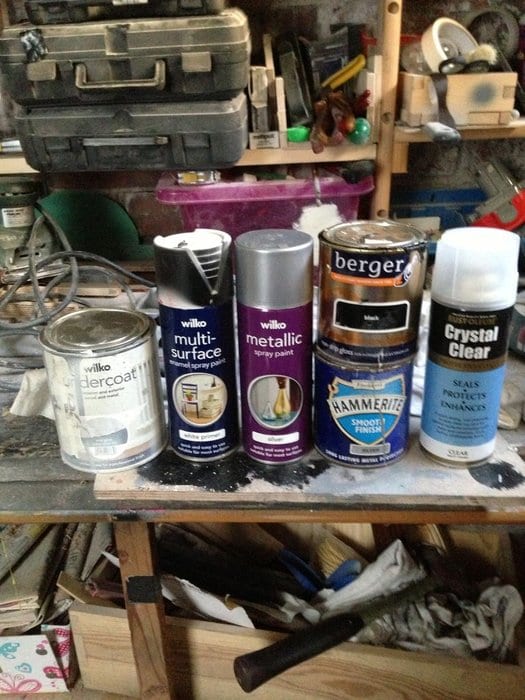
We must also prepare everything need:
- Wood
- Hollow metal tube
- Glues (wood, fabric, metal)
- Tools for cutting and carving wood (saw, sandpaper, clamps, drill, ...).
- Primer, metallic gray spray paint, bitumen
Step 2 (build the hammer head):
-

- 1
-
- 2
-
- 3
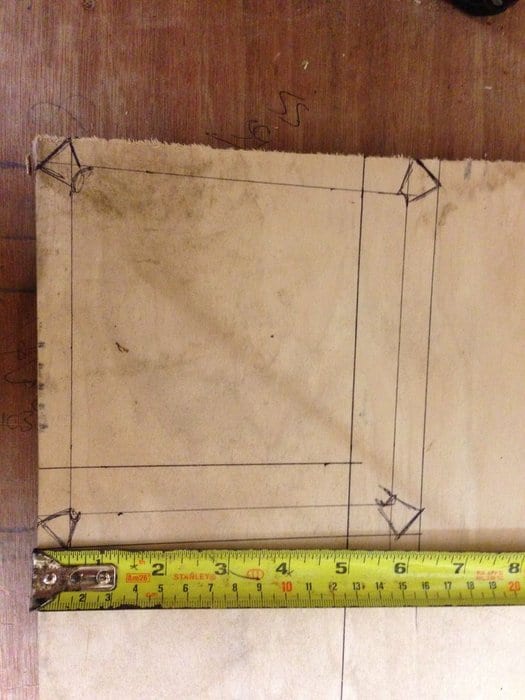
Once you have the reference, we get to work building the hammer head. For example, we have relied on the wooden model. For it:
- Get the wood planks. It should be a wood at least 1 cm thick so that it allows us to carry out the milling and different recesses.
- Measure, draw the lines and cut (image 1) the faces of the hammer head. The dimensions of the prism should be 15,25 × 15.25 × 23 cm, that is, 15.15 cm wide and 23 cm at its long end. Keep in mind that some parts will mount on top of each other when you glue it together, so you should leave the thickness of the wooden boards as extra when measuring the width to cut the pieces properly.
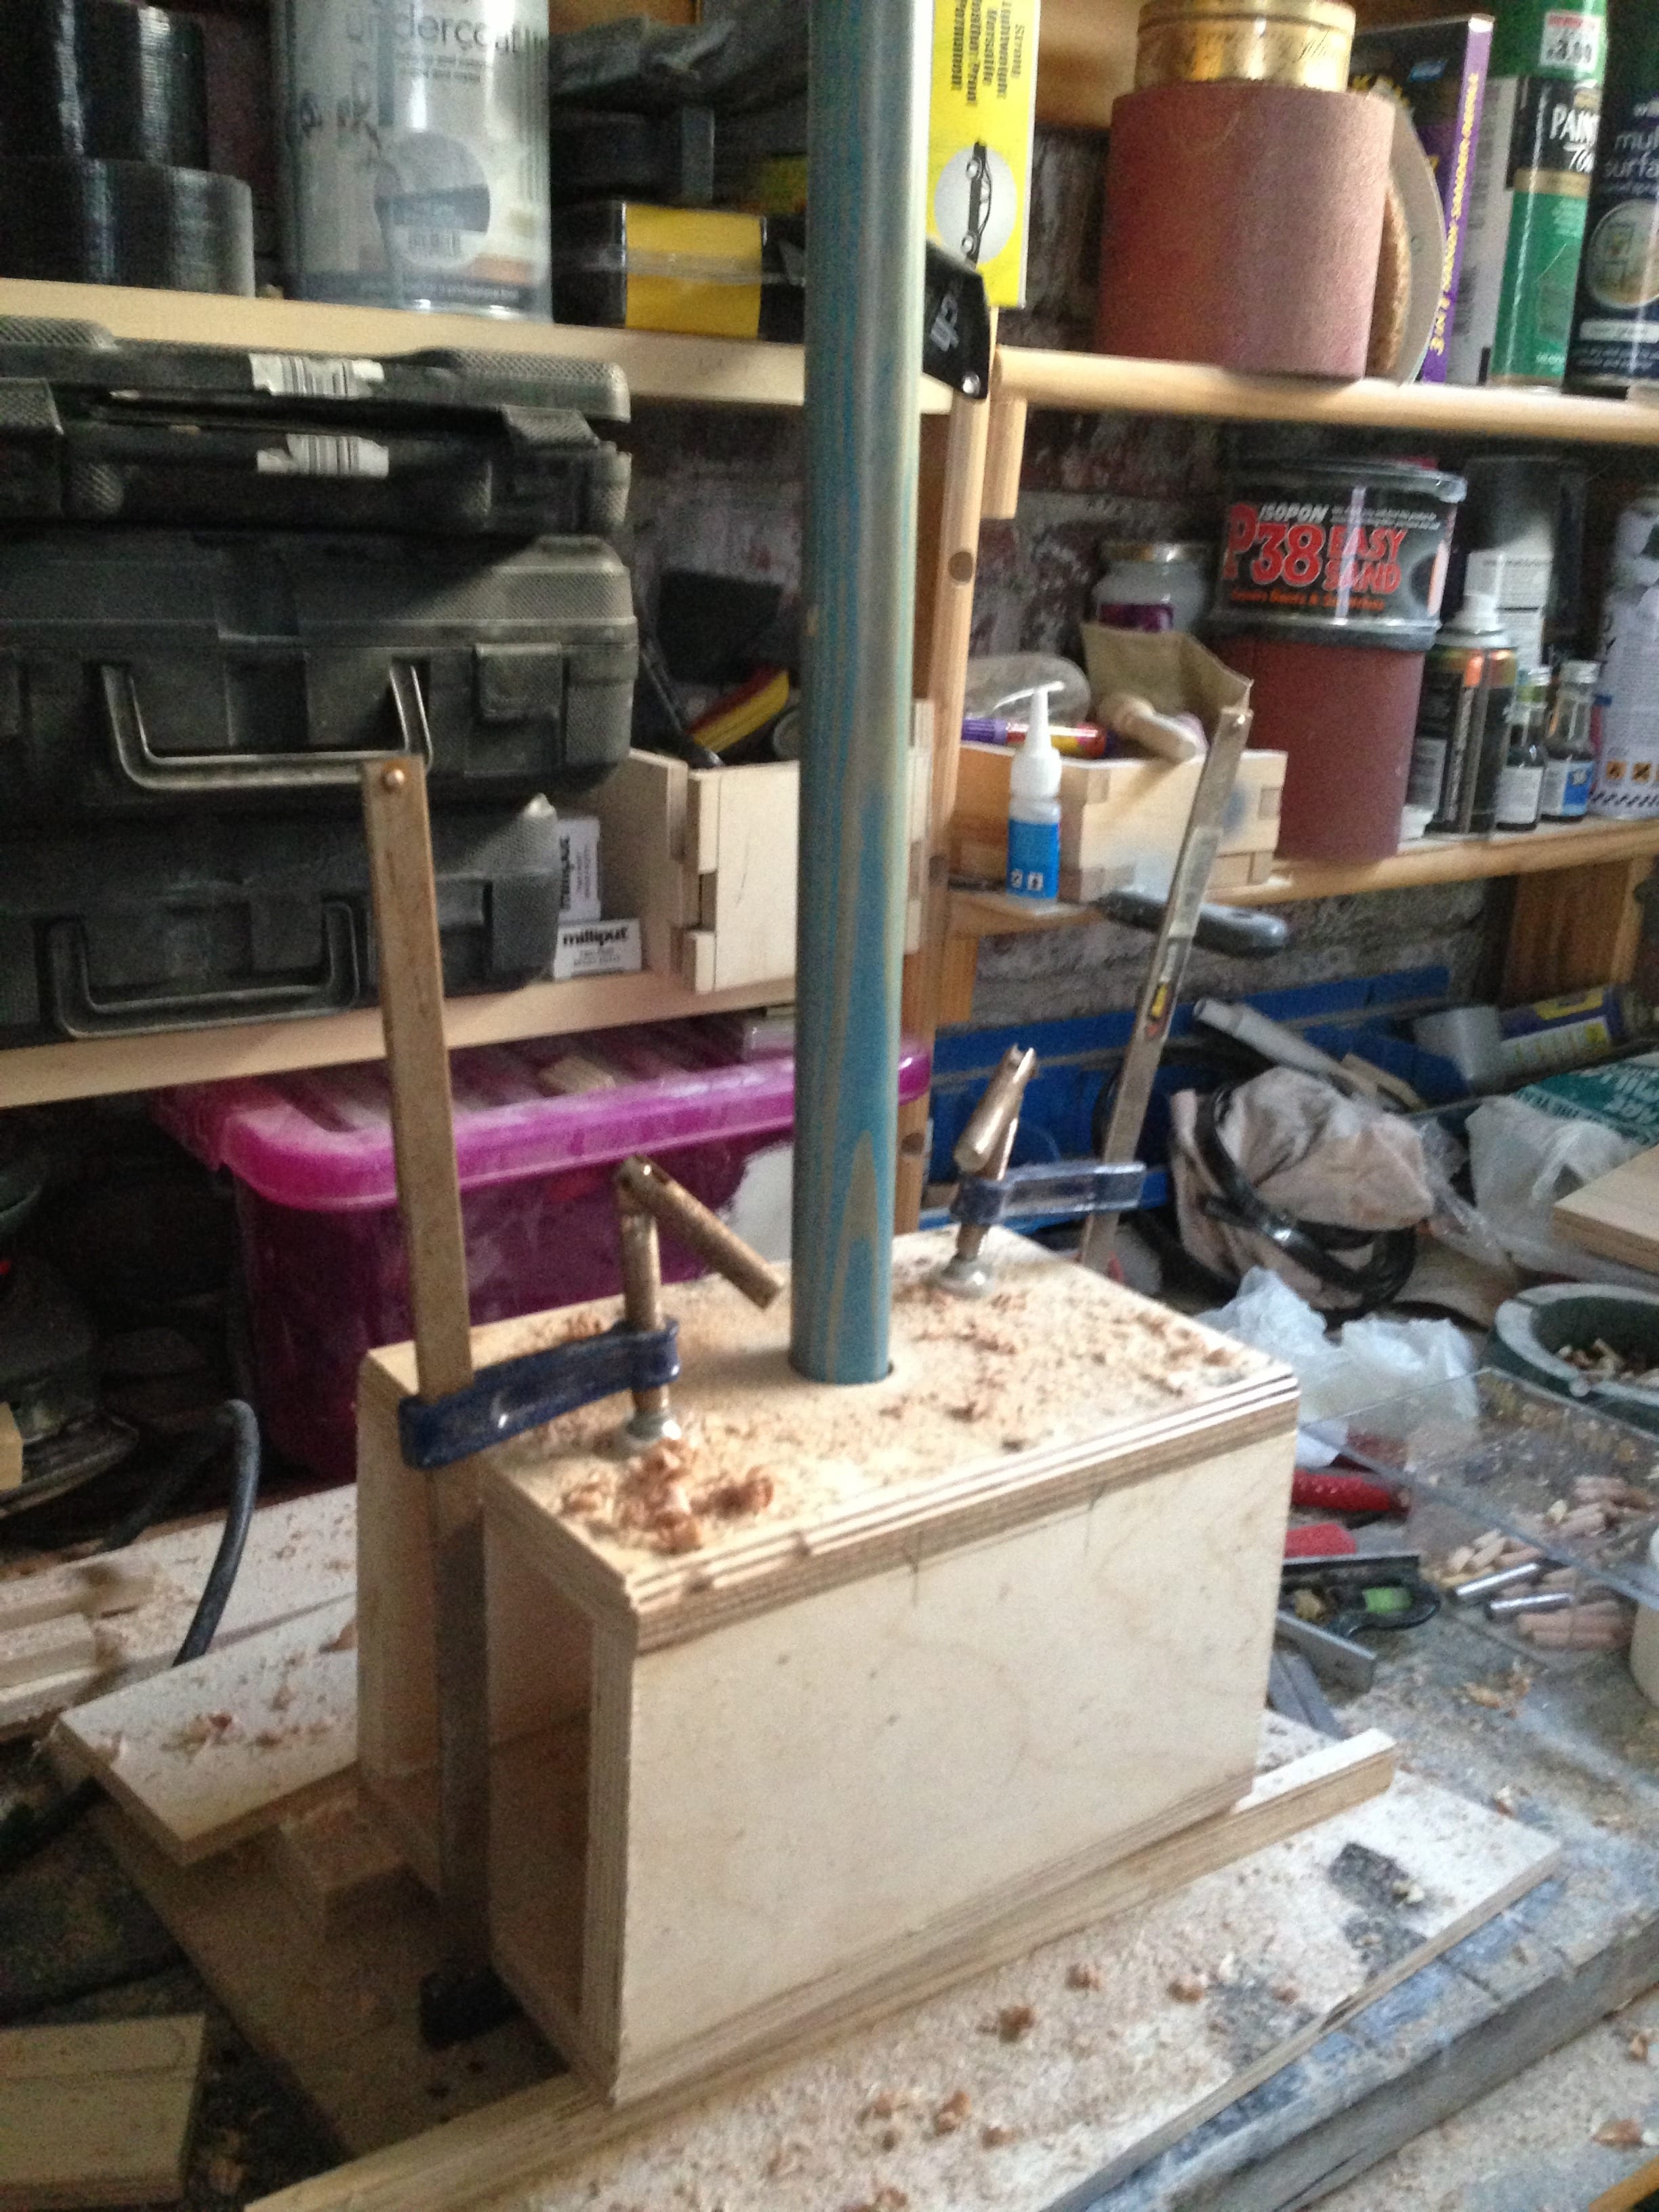
- Glue the four faces (image 2) with the dimensions mentioned above. You can use any special wood glue or glue. Put pressure on the parts while the glue dries or use clamps or clamps to keep it from moving.
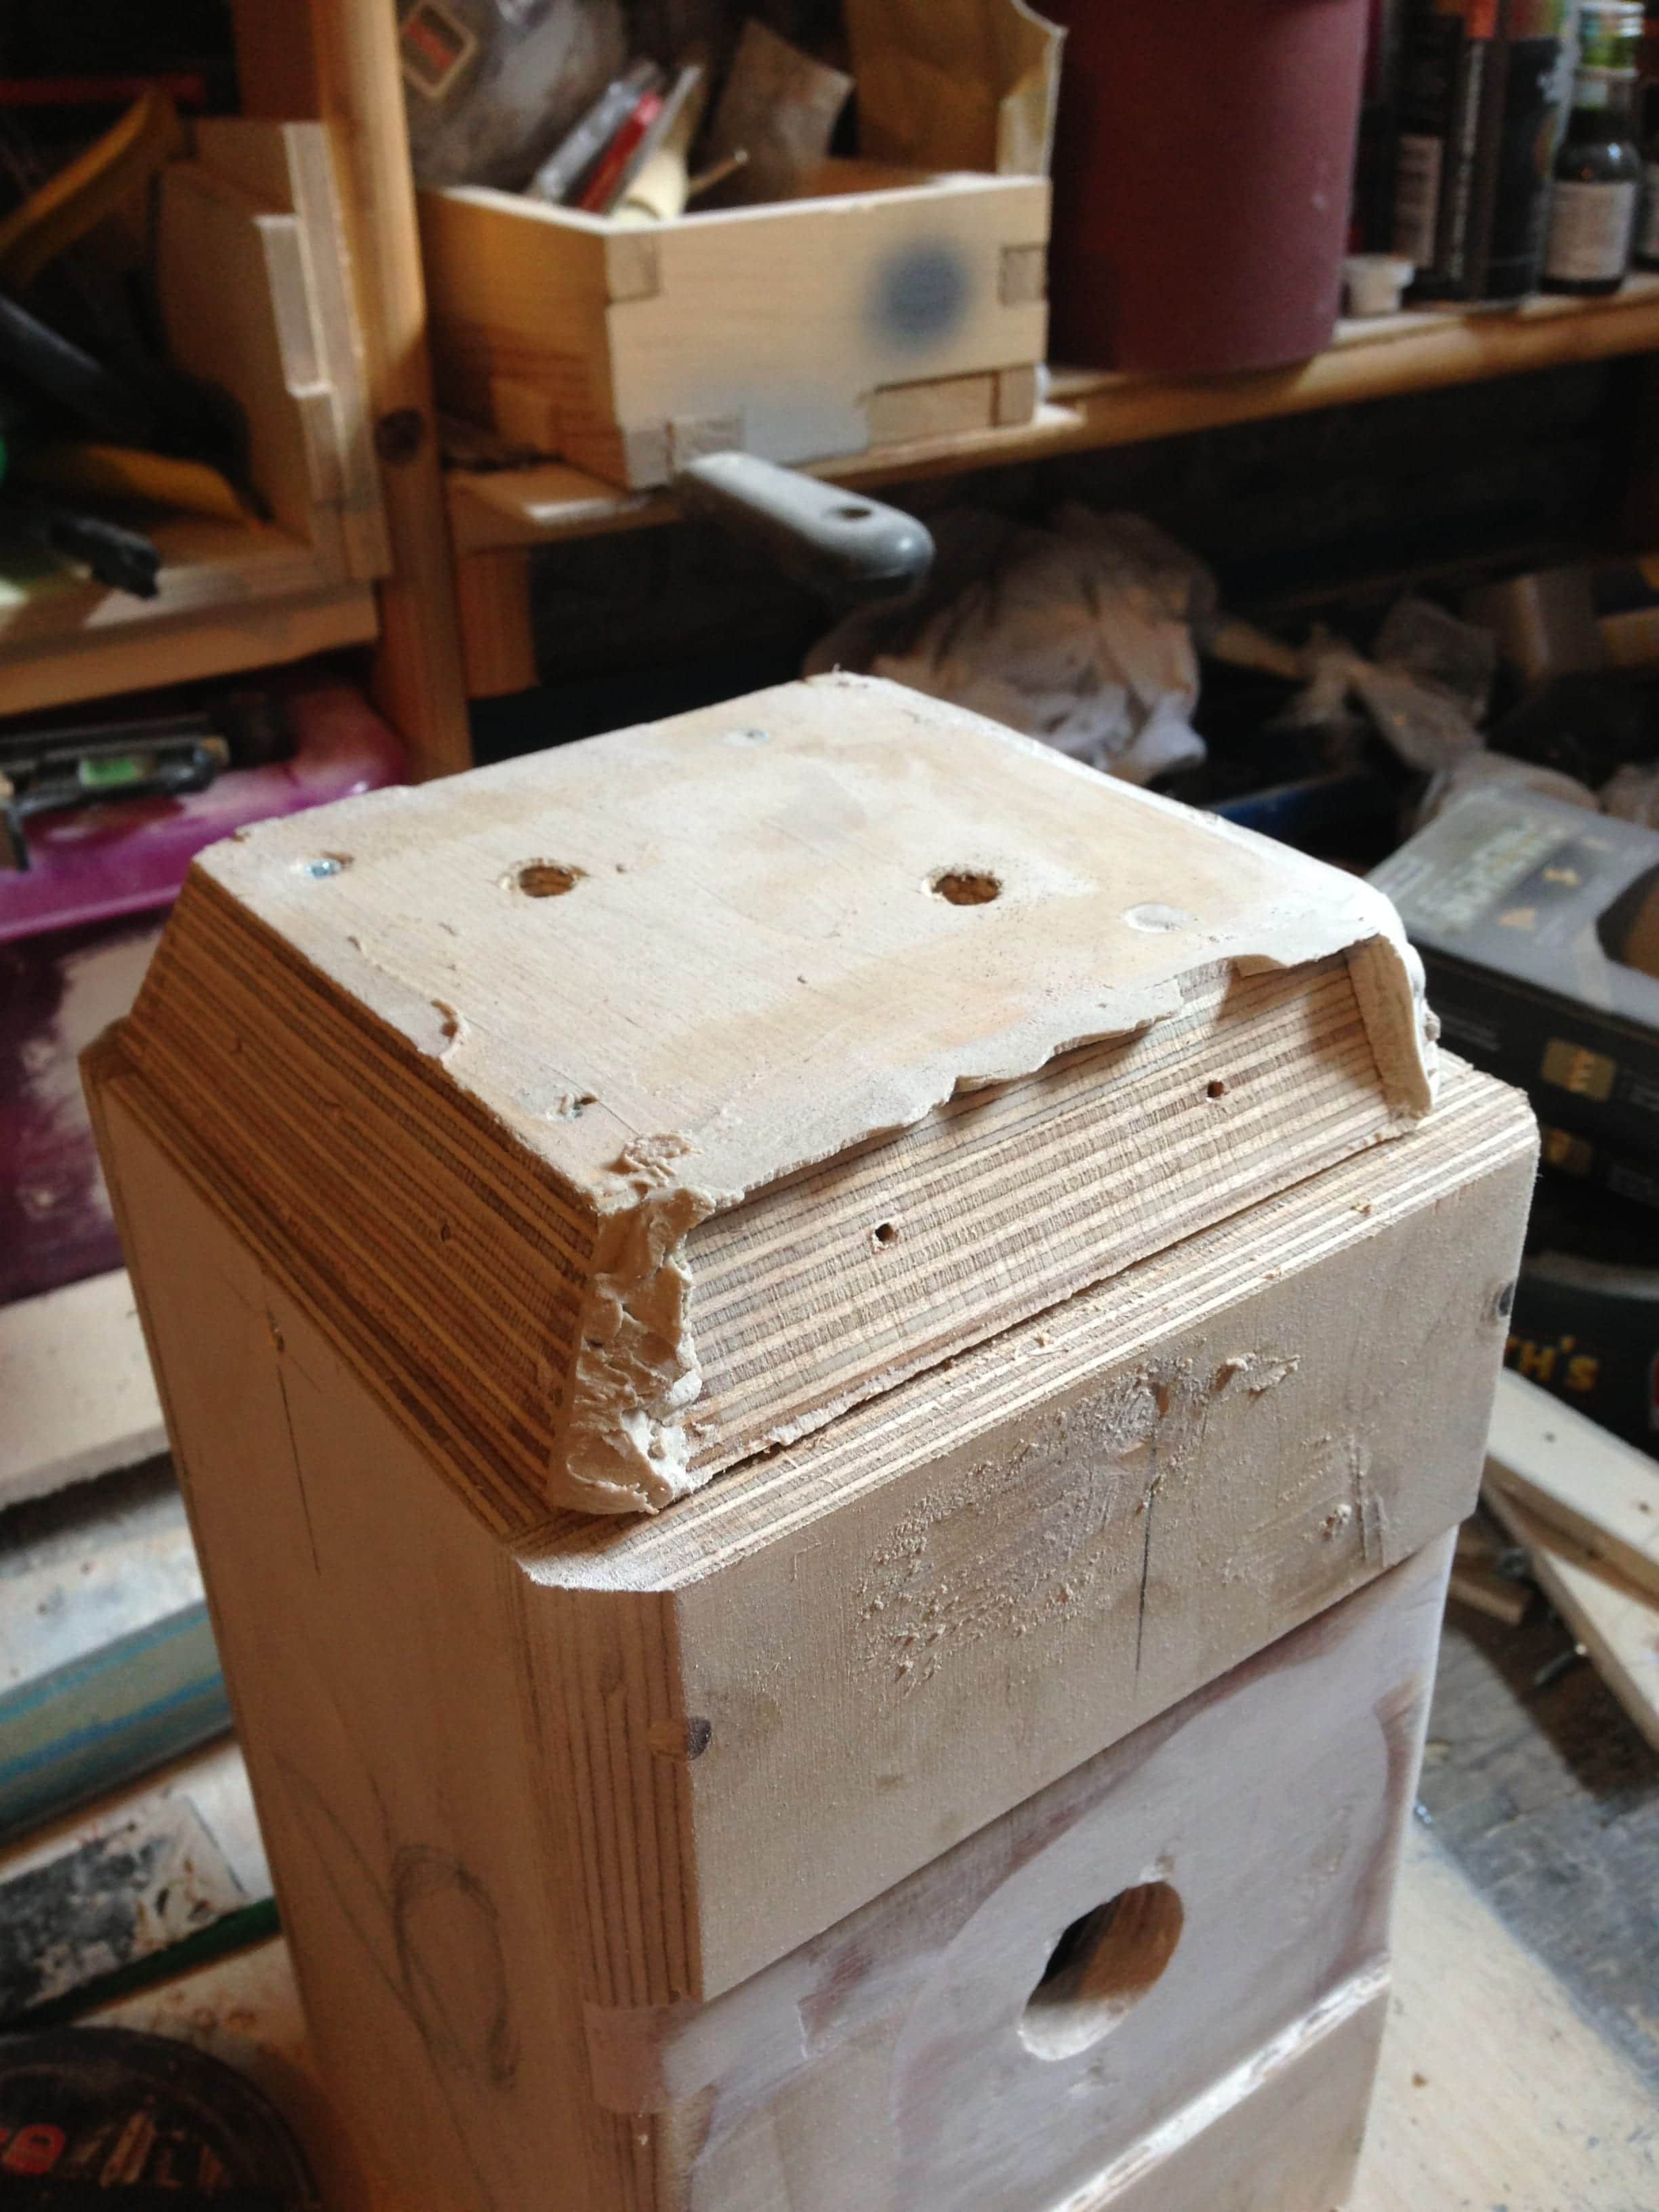
- As long as it hits, we can go making the two tapas for the hammer faces (image 3). To do this, we must make a pyramidal shape as seen in the images. Cut a square just wide enough to cover both sides of the hammer head being glued, then draw a pencil square 1 to 1.5 cm smaller in the center of that piece. We can use an inclined wood saw to cut the flanks with a little inclination (from the face where we have drawn the lines towards the other face of the piece reaching its outer edge) or use a wood bur and gradually wear the wood to generate said form.
- Now we can paste one of the faces with glue, but we must leave the other one still unglued to be able to insert the electronics inside.
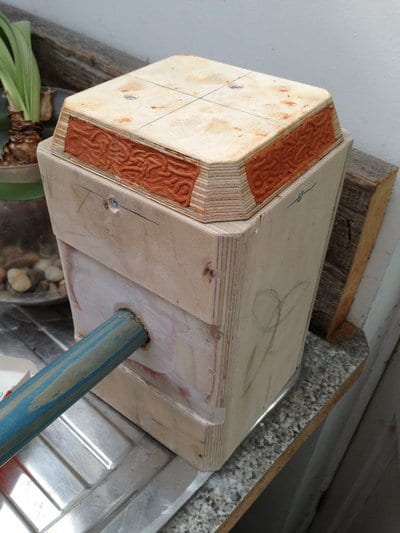
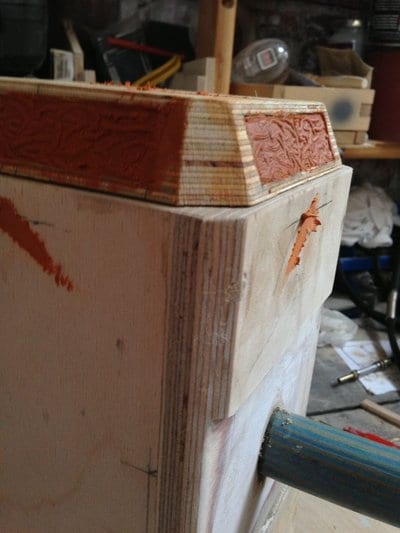
- Once the entire block is dry and we have respected the gluing time, we can make a small recess or grimace in the area where you will join the head with the hammer handle as shown in image 3, and right in its center drill the hole to insert the handle with a bit with the width of the handle that we are going to use (see Step 4 - Point 1). By the way, to make the undercut, you can use a wood brush or a sander to eat a bit of the wood in the center.
- With the same electric or manual sander, we can round peaks from each corner to leave a smoother shape as shown in the pictures.
Step 3 (details and engravings):
-
- 1
-
- 2
-
- 3
We now continue with the details of the hammer head:
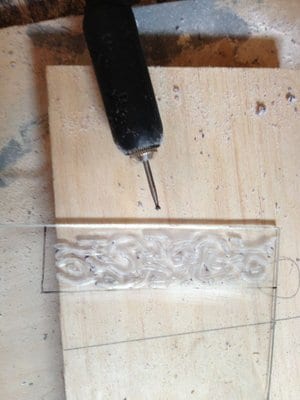
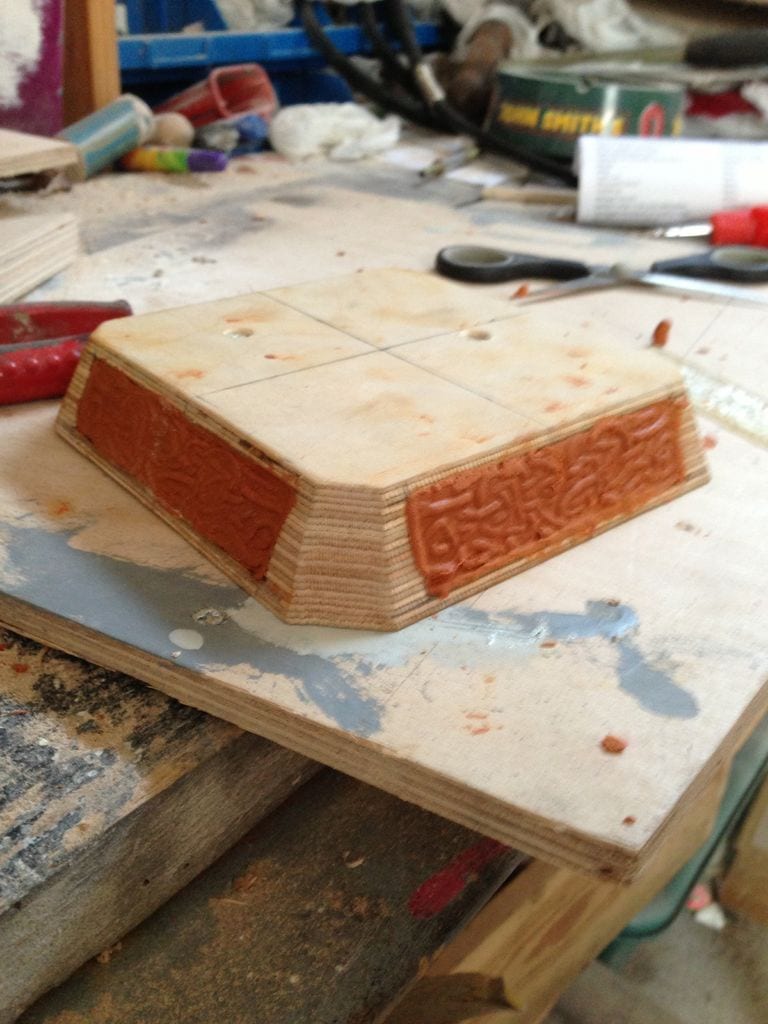
- We can decorate the hammer head (image 1) in many ways. One can be by carving by hand if you know how to treat the wood, with an awl. Another simpler way for those who are not so handy is to use hot glue or silicone to make some "scribbles" on a small plate of whatever material you have at your disposal. Said plate must have the same dimensions as the inclined flank that we made in point 6 of the previous section.
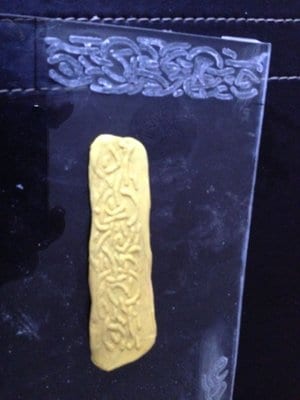
- That plate will serve as a mold (image 2) for our ornament. Then we can pour some polymer that hardens on it so that the marks remain on the piece. For example, we can use an all-fix bar, one of those that have two colors and we can knead to mix them and make it harden, after having pressed it against the mold so that the engraved marks remain.
- Once we have the ornament, you can cut the leftovers to make it square. And finally we stick it with some glue to the flantos (image 3).
Step 4 (put the mast):

To put the handle or neck hammer:
- Use a metallic tube, such as the typical hollow tubes for hangers or curtains that you can find in any DIY surface.
- Insert the tube in the hole you previously made in the hammer head. Previously, you should have smeared some resistant glue on the edges of the hole so that the wood and metal join well. Wait for the glue to dry and it will be done.
By the way, the hole is only made on one side of the head, it should not go through, since if it enters the head, it will make it difficult to insert the electronics and will not leave space.
Step 5 (finishing):
-
- 1
-
- 2
-
- 3
-
- 4
-
- 5
-
- 6
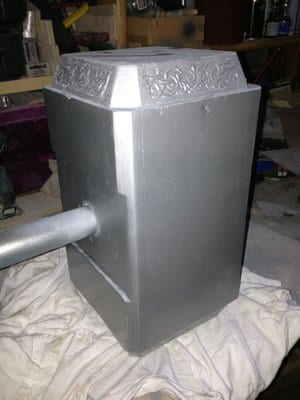
The next step is paint our hammer and put the skin layer for the mango:
- First you must Sanding wood to remove any chips or blemishes and leave the surface smooth for applying paint. Do it with a very fine grit sandpaper. Wipe the entire surface with a damp cloth to remove dust.
- Apply a base or primer so that the paint can adhere in a better way and prepare the surface so that it is not so porous and the finish is of a higher quality.
- Then, once it has dried, we begin to paint the entire surface of the head. It is best to use metallic spray paint, pistol or airbrush, since with a brush you can notice the brushstrokes in the finish.
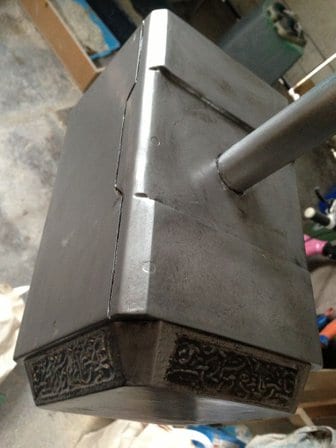
- Once the paint has dried well, we can make different finishes to give it more realism. For example, use bitumen all over the surface and then remove it with a cotton cloth before it dries. That will cause the bitumen to embed into the recesses of the surface, like the etching we did earlier and give the feel of old metal. Another idea that I give you is to use gold paint to make some reflections on the gray surface. You can do it by slightly wetting the tip of a brush and giving it a few strokes brushing the surface. There are also other finishes like rust, etc., that you could use.
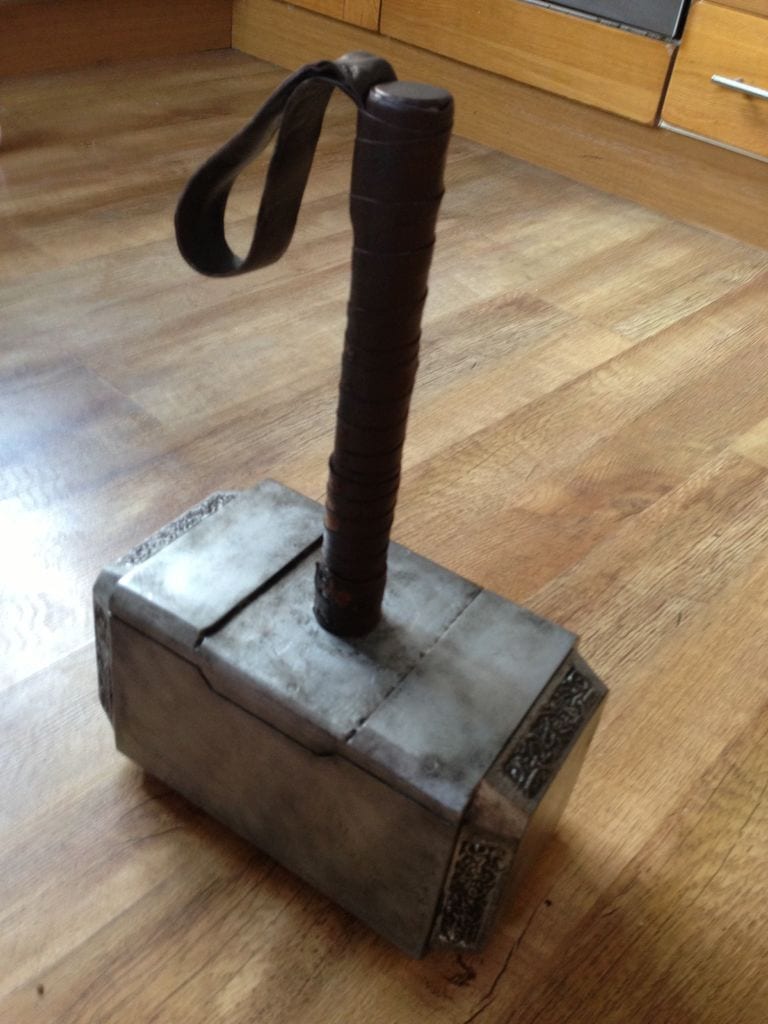
- Finally, we are going to use an imitation leather fabric or brown faux fur to cut a long strip about 2 cm wide and roll it over the entire surface of the handle. Use a special fabric glue on one side of the fabric so that it sticks well. You can use a cutout of this same fabric to stick it on the tip in the shape of a handle ...
Create the internal circuitry:
We have already finished our hammer of Thor, or rather, our replica. There are many people who already leave it like that, but if you want some electronic DIY, and since we are a hardware blog, we must start create the circuitry. But first, you must gather these materials:
- Arduino Pro Mini 5v and FTDI cable to program the board.
- Fingerprint scanner Sparkfun. JST connector is also required
- Touch fingerprint sensor capacitive type TTP223. Adafruit also has alternatives.
- Optocoupler 4N35, along with a 1K resistor.
- Battery 3.7v 150mAh lithium battery to power the capacitive sensor. Or you can avoid it if you don't connect the handle to the Arduino ground.
- 4 battery holders AA, and of course 4 12v 1.2Ah SLA batteries.
- Solid state relay Crydom CMX60D10 60v 10A.
- diodes 1n400x, such as 1n4002, 1n4007, etc. Any one of them is worth it.
- Homemade electromagnet. It can be easily built with a metal core and a coil of copper wire or buy it ...
Now that we know the parts, let's see how to connect them all to create our circuit, and for that, what better than a diagram:
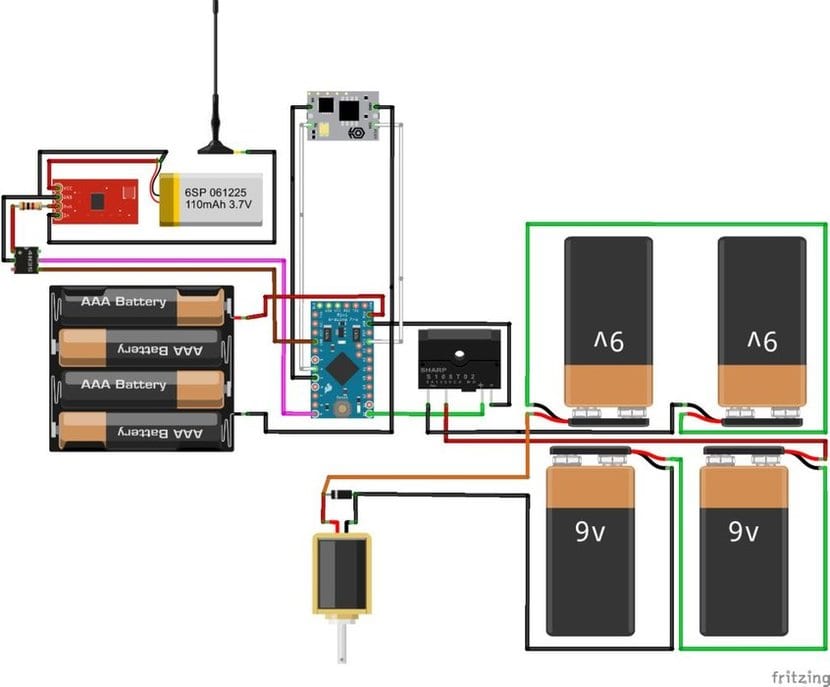
In the Fritzing program there are not all types of components that will be used for the project, therefore, some of the components that appear are representing others. I recommend that you install Fritzing and go looking for all the components that appear in the diagram to better clarify how they are connected. Anyway I would like to make you these clarifications:
- Notice that we have some AAA batteries that are representing where the 12v battery that we are going to use.
- The antenna that appears above in the diagram, is not really an antenna, it is representing the metal hand tube of the hammer where we will have to connect one of the cables.
- What appears as a Flash memory module for Arduino, is actually the fingerprint scanner.
- The solenoid at the bottom of the diagram, with the resistor tapping its terminals, is really the electromagnet.
- We also see the small solid state relay, even if it is for AC instead of DC, but you know that it is only to be able to represent it with the parts that we have in Fritzing ...
- There is a small Op-Amp on the left that actually represents the capacitive sensor fingerprints and that we will have to take out of the handle, in an accessible place to be able to put our fingerprint.
- Actually, there is also a wire connecting the ground of the capacitive sensor to the metal heart or core of the electromagnet. That does not appear in the diagram, but remember that you must. That provides the dirt road when the hammer.
- Remember that if you do not connect the ground control (GND), you can avoid using the power of the capacitive sensor and the optocomputer, and save yourself that.
- You can also add interruptions between the power supply and the arduino board in case you want to turn off the circuit and it is not always connected ...
As for the sketch that we must record in Arduino to program our circuit, it will be (don't forget the FPS library):
You can download the code from here. And so you won't have to type everything ...
/*
Proyecto Martilo de Thor
*/

#include "FPS_GT511C3.h"
#include "SoftwareSerial.h"

FPS_GT511C3 fps(4, 5);

int touch = 0;
int capPin = 9;
int flag = 0;

void setup() {
Serial.begin(9600);
// fps.UseSerialDebug = true; // so you can see the messages in the serial debug screen
fps.Open();
pinMode(10, OUTPUT);
digitalWrite(10, LOW);
pinMode(capPin, INPUT_PULLUP);
}

void loop() {
touch = digitalRead(capPin);
//Serial.println(touch);
if ((touch == 0) && flag == 0) {
digitalWrite(10, HIGH);
fps.SetLED(true);
if (fps.IsPressFinger()) {
fps.CaptureFinger(false);
int id = fps.Identify1_N();
if (id<200) { //Don't care which fingerprint matches, just as long as there is a match
digitalWrite(10, LOW);
fps.SetLED(false);
flag = 1;
}
}

}
else {
fps.SetLED(false);
digitalWrite(10, LOW);
}
if ((touch == 1) && flag == 1) { //Reset the flag after the hammer has been lifted to return to normal behavior
flag = 0;
}
}
Once you have assembled your circuit, you must manage to introduce all this inside the hollow head of wood that we prepare in previous steps. Close the other cover of the face that we did not close at the beginning and it will be ready. To enjoy!
Sources:
Instructables - Mjolnir (Thor's Hammer)
Instructables - Thor's Hammer - Mjölnir
Instructables - Electromagnetic Mjolnir (From Thor's Hammer Prank)