One of the first projects that a user who is starting in the world of electronics learns is working with lights and especially with LEDs. The learning curve of this element is very easy and in a matter of minutes we can achieve great things like smart lamps, light signals or verification elements of a larger project.
However, lately, users are learning how to use RGB LEDs, a variation that has become very popular and very useful for many projects. But What is it? What are the most popular projects that we can create with the new RGB Led diodes?
What is RGB Led?
An LED is a light emitting diode. An inexpensive and easy to use device with any electronic board even without it. Its main functions are the low energy it consumes and the various formats that we find with LEDs. Thus, unlike the traditional bulbs that illuminate us, LEDs allow us to use them in different devices and even create other shapes that are far from the traditional bulb shape. The useful hours of LEDs are also much higher than other devices. Thus, as a light bulb, a diode of this type offers more hours of light than a traditional light bulb; As part of a screen, LED pixels offer more life than a normal pixel; And so with the different devices that use technology.

But in this case we are going to talk about RGB lights, increasingly popular lights. The reason for this success is due to the possibilities they offer above normal lights. An LED diode offers only one color of light, something that we cannot change to the device unless we change the diode. An RGB Led diode emits light in three colors: Red (Red), Green (Green) and Blue (Blue) and their combinationsIn other words, it can change color to our liking without having to change the diode. The success of RGB LED lights lies in the possibility of changing the color of the light without changing the diode, something very practical for which only programming knowledge is needed.
Infinite Led RGB Cube
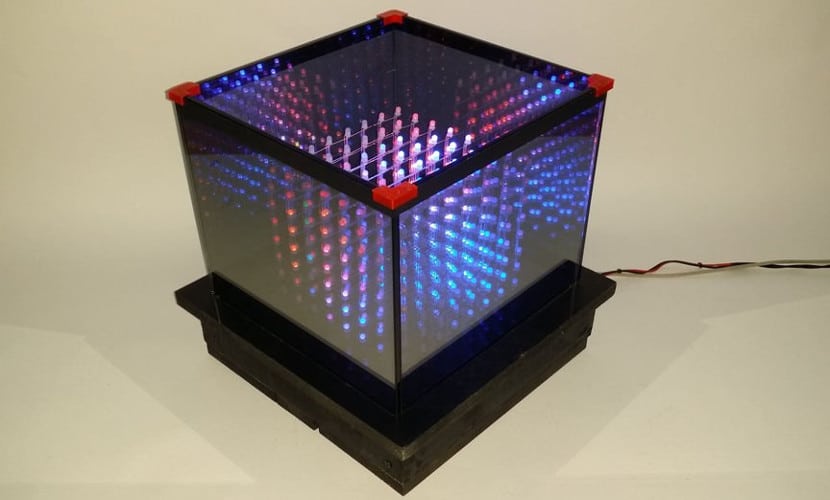
This project consists of creating a cube of colors that can change according to the time we have or simply every few seconds. Infinite Led RGB Cube is a light cube, which can work as a diode lamp. The end result will be the combination of the rgb led diode and Arduino.
For its construction you need 512 RGB Led diodes, 6 crystals, a microcontroller that may well be Arduino UNO, a cable or battery to power the diodes and a base that supports the entire structure. Once we have this, we have to unite all the diodes so that they create a cube or have a cube shape. The secret to building this structure is to bend one pin of the diode perpendicular to the diode, creating a right angle with the other pin. There will be one side of the cube that does not have any connection to each other, but they will all be attached to one RGB led diode.
Once we have all the structure created, we have to join the pins that remain to the microcontroller board. At this point, we must point out that the side of this cube must have 8 x 8 diodes, creating a cube of 8 x 8 x 8 RGB LEDs. Thus, we join the pins of the diodes that are loose from the cube to the board and we introduce a program that turns on the diode cube progressively and with various colors. Once everything is assembled, we have to use the crystals to create a kind of urn that protects and covers the diodes, the base will support not only the diode cube but also the urn that we have created. The construction of this Infinity Led RGB Cube is very easy but easier is its customization. Still, in Instructables You will find a step-by-step guide to its construction.
Easy LED RGB Sign
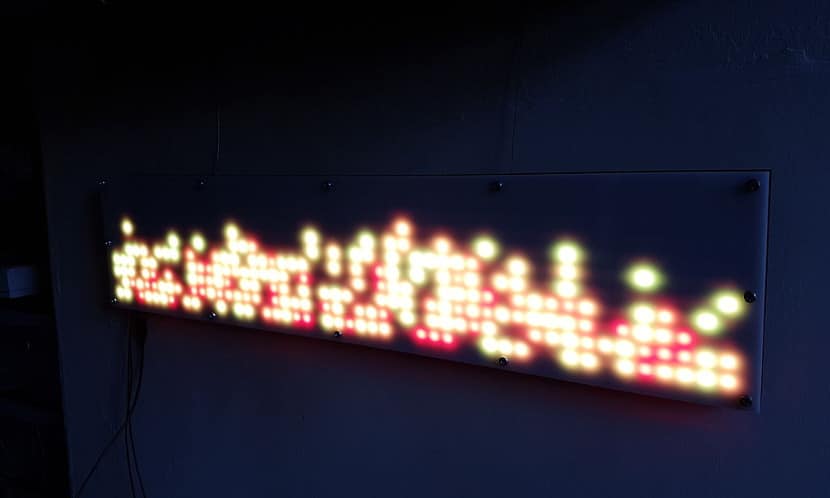
This project is better known and more useful but also more difficult to build than the previous project. Easy LED RGB Sign is an informational sign built with diodes and Arduino. This project needs 510 RGB LEDs or we can change this for strips of the same type. The idea is to build a rectangle of 10 x 51 LEDs. We will also need 3 acrylic sheets that will serve as a support and protector for the Easy LED RGB Sign that we create. 510 RGB LED diodes, cables to do the wiring, a microcontroller board such as Arduino UNO and a battery to power the diode and also the Arduino board.
First we have to create the structure and place the diodes on it. We can do as we want but a good trick is to use one of those acrylic sheets as a support for LED lights, as it is transparent, it will not be appreciated in the final result. With a thin cable we have to add the diodes and connect them to the microcontroller. Once everything is attached, we connect the microcontroller to the battery and in it we introduce the program we want. The program will perform the following function:
- Turn on certain LEDs.
- Each of these diodes will have a certain color.
The result will be the creation of letters, symbols or signals that we can use in certain situations. Easy LED RGB Sign is a very interesting project since it is very useful, since it allows us to create the illuminated signs that we want. We have more information about its construction at the Instructables repository. But it is not a closed project and We can vary the number of diodes or directly change the program that executes the light of the diodes so that it works differently. The power increases when we combine this RGB LED sign and Arduino, being able to create smart signs or with connection to computers like professional signs.
Led RGB Pixel Touch Table
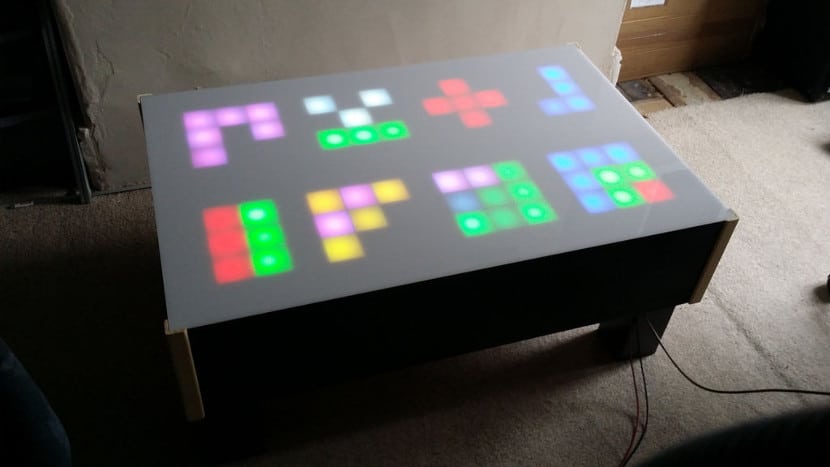
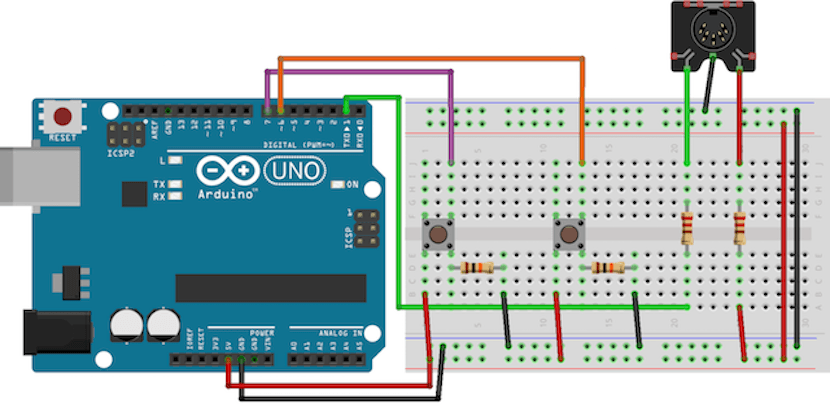
Led RGB Pixel Touch Table is a fun project that turns diodes into a simple gaming table. This project is more difficult than previous projects but its construction is very simple. In this case we will combine something more than RGB and Arduino LEDs, since we will also use touch sensors or IR sensors. For this we will need the following materials:
- Table with transparent surface.
- A matrix of 10 x 16 RGB LEDs.
- An array of 10 x 16 IR touch sensors.
- An SD or MicroSD card to store data.
- Bluetooth module.
- Arduino board.
- A smart speaker with bluetooth connection.
In this case we have to create nodes or "keys" that form the junction of the touch sensor and the diode and that will be the controls that we will press when playing with our table. In such a way that each node can emit information if we touch the panel and it can emit a light. A) Yes, We can play with this table tetris, visual memory games, the classic snake, ping-pong or create a simple counter. In total we will have 160 nodes that we can place in the form of a 10 x 16 matrix.
We will place this matrix under the glass of the table. The glass of the table must be replaced by a softer surface such as acrylic plastic. This is done in order that the sensor works when we press it.
Now, assembled everything, we have to create the program that works and executes with this matrix. We can use games like tetris or simply the classic game of "Simon". We insert it into the microcontroller board and we connect it to the matrix. We can add sound to this project thanks to a bluetooth speaker that we can connect to the bluetooth sensor that has the microcontroller board.
Esto is a summary of the Led RGB Pixel Touch Table project but its guide is not as simple as it seems. The creation of the nodes requires a scheme and creation of small nodes, with the game software the same thing happens. Here we just wanted to talk about the main ideas and what can result. But you have the complete guide to its construction in this link.
What project is worth building?
We have talked about three projects with RGB LEDs that are easy to build and inexpensive. Although many of you have seen that we use large quantities of diodes, we have to say that the price of these new ones is very low, so low that such a quantity of diodes only costs a couple of euros. All projects have their peculiarities and their appeal. Personally I recommend doing all the projects. First he would build the cube of lights; later he would build the illuminated sign and finally he would build the game table. The order of completion is important as we go from a simple project to a more difficult project. In any case, after the construction of these three projects the result will be the same: we will master the use of these diodes. And to you What project do you like the most?