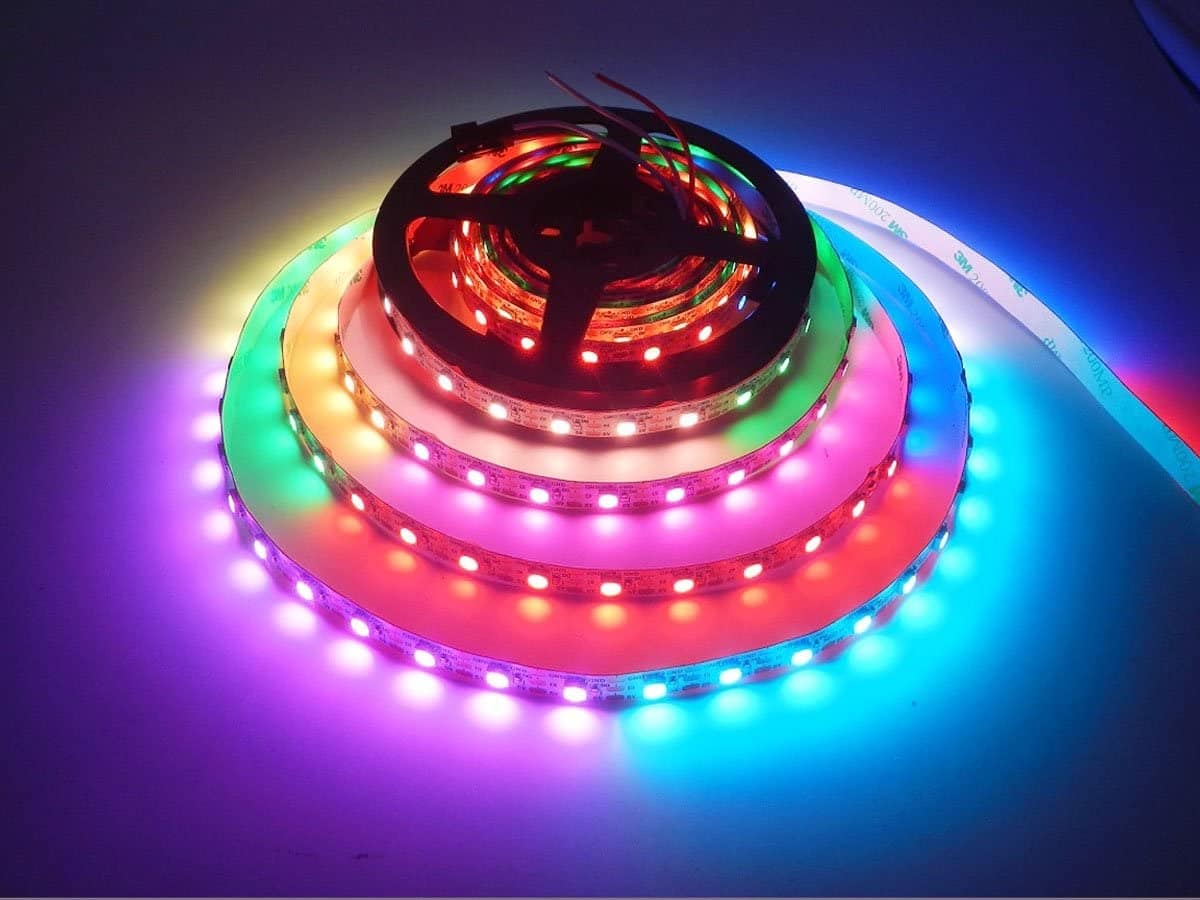
Surely you need to add a touch of color to your DIY projects. For this, many makers use the famous WS2812B RGB LED Strips, with which to achieve a varied color control and quite attractive lighting effects for your projects. Of course they are strips fully compatible with the Arduino boards, so you will not have any problem when trying to integrate them.
You can find them in lengths of 1 meter, for example, although they can vary depending on the type of density of LEDs for each meter they have. For example, there are from 30 LEDs to 144 LEDs. However, if you need longer lengths to obtain a larger surface, you also have other options on the market such as RGB LED panels or you can always use several strips ...
These strips are nothing more than a series of assembled RGB LEDs and mounted on a common support to group them into strips. But its operation is identical to the separate RGB LEDs.
What is WS2812B?
Actually the WS2812B is not the strip itself, but each one of the cells or small RGB LED plates that include. They can be grouped in the form of a strip or a panel, so you can make various configurations in terms of their number and shape. The strips that make up are flexible strips, but you can also find WS2812B on PCB panels that are not.
If you want, you can find the devices WS2812B separately to create the shapes you need yourself. For example, about 100 units of them usually cost slightly more than € 10.
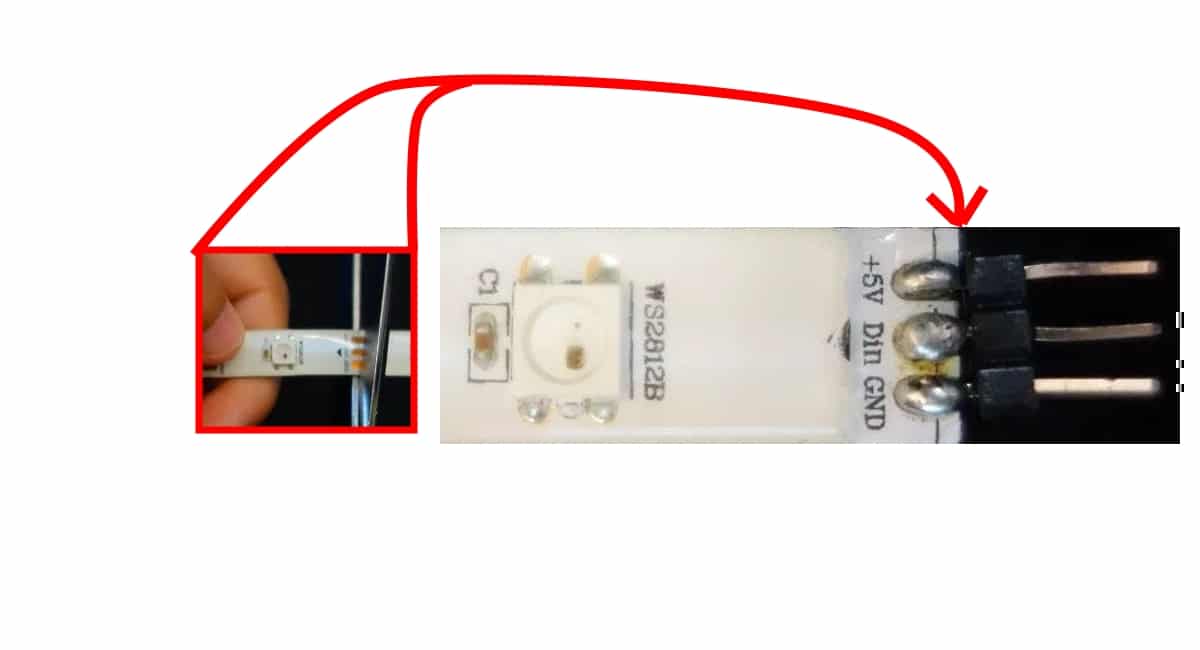
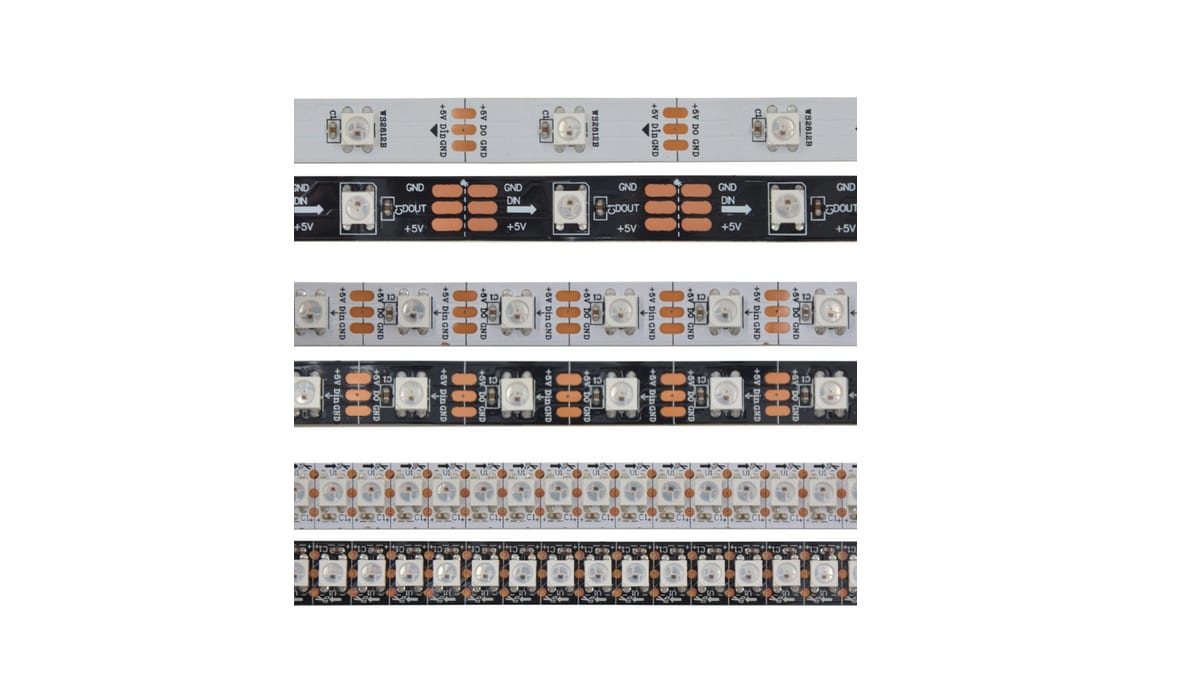
You should also know that you throw them you can cut them with a scissors wherever you need, that does not imply that they stop working. So you can have only the RGB LEDs you need. In fact, it has some markings (three copper pads) that you can cut through. If you cut through these pads you will have three tracks on one side of the strip and on the other in case you want to reuse the other pieces, you can solder the pins to them for easy connection.
Pinout and datasheet
It is an independent WS2812B cell with its inputs and outputs
For more information about your RGB LED strip WS2812B You can read the datasheet offered by each manufacturer, there you can consult all the details of dimensions and technical characteristics to know how to use them properly, in addition to knowing all the operating ranges and limits.
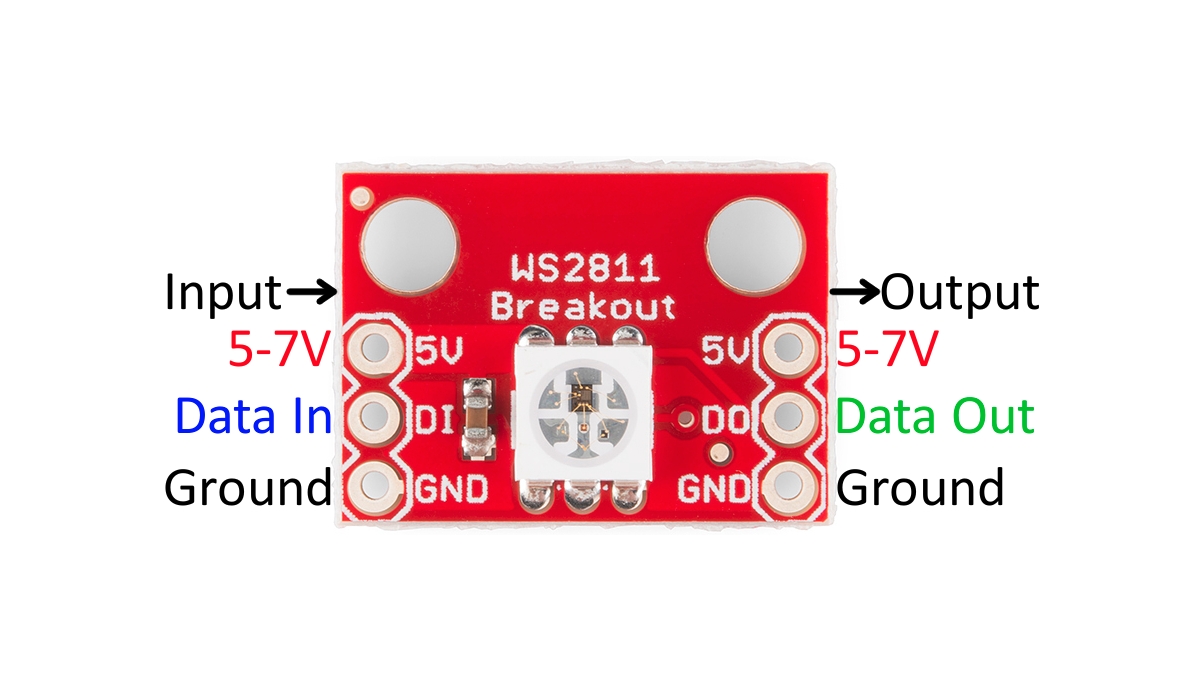
As to PinoutIt is not a major problem either, these strips have a simple connection that you can master from the beginning without too much knowledge. There are only three available, although each WS2812B cell actually has more connections ...
You simply must connect on each strip the Vcc pin that feeds the strip to the 5V from Arduino or from a different power supply, the GND to ground, of course, and finally the DI which is the other that will go to any output of the microcontroller to activate RGB LEDs on the strip.
If you look at a WS2812B cell You will see that it has the Data In or DI input, and the Vcc and GND power supply. Then it will have three other outputs, these will be connected to the next cell of the strip, and the next cell will have its outputs connected to the input of the next and so on until the entire strip is completed ...
It is precisely that DI or data input the one that is interesting to configure the RGB LEDs, and that same one will be connected to Data Out or DO that will take that same information to the next link in the strip. And so it spreads throughout the strip.
Buy WS2812B RGB LED Strips

You can buy at a not too high price in various specialized stores. You also have them in Amazon in different formats. Some examples are:
- RGB LED Strips WS2812B of 60 LEDs / m.
- RGB LED Strips WS2812B of 100 LEDs / m.
- RGB LED Strips WS2812B of 144 LEDs / m.
- RGB LED Strips WS2812B of 5 meters of 30 LEDs.
- RGB LED Strips WS2812B of 5 meters of 60 LEDs.
- WS2812B panel
- 5 meter coil of RGB LEDs.
Testing with Arduino and WS2812B
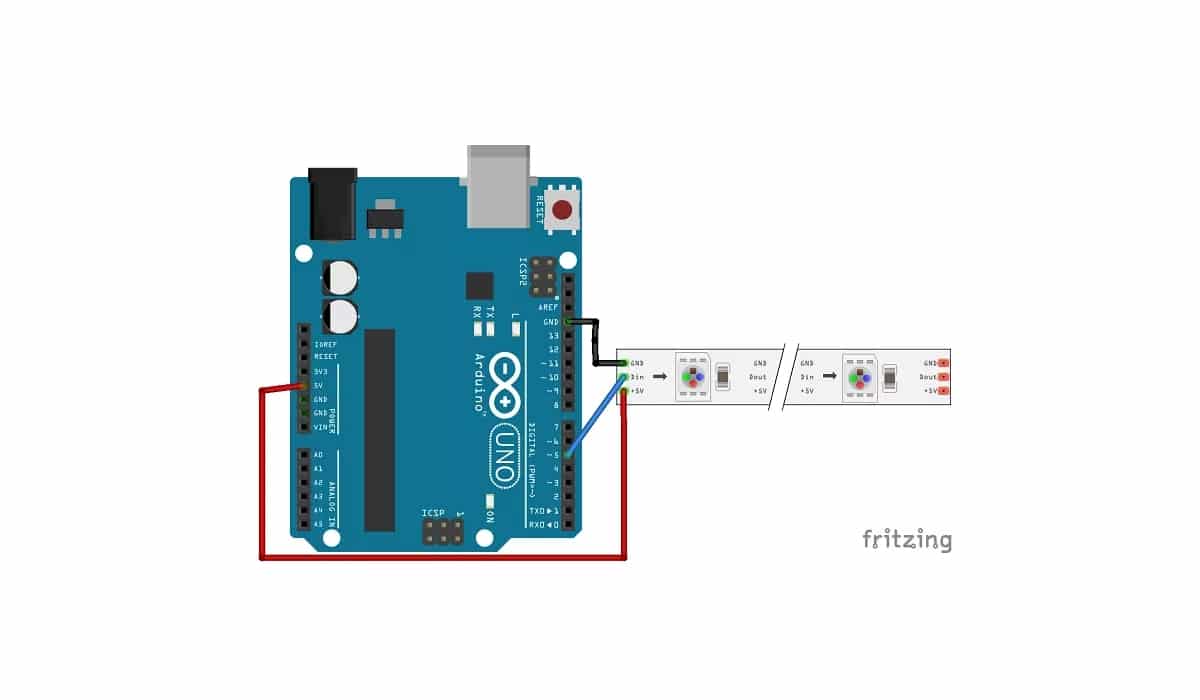
As you can imagine, with only three pins it is very easy to connect to arduino as you can see in the diagram above. You just have to connect 5v and GND to the WS2812B strip, and the DI to an output you want on Arduino. Remember that if you change the pin you must also modify the source code so that the program works properly.
As to sketch code, it can be quite simple like the following code. If you do not want to copy and paste, you can find it among the examples that come already. So go to File> Examples> FastLED> ColorPalette.
#include <FastLED.h>

#define LED_PIN     5
#define NUM_LEDS    14
#define BRIGHTNESS  64
#define LED_TYPE    WS2811
#define COLOR_ORDER GRB
CRGB leds[NUM_LEDS];

#define UPDATES_PER_SECOND 100

// This example shows several ways to set up and use 'palettes' of colors
// with FastLED.
//
// These compact palettes provide an easy way to re-colorize your
// animation on the fly, quickly, easily, and with low overhead.
//
// USING palettes is MUCH simpler in practice than in theory, so first just
// run this sketch, and watch the pretty lights as you then read through
// the code.  Although this sketch has eight (or more) different color schemes,
// the entire sketch compiles down to about 6.5K on AVR.
//
// FastLED provides a few pre-configured color palettes, and makes it
// extremely easy to make up your own color schemes with palettes.
//
// Some notes on the more abstract 'theory and practice' of
// FastLED compact palettes are at the bottom of this file.


CRGBPalette16 currentPalette;
TBlendType    currentBlending;

extern CRGBPalette16 myRedWhiteBluePalette;
extern const TProgmemPalette16 myRedWhiteBluePalette_p PROGMEM;


void setup() {
    delay( 3000 ); // power-up safety delay
    FastLED.addLeds<LED_TYPE, LED_PIN, COLOR_ORDER>(leds, NUM_LEDS).setCorrection( TypicalLEDStrip );
    FastLED.setBrightness(  BRIGHTNESS );

    currentPalette = RainbowColors_p;
    currentBlending = LINEARBLEND;
}


void loop()
{
    ChangePalettePeriodically();

    static uint8_t startIndex = 0;
    startIndex = startIndex + 1; /* motion speed */

    FillLEDsFromPaletteColors( startIndex);

    FastLED.show();
    FastLED.delay(1000 / UPDATES_PER_SECOND);
}

void FillLEDsFromPaletteColors( uint8_t colorIndex)
{
    uint8_t brightness = 255;

    for( int i = 0; i < NUM_LEDS; i++) {
        leds[i] = ColorFromPalette( currentPalette, colorIndex, brightness, currentBlending);
        colorIndex += 3;
    }
}


// There are several different palettes of colors demonstrated here.
//
// FastLED provides several 'preset' palettes: RainbowColors_p, RainbowStripeColors_p,
// OceanColors_p, CloudColors_p, LavaColors_p, ForestColors_p, and PartyColors_p.
//
// Additionally, you can manually define your own color palettes, or you can write
// code that creates color palettes on the fly.  All are shown here.

void ChangePalettePeriodically()
{
    uint8_t secondHand = (millis() / 1000) % 60;
    static uint8_t lastSecond = 99;

    if( lastSecond != secondHand) {
        lastSecond = secondHand;
        if( secondHand ==  0)  { currentPalette = RainbowColors_p;         currentBlending = LINEARBLEND; }
        if( secondHand == 10)  { currentPalette = RainbowStripeColors_p;   currentBlending = NOBLEND;  }
        if( secondHand == 15)  { currentPalette = RainbowStripeColors_p;   currentBlending = LINEARBLEND; }
        if( secondHand == 20)  { SetupPurpleAndGreenPalette();             currentBlending = LINEARBLEND; }
        if( secondHand == 25)  { SetupTotallyRandomPalette();              currentBlending = LINEARBLEND; }
        if( secondHand == 30)  { SetupBlackAndWhiteStripedPalette();       currentBlending = NOBLEND; }
        if( secondHand == 35)  { SetupBlackAndWhiteStripedPalette();       currentBlending = LINEARBLEND; }
        if( secondHand == 40)  { currentPalette = CloudColors_p;           currentBlending = LINEARBLEND; }
        if( secondHand == 45)  { currentPalette = PartyColors_p;           currentBlending = LINEARBLEND; }
        if( secondHand == 50)  { currentPalette = myRedWhiteBluePalette_p; currentBlending = NOBLEND;  }
        if( secondHand == 55)  { currentPalette = myRedWhiteBluePalette_p; currentBlending = LINEARBLEND; }
    }
}

// This function fills the palette with totally random colors.
void SetupTotallyRandomPalette()
{
    for( int i = 0; i < 16; i++) {
        currentPalette[i] = CHSV( random8(), 255, random8());
    }
}

// This function sets up a palette of black and white stripes,
// using code.  Since the palette is effectively an array of
// sixteen CRGB colors, the various fill_* functions can be used
// to set them up.
void SetupBlackAndWhiteStripedPalette()
{
    // 'black out' all 16 palette entries...
    fill_solid( currentPalette, 16, CRGB::Black);
    // and set every fourth one to white.
    currentPalette[0] = CRGB::White;
    currentPalette[4] = CRGB::White;
    currentPalette[8] = CRGB::White;
    currentPalette[12] = CRGB::White;

}

// This function sets up a palette of purple and green stripes.
void SetupPurpleAndGreenPalette()
{
    CRGB purple = CHSV( HUE_PURPLE, 255, 255);
    CRGB green  = CHSV( HUE_GREEN, 255, 255);
    CRGB black  = CRGB::Black;

    currentPalette = CRGBPalette16(
                                   green,  green,  black,  black,
                                   purple, purple, black,  black,
                                   green,  green,  black,  black,
                                   purple, purple, black,  black );
}


// This example shows how to set up a static color palette
// which is stored in PROGMEM (flash), which is almost always more
// plentiful than RAM.  A static PROGMEM palette like this
// takes up 64 bytes of flash.
const TProgmemPalette16 myRedWhiteBluePalette_p PROGMEM =
{
    CRGB::Red,
    CRGB::Gray, // 'white' is too bright compared to red and blue
    CRGB::Blue,
    CRGB::Black,

    CRGB::Red,
    CRGB::Gray,
    CRGB::Blue,
    CRGB::Black,

    CRGB::Red,
    CRGB::Red,
    CRGB::Gray,
    CRGB::Gray,
    CRGB::Blue,
    CRGB::Blue,
    CRGB::Black,
    CRGB::Black
};


// Additionl notes on FastLED compact palettes:
//
// Normally, in computer graphics, the palette (or "color lookup table")
// has 256 entries, each containing a specific 24-bit RGB color.  You can then
// index into the color palette using a simple 8-bit (one byte) value.
// A 256-entry color palette takes up 768 bytes of RAM, which on Arduino
// is quite possibly "too many" bytes.
//
// FastLED does offer traditional 256-element palettes, for setups that
// can afford the 768-byte cost in RAM.
//
// However, FastLED also offers a compact alternative.  FastLED offers
// palettes that store 16 distinct entries, but can be accessed AS IF
// they actually have 256 entries; this is accomplished by interpolating
// between the 16 explicit entries to create fifteen intermediate palette
// entries between each pair.
//
// So for example, if you set the first two explicit entries of a compact
// palette to Green (0,255,0) and Blue (0,0,255), and then retrieved
// the first sixteen entries from the virtual palette (of 256), you'd get
// Green, followed by a smooth gradient from green-to-blue, and then Blue.