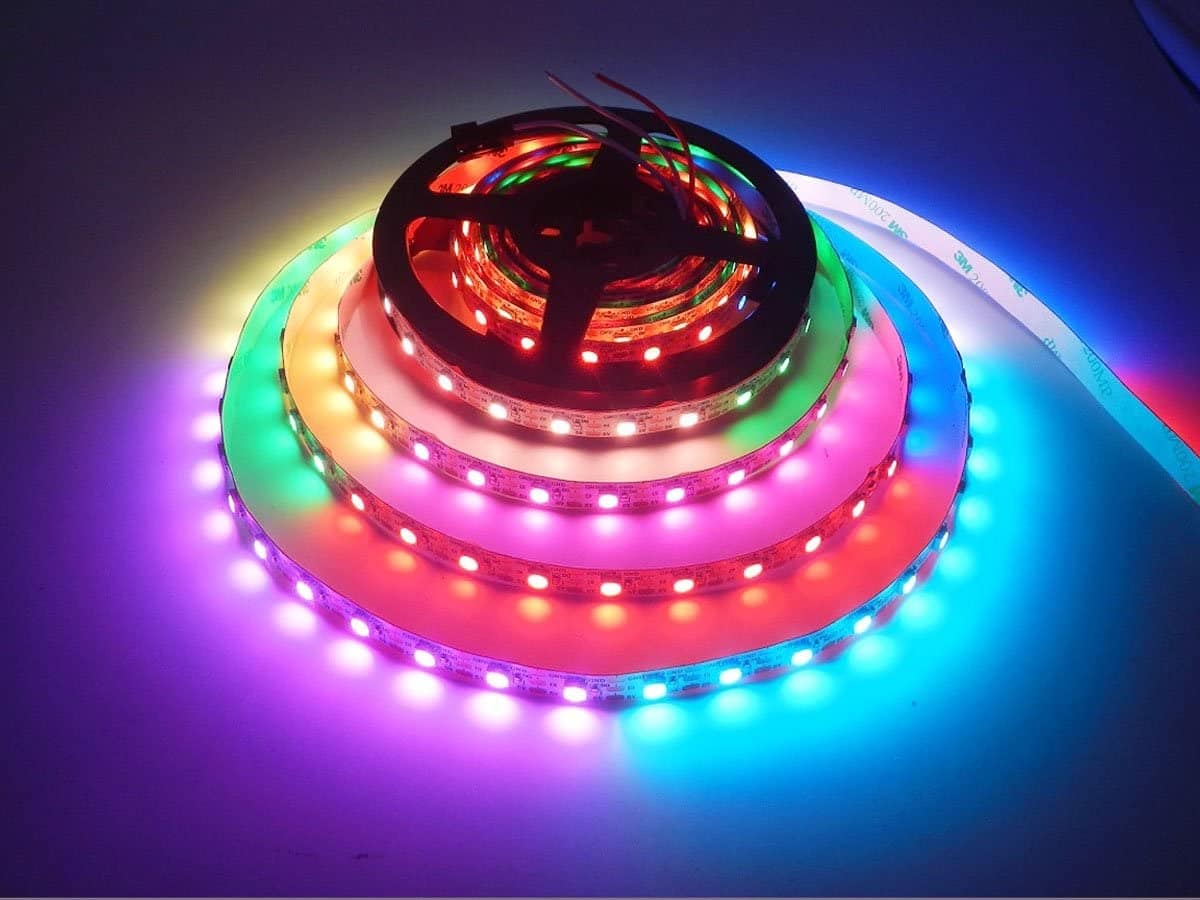
確かにあなたはあなたのDIYプロジェクトに少し色を加える必要があります。 このために、多くのメーカーが有名な WS2812B RGBLEDストリップ、プロジェクトにさまざまなカラーコントロールと非常に魅力的な照明効果を得ることができます。 もちろん、それらはArduinoボードと完全に互換性のあるストリップなので、それらを統合しようとしても問題はありません。
あなたがそれらを見つけることができます 1メートルの長さたとえば、メーターごとのLEDの密度の種類によって異なりますが。 たとえば、30個のLEDから144個のLEDがあります。 ただし、より大きな表面を得るためにより長い長さが必要な場合は、RGB LEDパネルなどの他のオプションも市場に出回っています。または、常に複数のストリップを使用できます...
これらのストリップは単なるものです 組み立てられた一連のRGBLED 共通のサポートに取り付けて、それらをストリップにグループ化します。 ただし、その動作は個別のRGBLEDと同じです。
WS2812Bとは何ですか?
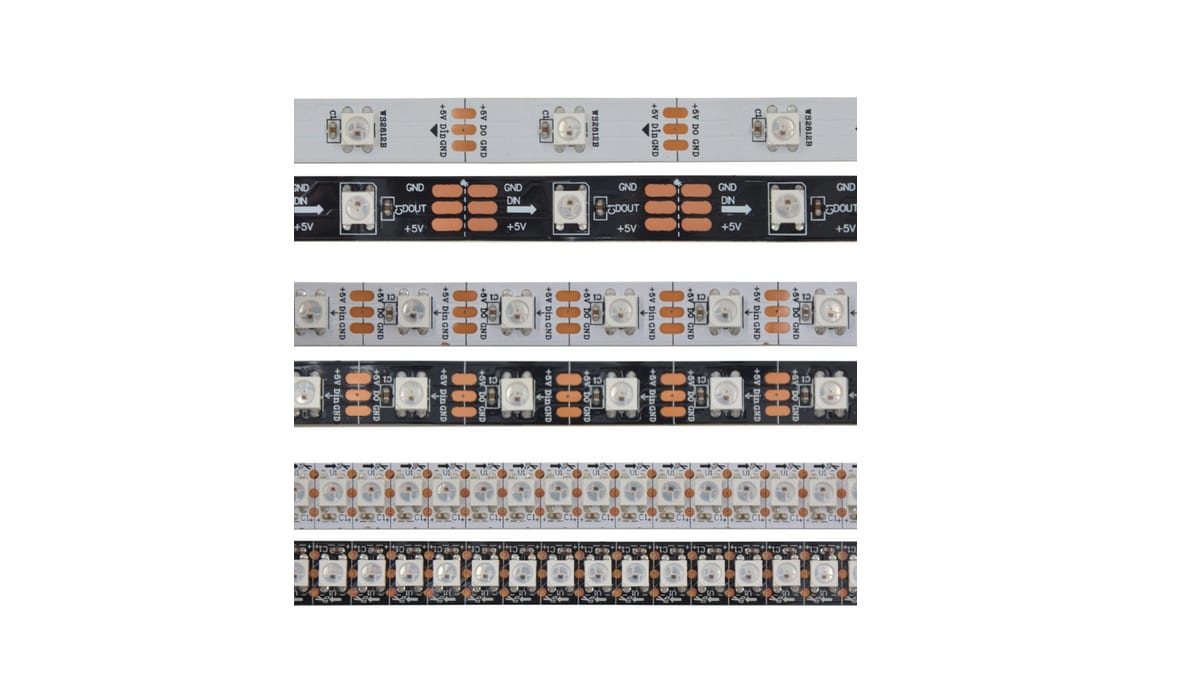
実際には、WS2812Bはストリップ自体ではなく、 細胞 またはを含む小さなRGBLEDプレート。 それらはストリップまたはパネルの形でグループ化できるので、それらの数と形状に関してさまざまな構成を行うことができます。 構成するストリップは柔軟なストリップですが、そうでないPCBパネルにもWS2812Bがあります。
必要に応じて、デバイスを見つけることができます WS2812Bは別途 自分で必要な形を作るために。 たとえば、それらの約100ユニットは、通常、10ユーロをわずかに超える費用がかかります。
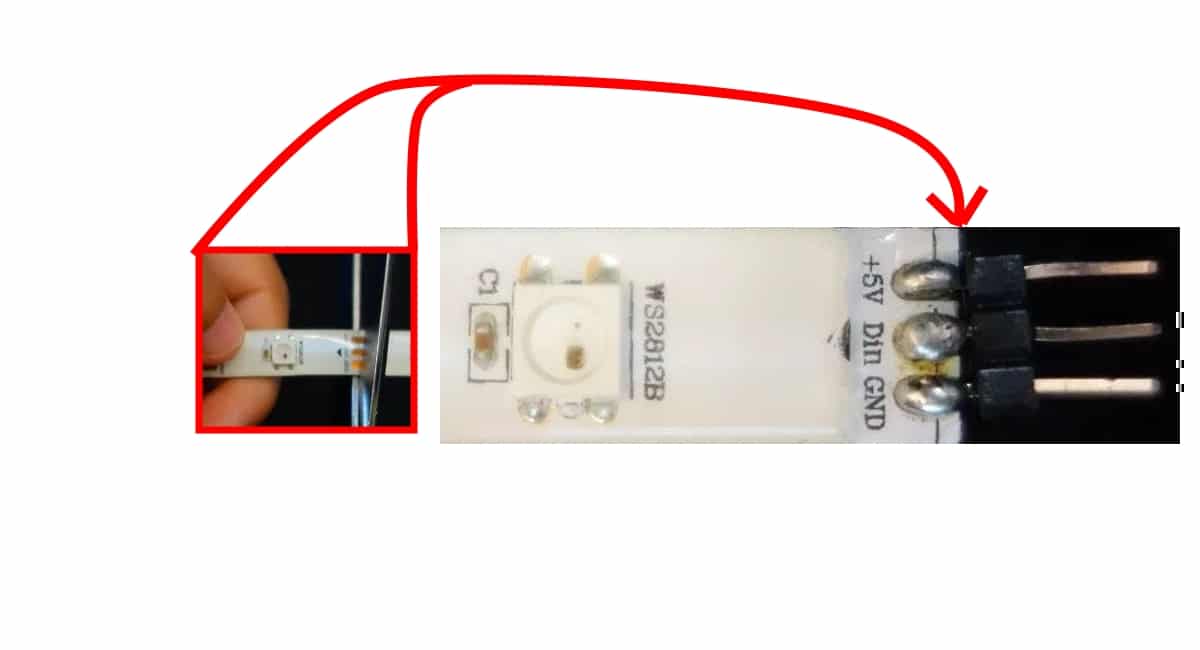
あなたはそれらを投げることも知っているべきです あなたはそれらを切ることができます 必要な場所にハサミを付けても、動作が停止するわけではありません。 したがって、必要なRGBLEDのみを使用できます。 実際、それはあなたが切り抜けることができるいくつかのマーキング(XNUMXつの銅パッド)を持っています。 これらのパッドをカットすると、ストリップの片側にXNUMXつのトラックがあり、他のピースを再利用する場合に備えて、ピンをはんだ付けして簡単に接続できます。
ピン配置とデータシート
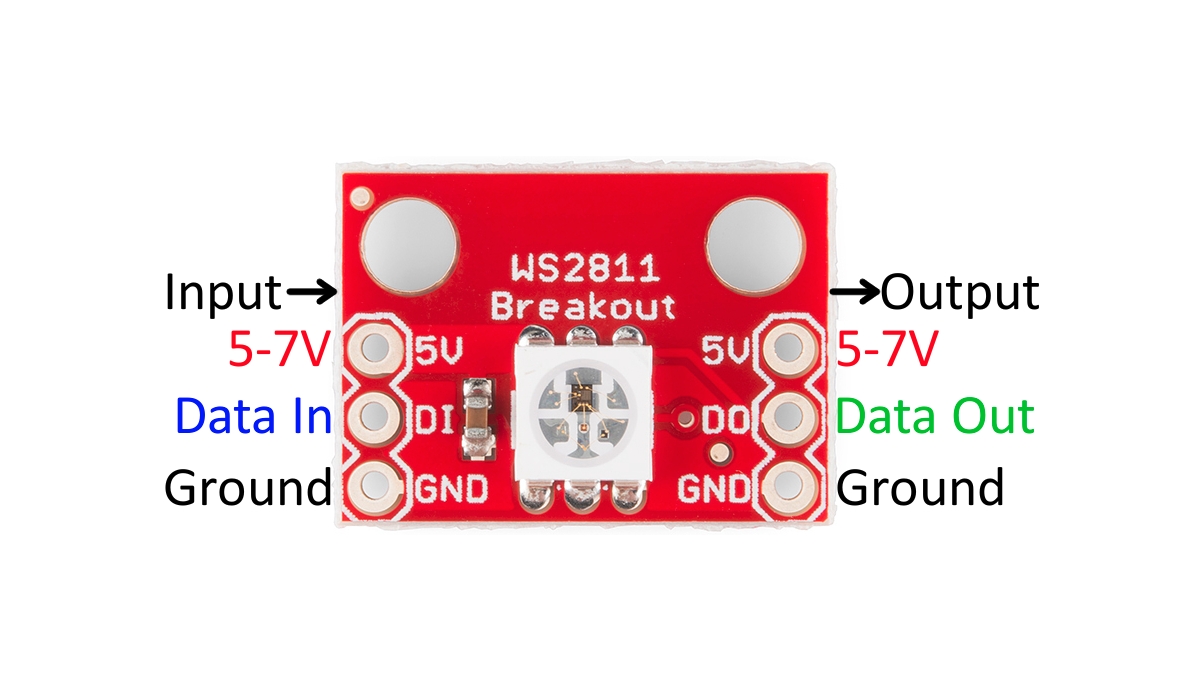
これは、入力と出力を備えた独立したWS2812Bセルです。
あなたの詳細については RGBLEDストリップWS2812B あなたは読める データシート 各メーカーが提供する寸法と技術的特性の詳細をすべて参照して、すべての動作範囲と制限を知るだけでなく、それらを適切に使用する方法を知ることができます。
のように ピン配置それも大きな問題ではありません。これらのストリップは、あまり知識がなくても最初から習得できる単純な接続を備えています。 各WS2812Bセルには実際にはより多くの接続がありますが、使用できるのはXNUMXつだけです...
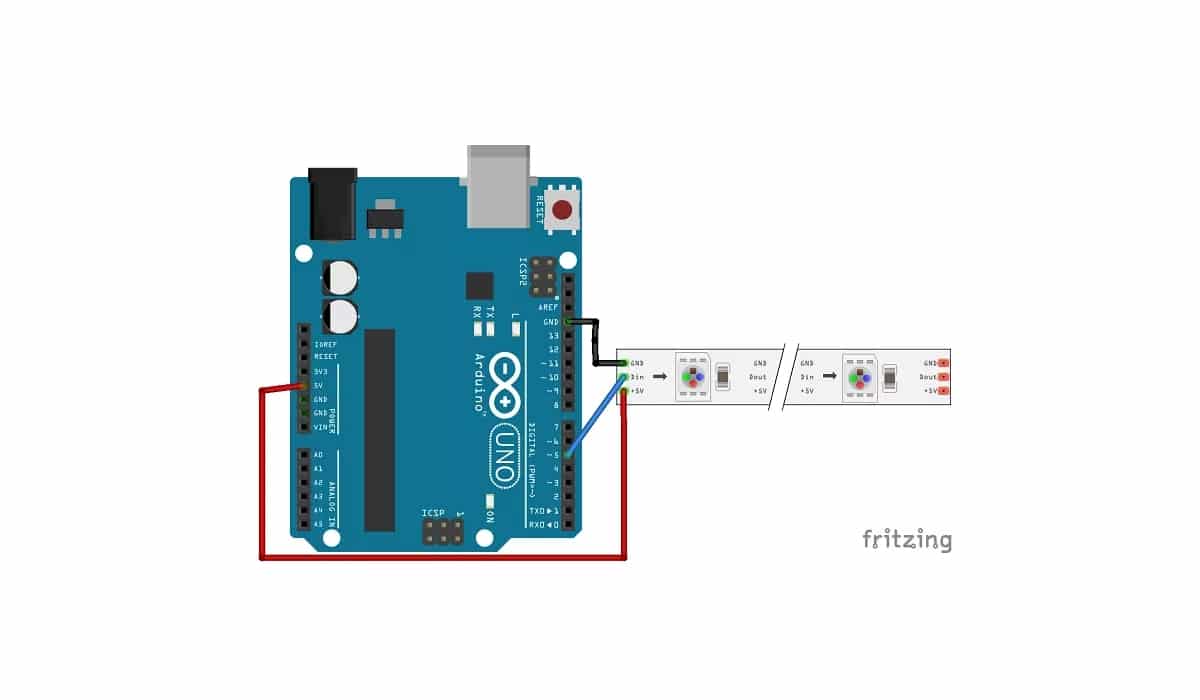
あなたは単にしなければなりません つなぐ 各ストリップで、Arduinoまたは別の電源から5Vにストリップを供給するVccピン、もちろんGNDをグランドに、そして最後に、マイクロコントローラーの任意の出力に送られ、ストリップ上のRGBLED。
あなたが見れば WS2812Bセル データ入力またはDI入力、およびVccとGND電源があることがわかります。 次に、他にXNUMXつの出力があり、それらはストリップの次のセルに接続され、次のセルの出力は次の入力に接続され、以下同様にストリップ全体が完了するまで続きます。
それはまさにそれです DIまたはデータ入力 RGB LEDを構成するのに興味深いものであり、同じものがデータ出力またはDOに接続され、同じ情報をストリップ内の次のリンクに移動します。 そして、それはストリップ全体に広がります。
WS2812B RGBLEDストリップを購入する
あなたはできる 高すぎない価格で購入する 様々な専門店で。 また、Amazonにはさまざまな形式でそれらがあります。 いくつかの例は次のとおりです。
- RGB LEDは、WS2812Bから60個のLED / mを取り除きます。
- RGB LEDは、WS2812Bから100個のLED / mを取り除きます。
- RGB LEDは、WS2812Bから144個のLED / mを取り除きます。
- WS2812B RGB LED5メートルの30個のLEDのストリップ。
- WS2812B RGB LED5メートルの60個のLEDのストリップ。
- WS2812Bパネル
- RGBLEDの5メートルのコイル。
ArduinoとWS2812Bでのテスト
ご想像のとおり、ピンがXNUMXつしかないので、簡単に操作できます。 arduinoに接続する 上の図でわかるように。 5vとGNDをWS2812Bストリップに接続し、DIをArduinoで必要な出力に接続するだけです。 PINを変更する場合は、プログラムが正しく機能するようにソースコードも変更する必要があることに注意してください。
のように スケッチコード、次のコードのように非常に単純にすることができます。 コピーして貼り付けたくない場合は、すでに提供されている例の中で見つけることができます。 したがって、[ファイル]> [例]> [FastLED]> [ColorPalette]に移動します。
#include <FastLED.h>

#define LED_PIN     5
#define NUM_LEDS    14
#define BRIGHTNESS  64
#define LED_TYPE    WS2811
#define COLOR_ORDER GRB
CRGB leds[NUM_LEDS];

#define UPDATES_PER_SECOND 100

// This example shows several ways to set up and use 'palettes' of colors
// with FastLED.
//
// These compact palettes provide an easy way to re-colorize your
// animation on the fly, quickly, easily, and with low overhead.
//
// USING palettes is MUCH simpler in practice than in theory, so first just
// run this sketch, and watch the pretty lights as you then read through
// the code.  Although this sketch has eight (or more) different color schemes,
// the entire sketch compiles down to about 6.5K on AVR.
//
// FastLED provides a few pre-configured color palettes, and makes it
// extremely easy to make up your own color schemes with palettes.
//
// Some notes on the more abstract 'theory and practice' of
// FastLED compact palettes are at the bottom of this file.


CRGBPalette16 currentPalette;
TBlendType    currentBlending;

extern CRGBPalette16 myRedWhiteBluePalette;
extern const TProgmemPalette16 myRedWhiteBluePalette_p PROGMEM;


void setup() {
    delay( 3000 ); // power-up safety delay
    FastLED.addLeds<LED_TYPE, LED_PIN, COLOR_ORDER>(leds, NUM_LEDS).setCorrection( TypicalLEDStrip );
    FastLED.setBrightness(  BRIGHTNESS );

    currentPalette = RainbowColors_p;
    currentBlending = LINEARBLEND;
}


void loop()
{
    ChangePalettePeriodically();

    static uint8_t startIndex = 0;
    startIndex = startIndex + 1; /* motion speed */

    FillLEDsFromPaletteColors( startIndex);

    FastLED.show();
    FastLED.delay(1000 / UPDATES_PER_SECOND);
}

void FillLEDsFromPaletteColors( uint8_t colorIndex)
{
    uint8_t brightness = 255;

    for( int i = 0; i < NUM_LEDS; i++) {
        leds[i] = ColorFromPalette( currentPalette, colorIndex, brightness, currentBlending);
        colorIndex += 3;
    }
}


// There are several different palettes of colors demonstrated here.
//
// FastLED provides several 'preset' palettes: RainbowColors_p, RainbowStripeColors_p,
// OceanColors_p, CloudColors_p, LavaColors_p, ForestColors_p, and PartyColors_p.
//
// Additionally, you can manually define your own color palettes, or you can write
// code that creates color palettes on the fly.  All are shown here.

void ChangePalettePeriodically()
{
    uint8_t secondHand = (millis() / 1000) % 60;
    static uint8_t lastSecond = 99;

    if( lastSecond != secondHand) {
        lastSecond = secondHand;
        if( secondHand ==  0)  { currentPalette = RainbowColors_p;         currentBlending = LINEARBLEND; }
        if( secondHand == 10)  { currentPalette = RainbowStripeColors_p;   currentBlending = NOBLEND;  }
        if( secondHand == 15)  { currentPalette = RainbowStripeColors_p;   currentBlending = LINEARBLEND; }
        if( secondHand == 20)  { SetupPurpleAndGreenPalette();             currentBlending = LINEARBLEND; }
        if( secondHand == 25)  { SetupTotallyRandomPalette();              currentBlending = LINEARBLEND; }
        if( secondHand == 30)  { SetupBlackAndWhiteStripedPalette();       currentBlending = NOBLEND; }
        if( secondHand == 35)  { SetupBlackAndWhiteStripedPalette();       currentBlending = LINEARBLEND; }
        if( secondHand == 40)  { currentPalette = CloudColors_p;           currentBlending = LINEARBLEND; }
        if( secondHand == 45)  { currentPalette = PartyColors_p;           currentBlending = LINEARBLEND; }
        if( secondHand == 50)  { currentPalette = myRedWhiteBluePalette_p; currentBlending = NOBLEND;  }
        if( secondHand == 55)  { currentPalette = myRedWhiteBluePalette_p; currentBlending = LINEARBLEND; }
    }
}

// This function fills the palette with totally random colors.
void SetupTotallyRandomPalette()
{
    for( int i = 0; i < 16; i++) {
        currentPalette[i] = CHSV( random8(), 255, random8());
    }
}

// This function sets up a palette of black and white stripes,
// using code.  Since the palette is effectively an array of
// sixteen CRGB colors, the various fill_* functions can be used
// to set them up.
void SetupBlackAndWhiteStripedPalette()
{
    // 'black out' all 16 palette entries...
    fill_solid( currentPalette, 16, CRGB::Black);
    // and set every fourth one to white.
    currentPalette[0] = CRGB::White;
    currentPalette[4] = CRGB::White;
    currentPalette[8] = CRGB::White;
    currentPalette[12] = CRGB::White;

}

// This function sets up a palette of purple and green stripes.
void SetupPurpleAndGreenPalette()
{
    CRGB purple = CHSV( HUE_PURPLE, 255, 255);
    CRGB green  = CHSV( HUE_GREEN, 255, 255);
    CRGB black  = CRGB::Black;

    currentPalette = CRGBPalette16(
                                   green,  green,  black,  black,
                                   purple, purple, black,  black,
                                   green,  green,  black,  black,
                                   purple, purple, black,  black );
}


// This example shows how to set up a static color palette
// which is stored in PROGMEM (flash), which is almost always more
// plentiful than RAM.  A static PROGMEM palette like this
// takes up 64 bytes of flash.
const TProgmemPalette16 myRedWhiteBluePalette_p PROGMEM =
{
    CRGB::Red,
    CRGB::Gray, // 'white' is too bright compared to red and blue
    CRGB::Blue,
    CRGB::Black,

    CRGB::Red,
    CRGB::Gray,
    CRGB::Blue,
    CRGB::Black,

    CRGB::Red,
    CRGB::Red,
    CRGB::Gray,
    CRGB::Gray,
    CRGB::Blue,
    CRGB::Blue,
    CRGB::Black,
    CRGB::Black
};


// Additionl notes on FastLED compact palettes:
//
// Normally, in computer graphics, the palette (or "color lookup table")
// has 256 entries, each containing a specific 24-bit RGB color.  You can then
// index into the color palette using a simple 8-bit (one byte) value.
// A 256-entry color palette takes up 768 bytes of RAM, which on Arduino
// is quite possibly "too many" bytes.
//
// FastLED does offer traditional 256-element palettes, for setups that
// can afford the 768-byte cost in RAM.
//
// However, FastLED also offers a compact alternative.  FastLED offers
// palettes that store 16 distinct entries, but can be accessed AS IF
// they actually have 256 entries; this is accomplished by interpolating
// between the 16 explicit entries to create fifteen intermediate palette
// entries between each pair.
//
// So for example, if you set the first two explicit entries of a compact
// palette to Green (0,255,0) and Blue (0,0,255), and then retrieved
// the first sixteen entries from the virtual palette (of 256), you'd get
// Green, followed by a smooth gradient from green-to-blue, and then Blue.
