분명히 DIY 프로젝트에 색감을 더해야합니다. 이를 위해 많은 제작자가 유명한 WS2812B RGB LED 스트립,이를 통해 프로젝트에 대한 다양한 색상 제어와 매력적인 조명 효과를 얻을 수 있습니다. 물론 그들은 Arduino 보드와 완전히 호환되는 스트립이므로 통합하려고 할 때 아무런 문제가 없습니다.
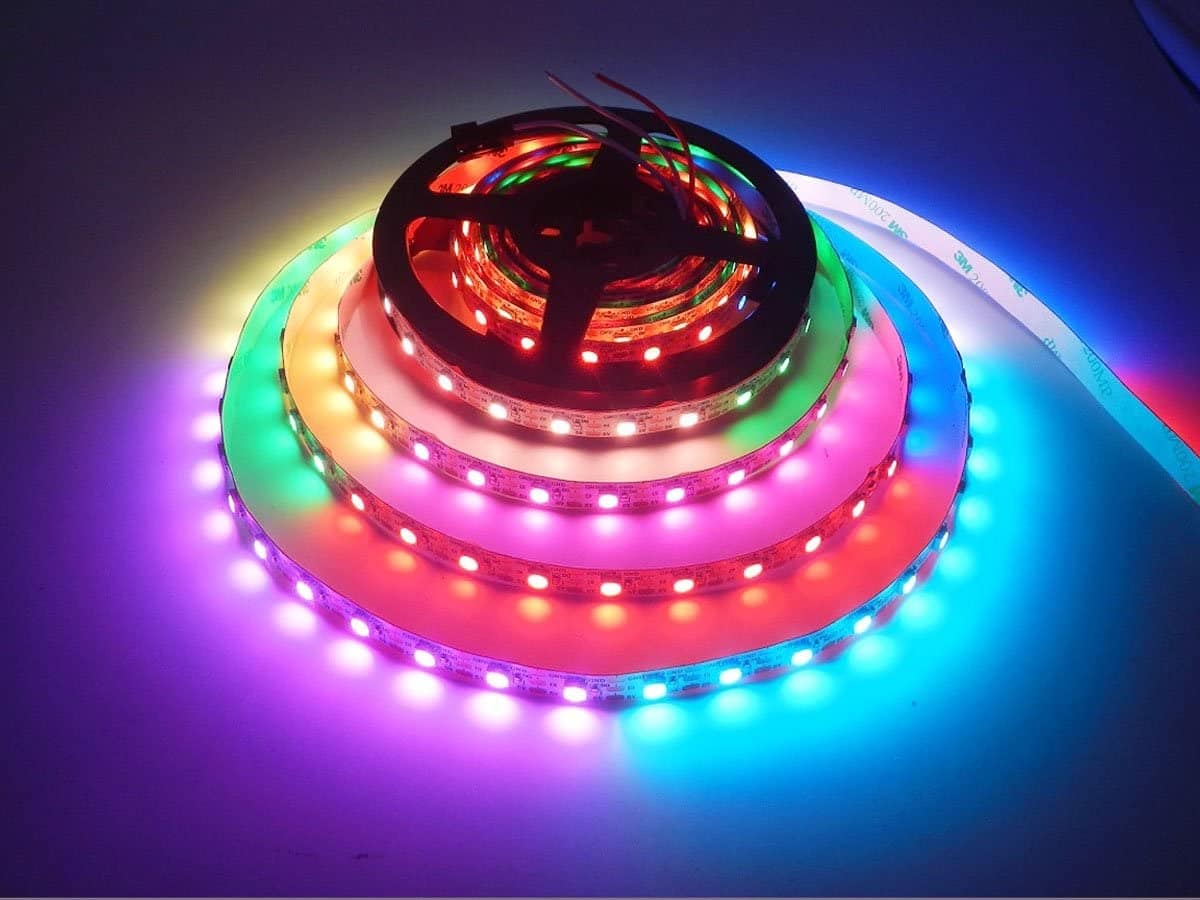
당신은 그들을 찾을 수 있습니다 1 미터 길이예를 들어 각 미터의 LED 밀도 유형에 따라 다를 수 있습니다. 예를 들어, 30 개의 LED에서 144 개의 LED가 있습니다. 그러나 더 큰 표면을 얻기 위해 더 긴 길이가 필요한 경우 RGB LED 패널과 같은 시장에 다른 옵션이 있거나 항상 여러 스트립을 사용할 수 있습니다 ...
이 스트립은 조립 된 일련의 RGB LED 공통 지지대에 장착하여 스트립으로 그룹화합니다. 그러나 그 작동은 별도의 RGB LED와 동일합니다.
WS2812B 란 무엇입니까?
사실 WS2812B는 스트립 자체가 아니라 세포 또는 포함하는 작은 RGB LED 플레이트. 스트립 또는 패널 형태로 그룹화 할 수 있으므로 개수와 모양 측면에서 다양한 구성을 만들 수 있습니다. 구성하는 스트립은 유연한 스트립이지만 그렇지 않은 PCB 패널에서 WS2812B를 찾을 수도 있습니다.
원하는 경우 장치를 찾을 수 있습니다. WS2812B 별도 필요한 모양을 만들 수 있습니다. 예를 들어, 약 100 개 단위는 일반적으로 € 10보다 약간 비쌉니다.
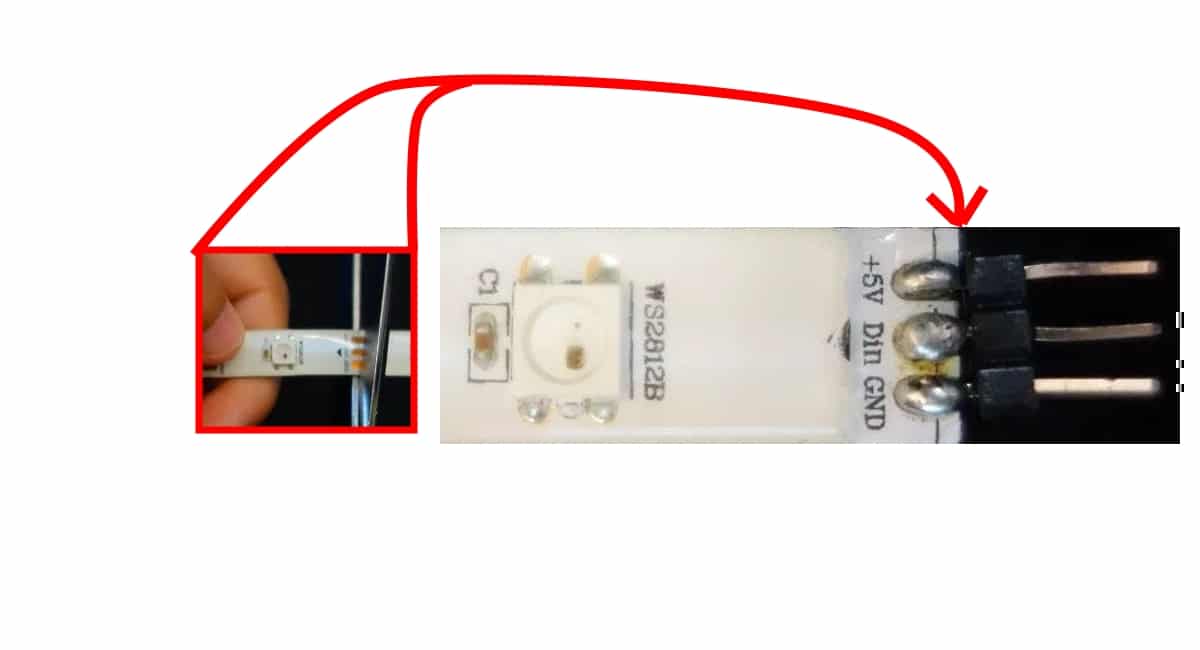
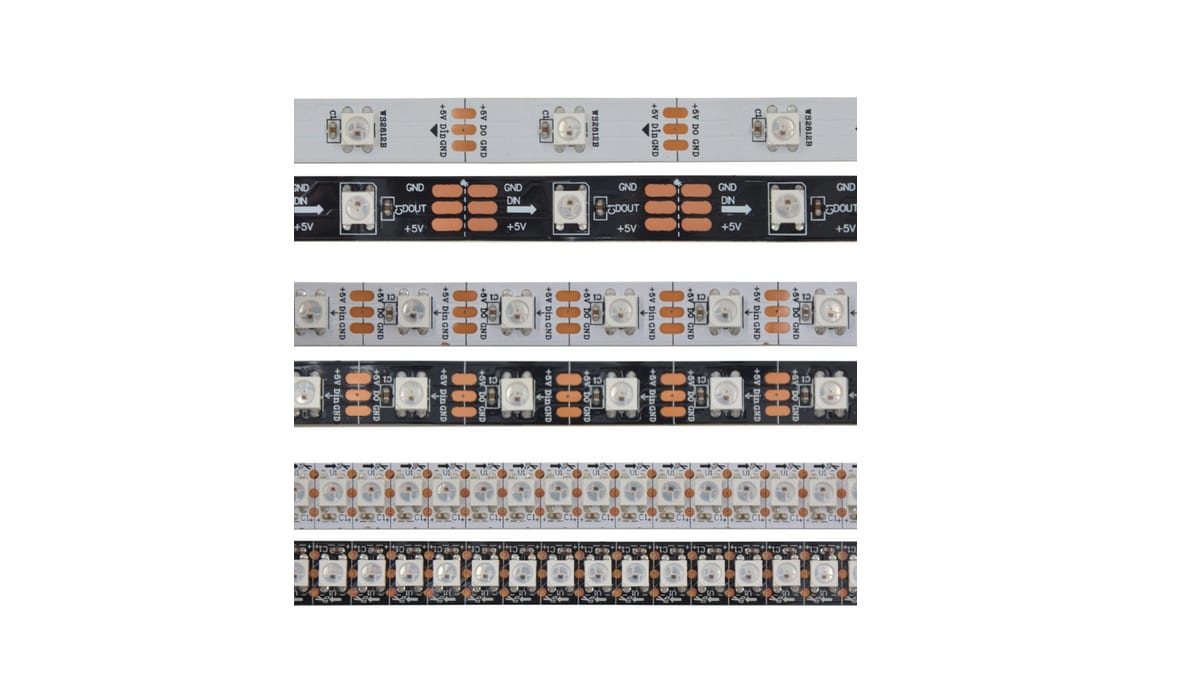
당신은 또한 당신이 그들을 던진다는 것을 알아야합니다 자를 수 있습니다 필요한 곳에 가위를 사용한다고해서 작동이 멈춘다는 의미는 아닙니다. 따라서 필요한 RGB LED 만 가질 수 있습니다. 실제로자를 수있는 몇 가지 표시 (구리 패드 XNUMX 개)가 있습니다. 이 패드를 자르면 스트립의 한쪽에 XNUMX 개의 트랙이 있고 다른 부분을 재사용하려는 경우 다른쪽에는 쉽게 연결할 수 있도록 핀을 납땜 할 수 있습니다.
핀아웃 및 데이터 시트
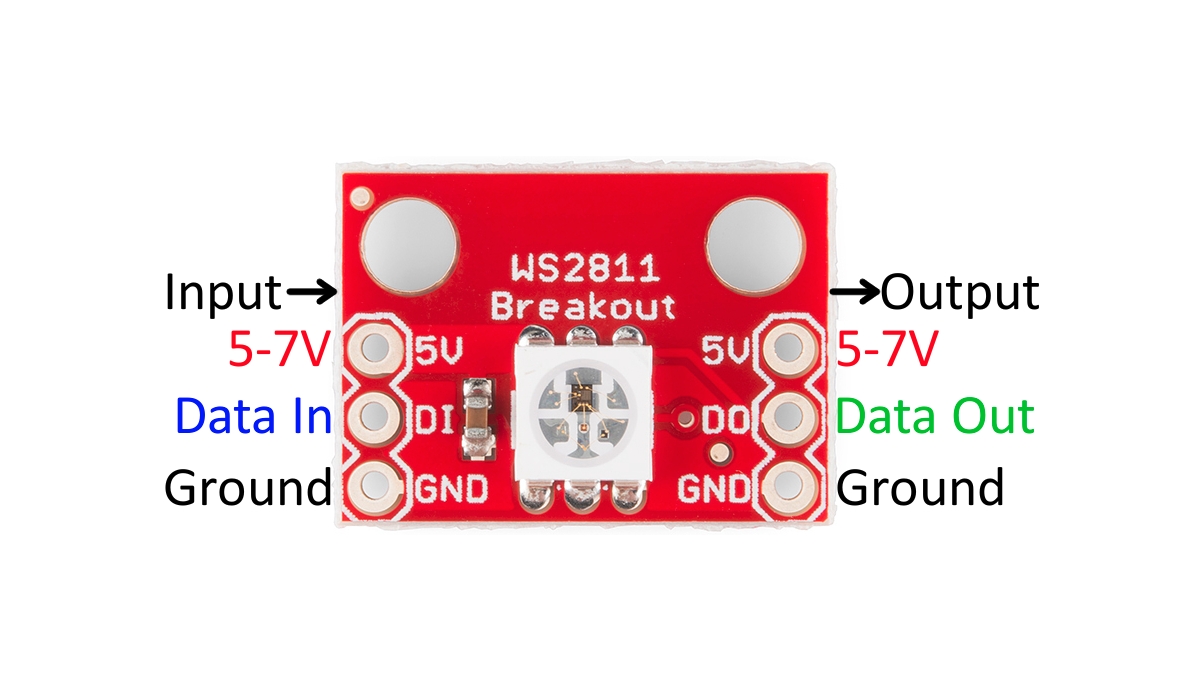
입력 및 출력이있는 독립적 인 WS2812B 셀입니다.
귀하의 RGB LED 스트립 WS2812B 당신은 읽을 수있다 데이터 시트 각 제조업체에서 제공하는 모든 작동 범위 및 한계를 아는 것 외에도 치수 및 기술적 특성에 대한 모든 세부 정보를 참조하여 올바르게 사용하는 방법을 알 수 있습니다.
로로 핀그것은 큰 문제도 아닙니다.이 스트립들은 너무 많은 지식없이 처음부터 마스터 할 수있는 간단한 연결을 가지고 있습니다. 각 WS2812B 셀에는 실제로 더 많은 연결이 있지만 세 개만 사용할 수 있습니다.
당신은 단순히 연결 각 스트립에는 Arduino 또는 다른 전원 공급 장치에서 스트립을 5V로 공급하는 Vcc 핀, 물론 GND를 접지로, 마지막으로 DI를 활성화하기 위해 마이크로 컨트롤러의 모든 출력으로 이동합니다. 스트립의 RGB LED.
당신이 보면 WS2812B 셀 데이터 입력 또는 DI 입력과 Vcc 및 GND 전원 공급 장치가 있음을 알 수 있습니다. 그런 다음 세 개의 다른 출력이 있으며 스트립의 다음 셀에 연결되고 다음 셀에는 전체 스트립이 완료 될 때까지 출력이 다음 셀에 연결됩니다.
정확히 DI 또는 데이터 입력 RGB LED를 구성하는 데 흥미로운 하나이며 동일한 정보가 스트립의 다음 링크로 이동하는 데이터 출력 또는 DO에 연결됩니다. 그래서 그것은 스트립 전체에 퍼집니다.
WS2812B RGB LED 스트립 구매

당신은 할 수 있습니다 너무 비싸지 않은 가격에 사다 다양한 전문점에서. 또한 다양한 형식으로 Amazon에 있습니다. 몇 가지 예는 다음과 같습니다.
- RGB LED 스트립 WS2812B of 60 LEDs / m.
- RGB LED 스트립 WS2812B of 100 LEDs / m.
- RGB LED 스트립 WS2812B of 144 LEDs / m.
- WS2812B 5 개 LED 30 미터의 RGB LED 스트립.
- WS2812B 5 개 LED 60 미터의 RGB LED 스트립.
- WS2812B 패널
- RGB LED의 5 미터 코일.
Arduino 및 WS2812B로 테스트
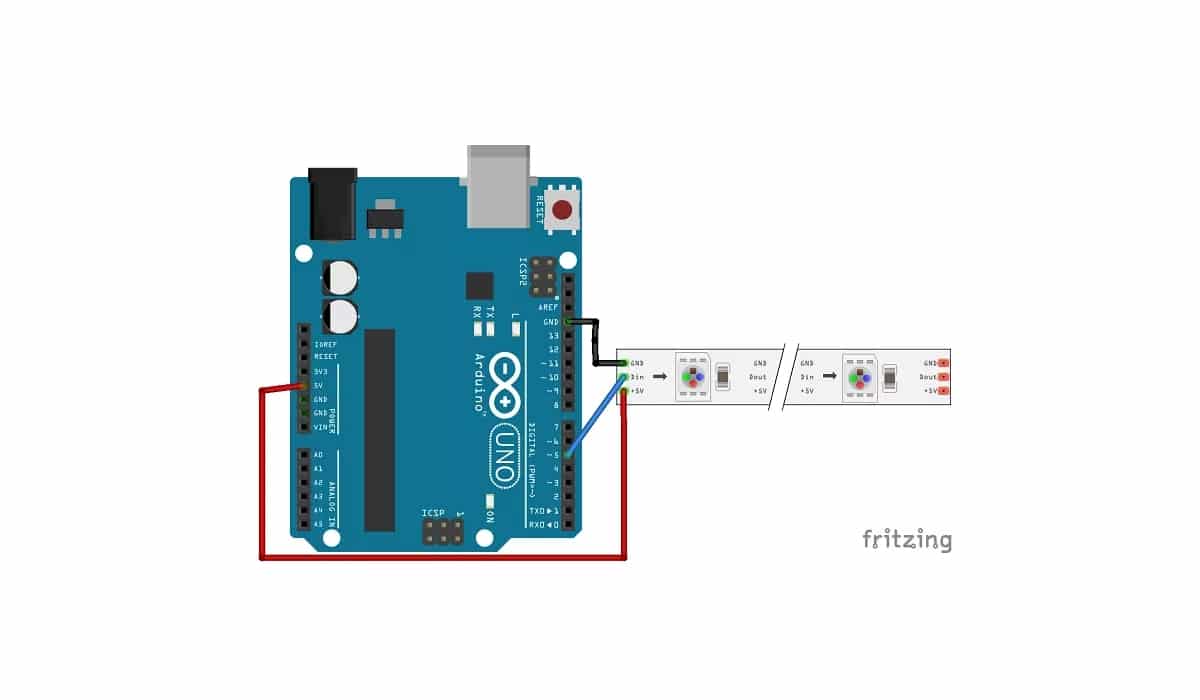
상상할 수 있듯이 핀이 세 개뿐이므로 arduino에 연결 위의 다이어그램에서 볼 수 있듯이. 5v와 GND를 WS2812B 스트립에 연결하고 DI를 Arduino에서 원하는 출력에 연결하기 만하면됩니다. 핀을 변경하면 프로그램이 제대로 작동하도록 소스 코드도 수정해야합니다.
로로 스케치 코드, 다음 코드와 같이 매우 간단 할 수 있습니다. 복사 및 붙여 넣기를 원하지 않는 경우 이미 제공되는 예제에서 찾을 수 있습니다. 따라서 File> Examples> FastLED> ColorPalette로 이동하십시오.
#include <FastLED.h>

#define LED_PIN     5
#define NUM_LEDS    14
#define BRIGHTNESS  64
#define LED_TYPE    WS2811
#define COLOR_ORDER GRB
CRGB leds[NUM_LEDS];

#define UPDATES_PER_SECOND 100

// This example shows several ways to set up and use 'palettes' of colors
// with FastLED.
//
// These compact palettes provide an easy way to re-colorize your
// animation on the fly, quickly, easily, and with low overhead.
//
// USING palettes is MUCH simpler in practice than in theory, so first just
// run this sketch, and watch the pretty lights as you then read through
// the code.  Although this sketch has eight (or more) different color schemes,
// the entire sketch compiles down to about 6.5K on AVR.
//
// FastLED provides a few pre-configured color palettes, and makes it
// extremely easy to make up your own color schemes with palettes.
//
// Some notes on the more abstract 'theory and practice' of
// FastLED compact palettes are at the bottom of this file.


CRGBPalette16 currentPalette;
TBlendType    currentBlending;

extern CRGBPalette16 myRedWhiteBluePalette;
extern const TProgmemPalette16 myRedWhiteBluePalette_p PROGMEM;


void setup() {
    delay( 3000 ); // power-up safety delay
    FastLED.addLeds<LED_TYPE, LED_PIN, COLOR_ORDER>(leds, NUM_LEDS).setCorrection( TypicalLEDStrip );
    FastLED.setBrightness(  BRIGHTNESS );

    currentPalette = RainbowColors_p;
    currentBlending = LINEARBLEND;
}


void loop()
{
    ChangePalettePeriodically();

    static uint8_t startIndex = 0;
    startIndex = startIndex + 1; /* motion speed */

    FillLEDsFromPaletteColors( startIndex);

    FastLED.show();
    FastLED.delay(1000 / UPDATES_PER_SECOND);
}

void FillLEDsFromPaletteColors( uint8_t colorIndex)
{
    uint8_t brightness = 255;

    for( int i = 0; i < NUM_LEDS; i++) {
        leds[i] = ColorFromPalette( currentPalette, colorIndex, brightness, currentBlending);
        colorIndex += 3;
    }
}


// There are several different palettes of colors demonstrated here.
//
// FastLED provides several 'preset' palettes: RainbowColors_p, RainbowStripeColors_p,
// OceanColors_p, CloudColors_p, LavaColors_p, ForestColors_p, and PartyColors_p.
//
// Additionally, you can manually define your own color palettes, or you can write
// code that creates color palettes on the fly.  All are shown here.

void ChangePalettePeriodically()
{
    uint8_t secondHand = (millis() / 1000) % 60;
    static uint8_t lastSecond = 99;

    if( lastSecond != secondHand) {
        lastSecond = secondHand;
        if( secondHand ==  0)  { currentPalette = RainbowColors_p;         currentBlending = LINEARBLEND; }
        if( secondHand == 10)  { currentPalette = RainbowStripeColors_p;   currentBlending = NOBLEND;  }
        if( secondHand == 15)  { currentPalette = RainbowStripeColors_p;   currentBlending = LINEARBLEND; }
        if( secondHand == 20)  { SetupPurpleAndGreenPalette();             currentBlending = LINEARBLEND; }
        if( secondHand == 25)  { SetupTotallyRandomPalette();              currentBlending = LINEARBLEND; }
        if( secondHand == 30)  { SetupBlackAndWhiteStripedPalette();       currentBlending = NOBLEND; }
        if( secondHand == 35)  { SetupBlackAndWhiteStripedPalette();       currentBlending = LINEARBLEND; }
        if( secondHand == 40)  { currentPalette = CloudColors_p;           currentBlending = LINEARBLEND; }
        if( secondHand == 45)  { currentPalette = PartyColors_p;           currentBlending = LINEARBLEND; }
        if( secondHand == 50)  { currentPalette = myRedWhiteBluePalette_p; currentBlending = NOBLEND;  }
        if( secondHand == 55)  { currentPalette = myRedWhiteBluePalette_p; currentBlending = LINEARBLEND; }
    }
}

// This function fills the palette with totally random colors.
void SetupTotallyRandomPalette()
{
    for( int i = 0; i < 16; i++) {
        currentPalette[i] = CHSV( random8(), 255, random8());
    }
}

// This function sets up a palette of black and white stripes,
// using code.  Since the palette is effectively an array of
// sixteen CRGB colors, the various fill_* functions can be used
// to set them up.
void SetupBlackAndWhiteStripedPalette()
{
    // 'black out' all 16 palette entries...
    fill_solid( currentPalette, 16, CRGB::Black);
    // and set every fourth one to white.
    currentPalette[0] = CRGB::White;
    currentPalette[4] = CRGB::White;
    currentPalette[8] = CRGB::White;
    currentPalette[12] = CRGB::White;

}

// This function sets up a palette of purple and green stripes.
void SetupPurpleAndGreenPalette()
{
    CRGB purple = CHSV( HUE_PURPLE, 255, 255);
    CRGB green  = CHSV( HUE_GREEN, 255, 255);
    CRGB black  = CRGB::Black;

    currentPalette = CRGBPalette16(
                                   green,  green,  black,  black,
                                   purple, purple, black,  black,
                                   green,  green,  black,  black,
                                   purple, purple, black,  black );
}


// This example shows how to set up a static color palette
// which is stored in PROGMEM (flash), which is almost always more
// plentiful than RAM.  A static PROGMEM palette like this
// takes up 64 bytes of flash.
const TProgmemPalette16 myRedWhiteBluePalette_p PROGMEM =
{
    CRGB::Red,
    CRGB::Gray, // 'white' is too bright compared to red and blue
    CRGB::Blue,
    CRGB::Black,

    CRGB::Red,
    CRGB::Gray,
    CRGB::Blue,
    CRGB::Black,

    CRGB::Red,
    CRGB::Red,
    CRGB::Gray,
    CRGB::Gray,
    CRGB::Blue,
    CRGB::Blue,
    CRGB::Black,
    CRGB::Black
};


// Additionl notes on FastLED compact palettes:
//
// Normally, in computer graphics, the palette (or "color lookup table")
// has 256 entries, each containing a specific 24-bit RGB color.  You can then
// index into the color palette using a simple 8-bit (one byte) value.
// A 256-entry color palette takes up 768 bytes of RAM, which on Arduino
// is quite possibly "too many" bytes.
//
// FastLED does offer traditional 256-element palettes, for setups that
// can afford the 768-byte cost in RAM.
//
// However, FastLED also offers a compact alternative.  FastLED offers
// palettes that store 16 distinct entries, but can be accessed AS IF
// they actually have 256 entries; this is accomplished by interpolating
// between the 16 explicit entries to create fifteen intermediate palette
// entries between each pair.
//
// So for example, if you set the first two explicit entries of a compact
// palette to Green (0,255,0) and Blue (0,0,255), and then retrieved
// the first sixteen entries from the virtual palette (of 256), you'd get
// Green, followed by a smooth gradient from green-to-blue, and then Blue.