Surely on some occasion you have needed for your project to connect a Raspberry Pi to some type of battery so that it can be completely autonomous. Thanks to this simple tutorial created by Daniel bull you can, in a very simple way and with minimal welding, connect your controller to a battery Adafruit PowerBoost LiPo that, today and in the market, has a price of around 14 dollars.
Before continuing, let me know that this tutorial has been published in its entirety on GitHub Therefore, although it has been taken into account that any user, regardless of their experience, can do it, if you have any doubts you can, as is customary in all the projects in this repository, contact Daniel Bull himself in order to receive any type of technical advice or answer to your questions, always referring to this project.
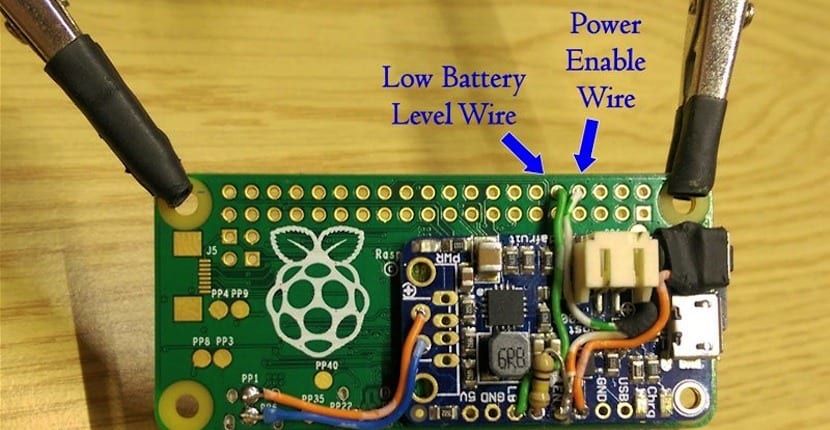
The way of working is very simple, there is a power button connected to the LiPo battery. On the other hand, we find a small transformer capable of increasing the power of the small battery to go from the 3.7v of output to the 5.2v (approximately) that the Raspberry Pi needs to work. To get this little transformer «Boot»Highlight that it makes use of that unique feature that this small card has and that is that, while it is in operation, it has a 3.3v output power whereas, when it is off, this voltage is 0.
While Raspberry Pi is running, this transformer informs the card itself of the battery status changing the LB / LBO pin which is connected to the GPIO 15 - UART RXD when the battery is low. Obviously, this change has to be registered by software by a preprogrammed task on the Raspberry Pi. When this change occurs the program executes a task that orders the safe system shutdown in order not to lose data or damage our SD card.
Hello, when seeing the images that you have put on how to connect the circuit to the raspberry, some questions have arisen:
- In the charger circuit, the output, which in principle is for a USB connector, has two cables connected in which one of them is soldered to a connection that indicates PP1, but the other does not appear where it is connected ...
-Are these connections suitable for a Raspberry model B, and model 2?
-Where could I get the charger circuit, and the battery? (at a cheap price, obviously ... XDDD).
Thanks in advance for the information, and greetings to everyone.
Hello erjavizgz,
As the text says, you can contact the author of the project through GitHub from https://github.com/NeonHorizon/lipopi (you even have a diagram of all the connections)
Regarding the battery http://makersify.com/products/adafruit-powerboost-500-charger-rechargeable-5v-lipo-usb-boost-500ma In this link you have it at about 14 pounds, which amounts to a little less than 20 euros at the exchange