Sometimes it is necessary Measure distances and for that you have at your disposal several sensors. We have already dedicated an article to talk about a high precision distance sensor such as the VL52L0X. This sensor was of the ToF type and was based on very precise measurements thanks to its laser. But if precision is not that important to you and you want something that allows you to measure distances at a low price, another possibility that you have at your fingertips is the HC-SR04.
In the case of HC-SR04 distance sensor, distance is measured by ultrasound. The system is similar to the optical method of the VL52L0X. That is, it is emitted, there is a bounce and it is received, but in this case instead of being a laser or IR, it is ultrasound. If you are passionate about electronics, robotics or amateur maker, you can use it for a multitude of DIY projects such as obstacle detection systems for robots, presence sensors, etc.
What is the HC-SR04?
Well, it is obvious, as I have already commented in the previous paragraphs, The HC-SR04 is a low precision distance sensor based on ultrasound. With it it allows to measure distances in a simple and fast way, although in principle it is not usually used for that. Most often, it is used as a transducer to detect obstacles and avoid them through other mechanisms associated with the response of the sensor.
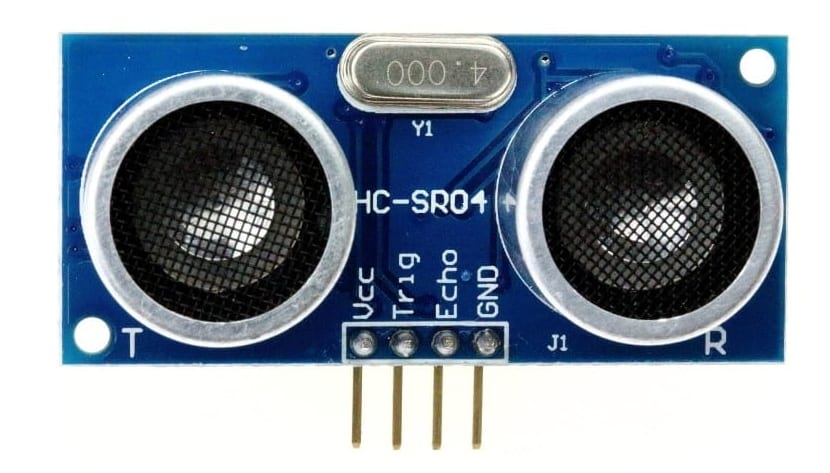
The appearance of the HC-SR04 is very distinctive and easily recognizable. In addition, it is a very popular item in Arduino starter kits and necessary for a multitude of projects. It is easily identified because it has two "eyes" that are actually the ultrasound devices that this module integrates. One of them is an ultrasound emitter and the other a receiver. It works at a frequency of 40 Khz, therefore it is inaudible to humans.
Principles of the ultrasonic sensor
The principle in which It is based on simulating the one used when you throw a stone into a well to measure its depth. You throw the stone and time how long it takes to fall to the bottom. Then you do calculations of the speed by the elapsed time and you get the distance that the stone has traveled. But in that case the sensor is you.

In the HC-SR04, the emitter will emit ultrasounds and when they bounce off an object or obstacle in the way they will be captured by the receiver. The circuit will do the necessary calculations of that echo to determine the distance. This may also be familiar to you if you know the system that some animals such as dolphins, whales or bats use to locate obstacles, prey, etc.
By counting the time from the moment the pulse is sent until the response is received, the time and therefore the distance can be accurately determined. Remember that [Space = velocity time] but in the case of the HC-SR04, you must divide this quantity by / 2, since the time has been measured from when the ultrasound comes out and travels through space until it hits the obstacle and the way back, so it will be approximately half of this ...
Pinout and datasheets
You already know that to see the complete data of the model that you have acquired, the best thing is find the datasheet manufacturer's concrete. For example, here is a Sparkfun datasheet, but there are many more available in PDF. However, here are the most important technical data of the HC-SR04:
- Pinout: 4 pins for power (Vcc), trigger (Trigger), receiver (Echo) and ground (GND). The trigger indicates when the sensor should be activated (when the ultrasound is launched), and thus it will be possible to know the time elapsed when the receiver receives the signal.
- Food: 5v
- Ultrasound frequency: 40 Khz, the human ear can only hear from 20Hz to 20Khz. Everything below 20Hz (infrasound) and above 20Khz (ultrasound) will not be perceptible.
- Consumption (stand-by): <2mA
- Consumption working: 15mA
- Effective angle: <15º, depending on the angles of the objects you may have better or worse results.
- Measured distance: from 2cm to 400cm, although from 250 cm the resolution will not be very good.
- Medium resolution: 0.3 cm variation between the actual distance and the measurement, so despite not being considered highly accurate like laser, the measurements are quite acceptable for most applications.
- Price: from about € 0,65
Integration with Arduino
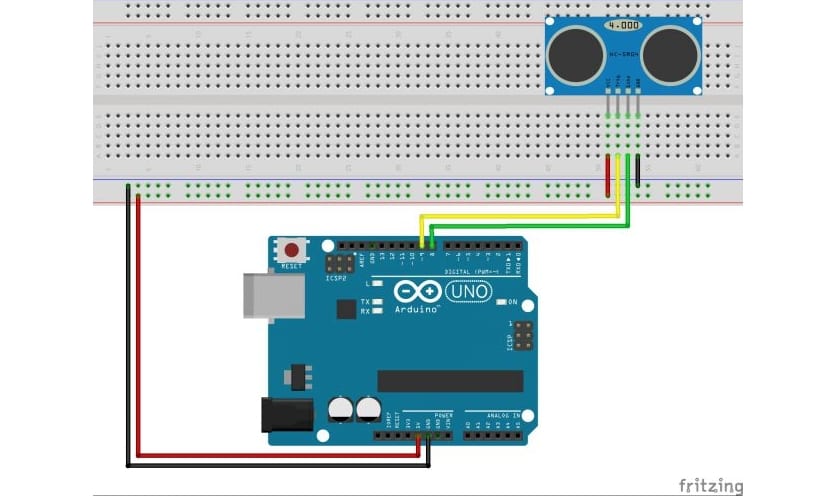
For connecting it to Arduino couldn't be easier. You just have to be in charge of connecting GND to the corresponding output of your Arduino marked as such, Vcc with the Arduino 5v power supply and the other two pins of the HC-SR04 with the inputs / outputs chosen for your project. You can see that it is simple in the upper Fritzing scheme ...
You just have to have one consideration, that the tigger must receive an electrical pulse of at least 10 microseconds for it to activate properly. Previously you must make sure that it is in LOW value.
As to code for Arduino IDE, you don't have to use any library or anything like that like with other components. Just make the formula to calculate the distance and little else ... Of course, if you want your project to do something in response to the measurement of the HC-SR04 sensor, you will have to add the code you need. For example, instead of simply displaying the measurements on the console, you can make servomotors move in one direction or another for certain distances to avoid the obstacle, or for a motor to stop, an alarm to be activated when it detects proximity, etc. .
More information about programming: Arduino Manual (Free PDF)
For example, you can see this basic code to use as base:
//Define las constantes para los pines donde hayas conectado el pin Echo y Trigger
const int EchoPin = 8;
const int TriggerPin = 9;

void setup() {
   Serial.begin(9600);
   pinMode(TriggerPin, OUTPUT);
   pinMode(EchoPin, INPUT);
}

//Aquí la muestra de las mediciones
void loop() {
   int cm = ping(TriggerPin, EchoPin);
   Serial.print("Distancia medida: ");
   Serial.println(cm);
   delay(1000);
}

//Cálculo para la distancia
int ping(int TriggerPin, int EchoPin) {
   long duration, distanceCm;

   digitalWrite(TriggerPin, LOW);  //para generar un pulso limpio ponemos a LOW 4us
   delayMicroseconds(4);
   digitalWrite(TriggerPin, HIGH);  //generamos Trigger (disparo) de 10us
   delayMicroseconds(10);
   digitalWrite(TriggerPin, LOW);

   duration = pulseIn(EchoPin, HIGH);  //medimos el tiempo entre pulsos, en microsegundos

   distanceCm = duration * 10 / 292/ 2;   //convertimos a distancia, en cm
   return distanceCm;
}
I found the explanation very useful and simple.